background image

Summary of Contents for Palmcoder PV-53D

Page 1: ...structions PV 53 v sl_ Consists of PV 53D PV A16 Before attempting to connect operate or adjust this product please read these instructions completely Spanish Quick Use Guide is included Gufa para rapida consulta en espa5ol esta_incluida VQTW0456 ...

Page 2: ...yPak PV P1 and one AA battery VYMS006_ 1 pc 8 Function Remote VSQS1200 1 pc Colo_ Enhancement Light VUAW0481 Q 2 pc CR2025 Battery VSBW0004 p_ Audio Video Cable VJAW0017 or VJPS0216 1 pc Shoulder Strap VYCW0028 WARNING TO PREVENT FIRE OR SHOCK HAZARD DO NOT EXPOSE THIS EQUIPMEN IO RAIN OR MOISTURE Your Compact VHS Palmcorder is designed to record and play back in Standard Play SP and Super Long Pl...

Page 3: ...ug The 3 wire grounding type plug will fit into a grounding type power outlet This is a safety feature If you are unable to insert the plug into the outlet contact your electrician to replace your obsolete outlet Do not defeat the safety purpose of the grounding type plug Power Cord Protection Power supply cords should be routed so that they are not likely to be walked on or pinched by items place...

Page 4: ...nce this indicates a need for service 20 Replacement Parts When replacement parts are required be sure the service technician has used replacement parts specified by the manufacturer or have the same characteristics as the original part Unauthorized substitutions may result in fire electric shock or other hazards 21 Safety Check Upon completion of any service or repairs to this video unit ask the ...

Page 5: ...s Tape Counter Counter Memory Lap Time Counter Tape Remaining Functions 23 Variable Speed Power Zoom High Speed Shutter 24 Focusing 25 White Balance Backlight Button 26 VHS Index Search System Book Mark Search 27 Digital Color Fade 28 Digital Zoom 29 Electronic Image Stabilization System E I S 30 Still StrobeNVide 31 Copying your Tapes dubbing 32 Dubbing over Recordings Dubbing over Audio 34 Dubbi...

Page 6: ...PV P1 To Transport System Carrying Case optional PV H18 Shoulder Strap supplied VYCW0028 For Special Effects Video Corrector optional PV CC50 To Enhance your Recording 5W Color Enhancement Light supplied VUAW0481 optional PV L5 Wide Angle Lens optional PV LW491Q Filter Kit optional PV F49 Telephoto Lens optional PV LT49 Note Use only Panasonic PV LW491Q wide conversion lens use of other wide conve...

Page 7: ...trap from the Buckle Catch 3 Thread the strap ends through the Strap Attachment Rings Then re hook them onto the Buckle Catch 4 Snap the clasp shut to lock the strap in place Pull a loop of the strap loose from the buckle then pull the strap firmly through the buckle to adjust the length 7 ...

Page 8: ...n the Tape Wheel in the direction of the arrow until there is no slack EJECT 2 Slide the EJECT switch to open the door 3 Hold the cassette vertically with the window facing away from the Palmcorder body 4 Press the Door Close Area to close the door 8 Cassettes have a record tab to ensure that recordings are not accidentally erased To prevent accidental erasure Break off the tab with a screwdriver ...

Page 9: ...up and out BATTERY REFRESH POWER CHARGE C o 0 Charge Indicator goes out when charging is done About two hours Note After recharging the Battery Pack about 5 times use the BATTERY REFRESH button on the AC Adaptor as explained on page 10 To Attach the Battery Align the battery with the top of the _ ountll_y surface and press it firmly into place To Remove the Battery While sliding the BATTERY RELEAS...

Page 10: ...y 5 charges to keep your Battery in top operating condition 1 Place the Battery into the AC Adaptor BATTERY REFRESH 2 J czm Press the BATTERY REFRESH button The Charging indicator will flash and discharging will begin When discharging is complete the indicator will stop flashing Should you accidentally press the BATTERY REFRESH button remove the Battery Pack then re insert it to begin charging It ...

Page 11: ...y Cord to the DO Input of the Palmcorder 2 Start your car engine and then insert the Car Battery Cord plug into your cigarette lighter socket There is a fuse located in the lighter plug end of the cord Should fuse replacement be necessary use the exact current rating in amps Note This cord can only be used in vehicles equipped with DO 12V negative ground batteries Use only the specified car batter...

Page 12: ...R FADE STILL STROBE WIDE DIGITAL ZOOM BOOK MARK SEARCH DATE TIME REC REVIEW FEATURE PREVIEW ELECTRONIC IMAGE STABILIZATION SYSTEM AUTO LOCK MODE AUTO AUTO AUTO NON FUNCTIONAL NON FUNCTIONAL NON FUNCTIONAL NON FUNCTIONAL NON FUNCTIONAL NON FUNCTIONAL NON FUNCTIONAL NON FUNCTIONAL FUNCTIONAL FUNCTIONAL FUNCTIONAL only DATE TIME FUNCTIONAL The three functions used most often during recording are the ...

Page 13: ...ngle marks meet REPLACE BA I FERY WITH PANASONIC PART NO VSBW0004 CR2025 ONLY USE OF ANOTHER BATTERY MAY PRESENT A RISK OF FIRE OR EXPLOSION CAUTION BATTERY MAY EXPLODE IF MISTREATED DISPOSE OF USED BATTERY PROMPTLY KEEP AWAY FROM CHILDREN DO NOT RECHARGE DISASSEMBLE OR DISPOSE OF IN FIRE Note Make sure your Palmcorder is off when replacing the battery Keep the Battery out of the reach of children...

Page 14: ...n press SEL ect to fix that portion and move to the next I Repeat until the hour minute month I day and year have been entered I SEL 6 Press SEL ect again to lock in all the settings and start the clock Press DATE TIME twice to remove display from EVF DATE TIME Note Whenever AM12 00JAN 1 1993 appears it indicates thatthe clockneedsadjustment ress AT nce l in Record mode to display and record the d...

Page 15: ...attery charge is consumed the indicator changes E F E F BATTERY will flash for several minutes and then E F and BATTERY will flash for several seconds prior to automatic power shut off A battery recharge is now necessary END This indicator llashes when the tape is about to end in REC mode TAPE If the record tab is missing this indicator will flash and recording will not start DEW If excessive mois...

Page 16: ...n the standard light included Use of a different light modification to the light connector or light jack may cause severe battery drain and fire _hazard 1 16 Turn screw counterclockwise on the underside of the reflector casing and remove Turn reflector casing counter clockwise only as far as shown in the diagram and pull it off the bulb housing Pull the old bulb off the base Using a clean cloth or...

Page 17: ...r _visi n _ I L_ I Adjustment _ _ Knob A Fully extend viewfinder B Adjust the Vision Adjustment Knob to you r eyesight SPEED SP SLP Slide TAPE SPEED Selector for SP or SLP Press RECORD PAUSE to start recording The Tally Light is lit during recording If covered slide the Record Button Cover wnwar0 Press RECORD PAUSE again to pause recording f SP 1 I s l REC Helpful Notes To remove the cassette In R...

Page 18: ...eature to prevent gaps on unwanted overlaps in your recording after the tape has been removed then re inserted or has been in the Easy Edit Standby Mode for more than 24 hours POWER VCR OFF CAMERA Set the POWER switch to VCR Press REWIND to go back a few seconds on the tape PLAY Then press PLAY to review the picture on the Viewfinder STILL NOWpress STILL at the _ location you wish to continue your...

Page 19: ...not reverse the polarity Replace the Battery tray For Battery replacement set the Remote Power switch to OFF Select the REMOTE ON position on the Remote Controlled Functions REC PAUSE T telephoto Zoom W wide angle Zoom PLAY FF SEARCH REW SEARCH STOP STI LL VCR MODE o o O o o o o CAMERA MODE o O O After 5 minutes in the Rec Pause mode the Palmcorder will go into Standby mode power off to conserve b...

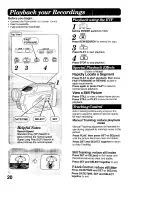
Page 20: ...sual search Press again or press PLAY to resume normal speed playback View a Still Picture Press STILL to view a freeze frame picture Press STILL or PLAY to resume normal playback Auto Tracking continuously analyzes the signal to adjust for optimum picture quality for each recording Manual Tracking reduce playback noise Manual Tracking adjustment is intended for use during playback to minimize noi...

Page 21: ...lack before placing the cassette in the PlayPak Slide the RELEASE button to open the PlayPak door 3 Insert the V_Y_g S i cassette with the window facing up and to the left Gently close the PlayPak door Let the Load Detector fully retract before using the PlayPak in your standard VHS VCR Be sure the cassette reel area under the PlayPak is free to turn while loading Slide RELEASE button and waitforl...

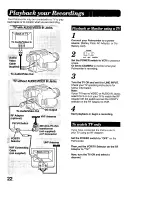
Page 22: ... switch to VCR to playback a tape Or set to CAMERA to monitor what your Palmcorder is recording 3 Turn the TV ON and set it to LINE INPUT Check your TV operating instructions for further information Note If your TV has no VIDEO or AUDIO IN Jacks select CH 3 or 4 on your TV to match the RF Adaptor CH 3 4 switch and set the VCR TV selector on the RF Adaptor to VCR 4 Start playback or begin a recordi...

Page 23: ...PLAY o t E 2 _ J press Th_l_i_ ifE aa8 _ 1 Memory Counter The Palmcorder will stop during Rewind Fast Forward Video Dubbing Audio Dubbing and AN Dubbing whenever it reaches the point where the Tape Counter was previously set to M0000 Lap Time Counter The elapsed time during a recording is displayed Press the RESET button to reset the display to 0 00 00 Tape Remaining Shows the time remaining on th...

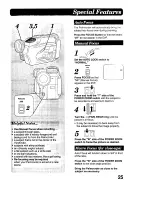
Page 24: ...ight level is inadequate See page 37 for more information Digital Auto Shutter In AUTO H S S mode displayed in EVF the Palmcorder automatically adjusts the shutter speed from 1 60 to 1 250 according to the brightness of the subject The speed does not appear in the EVF AUTO H S S is automatically selected when the AUTO LOCK switch is set to AUTO LOCK __ NORMAL i AUTO AUTO LOCK _ Manual Selection Ma...

Page 25: ...switch until the subject to be recorded is at maximum zoom in Turn the oo FAR NEAR ring until the picture is in focus It may be necessary to back away from the subject to focus the image properly Press the W side of the POWER ZOOM switch to frame the picture as desired t in low light situations a scene with fast motions like a golf swingl Re focusing may be required when your Palmcorder is aimed a...

Page 26: ...ct _O _ OUTDOOR when recording outdoor scenes from indoors or outdoors with an amber filter Select _C_ INDOOR when recording indoor scenes from outside or indoorswith a blue filter White Balance is affected by Color Temperature Seethe chart on page 38 Use when recording a subject that is darker than the surrounding scene in a shadowed area or when the light source is in back of your subject Make s...

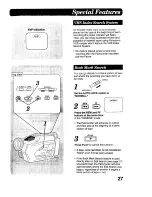
Page 27: ...after the Palmcorder has been put into Pause You can go directly to a blank portion of tape just where the recording you have done so far ends f_ NORMAL AUTO LOCK _ Set the AUTO LOCK switch to NORMAL s_ Rc Press the REW and FF buttons at the same time inthe CAMERA mode The Palmcorder will advance or rewind and then stop at the begining of a blank section of tape PLAY Press PLAY to cancel this func...

Page 28: ... mode selected will appear in the EVF Press COLOR repeatedly to select the desired Color for Digital Fade effects other than Black and White FADE 4 Hold the FADE button down while recording untilthe picture fades out Release to fade back in To create even more special effects Other than the BLACK WHITE and RANDOM modes you may also partially fade the picture and by pressing the MODE SEL HOLD butto...

Page 29: ... Because the image is enlarged digitally the picture may become distorted when the higher magnification levels are used 3 Press and hold the T side of the POWER ZOOM switch Digital Zoom engages when the Power Zoom reaches its maximum positionof xl0 The zoom level is displayed in the EVF Press the q or W side of the POWER ZOOM switch to control the digital zoom level When the level falls below xl0 ...

Page 30: ...ss of the subject EIS Press EIS again to cancel You may also use the High Speed Shutter function from 1 100 to 1 10000 The shutter speed you select remains active even after you cancel the E I S function Be sure that the E I S is turned off when not needed E I S may not function when Palmcorder movement is too extreme recording a subject with distinct horizontal or vertical stripes recording in lo...

Page 31: ... Press STILL STROBE twice Press once more to return to normal recording Wide Screen Use this feature to fill the entire screen of your Wide Screen TV Hold down STILL STROBE more than 3 seconds while in Strobe mode Press once again to return to the normal sized picture recording Note Playback must occur on a wide screen 16X9 aspect ratio television or the picture will appear distorted First Press N...

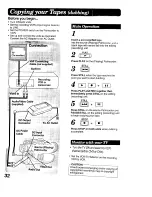
Page 32: ...ress PLAY on the Playing Palmcorder STILL 3 Press STILL when the tape reaches the point you want to start dubbing 4 _ql_q _G Press PLAY and REC together then immediately press STILL on the editing recording unit STILL 5 Press STILL on the source Palmcorder and PAUSE STILL on the editing recording unit to begin copying your tape STOP Press STOP on both units when dubbing is complete 32 TurntheTVONa...

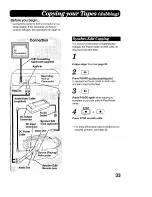
Page 33: ...Connector DC Input Cord optional Connector DC Power Cable _ource Pla Palmcorder Remote Jack The Synchro Edit feature simultaneously releases the Pause mode on both units so copying is fast and easy Follow steps 1 to 4 on page 32 2 Press PAUSE on the recording unit to release the Pause mode on both units and start copying the tape Press PAUSE again when copying is complete to put both units in Play...

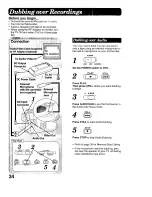
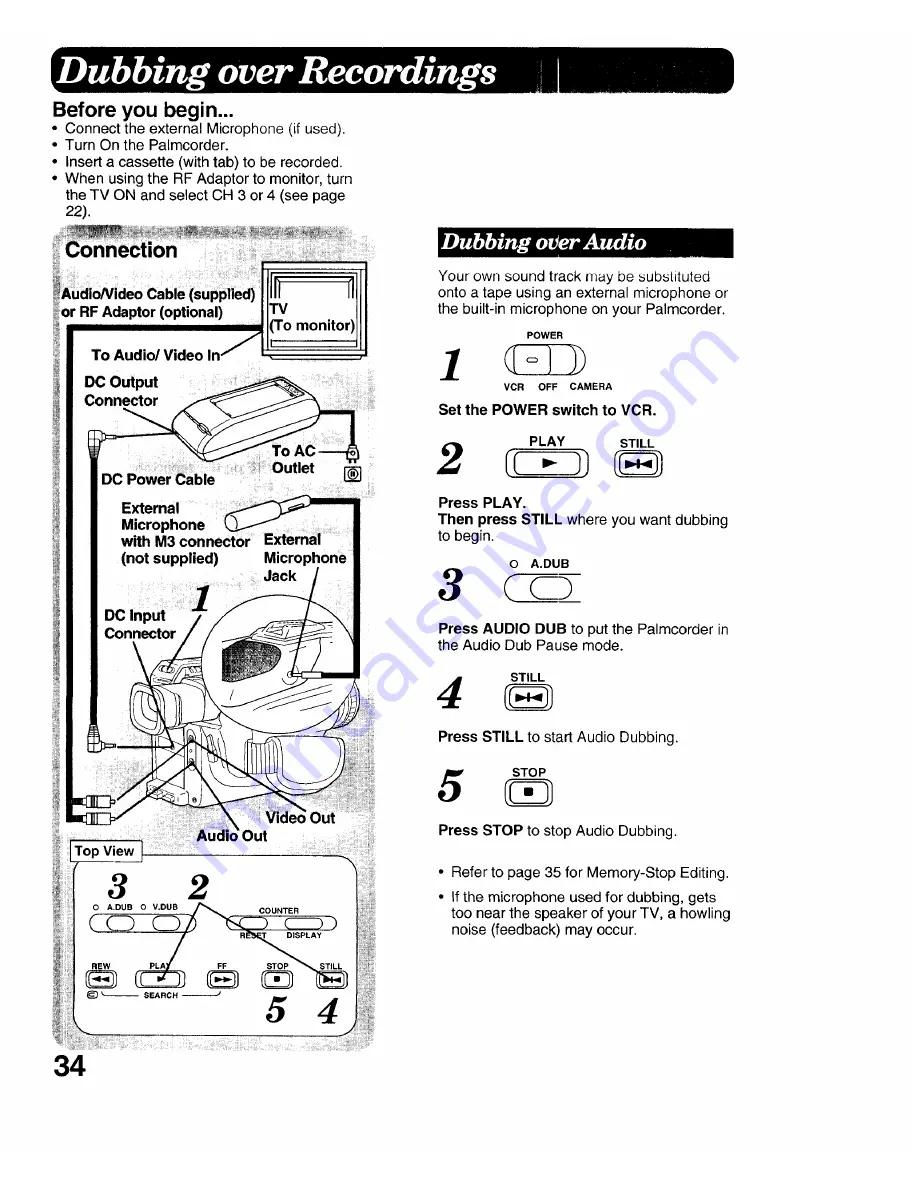
Page 34: ...ne Jack Top View Out iiiiii iiii _ N 34 Your own sound track may be substituted onto a tape using an external microphone or the built in microphone on your Palmcorder POWER VCR OFF CAMERA Set the POWER switch to VCR PLAY STILL Press PLAY Then press STILL where you want dubbing to begin 0 A DUB Press AUDIO DUB to put the Palmcorder in the Audio Dub Pause mode 4 Press STILL to start Audio Dubbing 5 ...

Page 35: ...int for dubbing Then press STILL where dubbing is to begin To preset the stopping point of your replacement segment see the Memory Stop Editing section below o V DUB 3 Press VIDEO DUB to put the Palmcorder in Video Dub Pause mode STILL 4 Press RECORD PAUSE or STILL to start taping a replacement video segment Press STOP to stop dubbing You can set an automatic Edit stopping point In step 2 locate t...

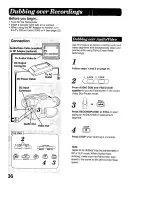
Page 36: ...isting audio and video segments with exceptionally clean and precise edits using Flying Erase Head technology 1 Follow steps 1 and 2 on page 35 o A DUB o V DUB 2 oo Press AUDIO DUB and VIDEO DUB together to put the Palmcorder in the Audio Video Dub Pause mode STILL 3 Press RECORD PAUSE or STILL to start taping an AUDIONIDEO replacement segment STOP 4 Press STOP when dubbing is complete Note Tapes ...

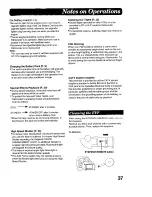
Page 37: ...doors For indoor High Speed Shutter recording the Supplied COLOR ENHANCEMENT LIGHT or additional halogen or tungsten light should be provided Fluorescent light will degrade the picture quality This feature requires ample light More lightis required for the fastest shutter speeds The Auto Focus system may not operate properly under insufficient lightwhen you are using the High Speed Shutter Copying...

Page 38: ...tylene lamp Kerosene lamp Candlelight Whitish Yellowish Reddish Be careful not to touch the lens itself Note Use only Panasonic PV LW491Q wide conversion lens use of other wide conversion lenses may distort the picture FCC Warning Any unauthorized changes or modifications to this equipment would void the user s authority to operate This device complies with Part 15 of the FCC Rules Operation is su...

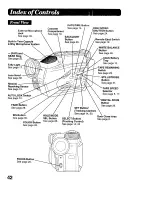
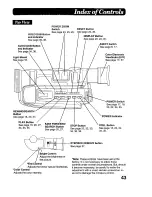
Page 39: ...and Strap This strap can be adjusted to the size of your hand BA I I ERY RELEASE See page 9 Audio Output Connector See page 22 Synchro Edit 32 33 34 36 Remote Jack See page 33 ideo Output Connector See page 22 32 33 34 36 DO Output Connector for the RF Adaptor See page 22 Lens Cap See page 47 Tripod Mounting Hole Vision Adjustment Knob See page 17 41 ...

Page 40: ... 28 Cassette Compadment See page 19 HOLD MODE SEL Button See page 28 DATE TIME Bu_on See page 14 BACKLIGHT Button See page 26 SET Button Tracking Control See page 14 20 SELECT Button Tracking Control See page 14 20 HIGH SPEED Button See page 24 Remote Eject Switch See page 19 WHITE BALANCE Button See page 26 Y Tray See page 13 REMAINING Switch See page 23 lOBE Button See page 31 rAPE SPEED Selecto...

Page 41: ...See page 20 27 STOP Button See page 20 32 33 34 35 36 POWER Switch See page 17 18 20 22 34 35 POWER Indicator STILL Button See page 18 20 32 34 35 _EYEPIECE REMOVE bu_on See page 37 Bright Control Adjust the brightness of the picture Tint 1 Adjusts the tint for natural fleshtones Color Control Adjusts the color intensity Note These controls have been set at the factory It is not necessary to adjus...

Page 42: ...g Indicator Lamp See e 9 Battery Charging Compartment See page 9 Clamp See page 9 DC Output Connector See page 11 32 33 34 36 BATTERY REFRESH Button Seepage9 10 AC Power Cord See page 9 CAUTION This unit will operate on 110 120 220 240V AC An AC plug adaptor may be required for voltages other than 120V AC Please contact either a local or foreign electrical parts distributor for assistance in selec...

Page 43: ...Shutter 24 Digital Color Fade 28 E I S 30 Erase Protection 8 EVF Indications 15 High Speed Shutter 24 37 High Speed Shutter Indicator 24 Index Indicator 27 Indoor C 26 Macro Focus 25 Manual Focus 25 Monitor 22 Outdoor O 26 Play Indicator 15 Playback 20 Power Supply 9 10 11 Rec Indicator 15 Record Review 18 RF Adaptor 6 22 Safety Precautions 2 Search Speed 20 Shoulder Strap 2 6 7 Special Effect Pla...

Page 44: ...canning system 1 track Sequential color difference field reverse system One integral color filter Charge Coupled Device CCD 10 1 zoom lens f1 4 with auto iris control Focal length 5 8mm 58mm Power zoom function Lens filter diameter 49mm 0 7 inch Liquid Crystal Color Electronic Viewfinder 1 Lux F1 4 0 1 footcandles 70dB 4 7K ohms unbalanced M3 connector 32 F 104OF 0 C 40 C 10 75 Compact VHS Palmcor...

Page 45: ...ure where the normal speed motion was motion or blurred action particularly rapid may produce this effect This is normal If the top of your playback picture waves back and forth excessively Because the playback signal is not as stable as an off the air TV signal the top of your TV screen may be bent or unstable when the tape is played back This symptom is more noticeable when a pre recorded tape r...

Page 46: ...ersey 07094 Panssonlc Company West of America Division of Matsushita Electric Corporation of America 6550 Kateila Ave Cypress CA 90630 Printed in Japan VQTW0456 Panasonic Sales Company Division of Matsushita Electric of Puerto Rico Inc San Gabriel Industrial Park 65th tnfantr_ Avenue KM 9 5 Carolina Puerto Rico 00630 ...

Reviews: