background image

Advanced Operations

23

RQT6050

1

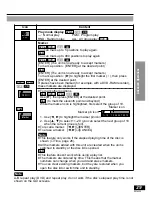
Press [MENU].

The play list screen is displayed.

Using the play list menu to play specific scenes

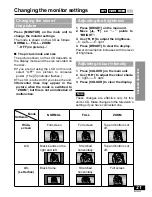
PLAYLIST

1

2

3

4

5

6

No

Date

Length

Contents

1

2

3

4

0:46:35

0:09:15

0:12:32
0:07:30

SELECT 

ENTER

RETURN

10/17

10/24

11/29
12/22

World 
Best Hit  

2

Use [

3

4

] to select the play list.

If you press [ENTER] or select a play
list with the numbered buttons, all the
scenes in the play list are played from
the beginning.

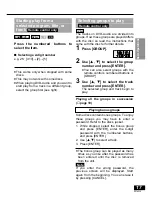
3

Use [

1

] to select “Contents” on

the right side of the list and
press [ENTER].

4

Use [

3

4

] to select “Scene

List” and press [ENTER].

5

Use [

3

4

2

1

] to select the

scene and press [ENTER].

The scene starts playing.

You cannot move the highlighting to
places where a scene is not 
displayed.

If there are more than 9 scenes in the
play list, use [

3

4

2

1

] to select

“Next” and press [ENTER]. Select
“Prev” to move back.

You can also select a page of play list
scenes by entering the page number
with the numbered buttons. (The page
numbers appear at the top right of the
screen.)

To enter a number

e.g. 25: [2]

>

[5]

>

[ENTER].

e.g. 111: [1]

>

[1]

>

[1]

>

[ENTER].

To display information about a selected
play list
1. Select the play list (steps 1 and 2).
2. Use [

1

] to select “Contents” on the right

side of the list and press [ENTER].

3. Use [

3

4

] to select “Program contents”

and press [ENTER].

When play finishes

After playing a play list: the play list 
selection screen appears.

After playing a scene: the scene selection
screen appears.

To return to the previous screen
Press [RETURN].

To clear the play list screen
Press [MENU].
(The unit returns to the condition it was in 
before you called up the play list.)

To stop play list play
Press [

] until the screens clear.

PLAYLIST

SELECT 

ENTER

RETURN

1  10/17  0:46:35  028  Memory lane

1

2

3

4

5

6

7

8

9

Next

1/004

0:00:19

World 
Best Hit  

Summary of Contents for PalmTheater DVD-LA95

Page 1: ... region number of this unit is 2 Example For Asia The region number of this unit is 3 Example For Russia The region number of this unit is 5 Example RQT6050 B 5 ALL 3 5 1 3 ALL 3 4 1 Dear customer Thank you for purchasing this product For optimum performance and safety please read these instructions carefully Before connecting operating or adjusting this product please read these instructions comp...

Page 2: ... is to be fitted please observe the wiring code as stated below If in any doubt please consult a qualified electrician IMPORTANT The wires in this mains lead are coloured in accordance with the following code Blue Neutral Brown Live As these colours may not correspond with the coloured markings identifying the termi nals in your plug proceed as follows The wire which is coloured Blue must be conne...

Page 3: ...lay On 1 ON LCD off switch Stop Off OFF Pause Skip 9 Pause Stop Slow Search 6 5 Skip 9 Cursor jockey 3 4 2 1 ENTER Numbered buttons Play 1 c Disc lid OPEN button d Standby Í indicator e Charge CHG indicator f Headphone Ë jack Main Unit Remote Control a 9 inch wide screen LCD b Stereo speakers Although it is not labeled ENTER the cursor jockey on the remote control functions the same as the cursor ...

Page 4: ... AN ENVIRONMENTALLY FRIENDLY MANNER ADVARSEL DETTE PRODUKTET ANVENDER EN LASER BETJENING AV KONTROLLER JUS TERINGER ELLER ANDRE INNGREP ENN DE SOM ER BESKREVENT I DENNE BRUKSANVISNING KAN FØRE TIL FARLIG BESTRÅLING DEKSLER MÅ IKKE ÅPNES OG FORSØK ALDRI Å REPARERE APPARATET PÅ EGENHÅND ALT SERVICE OG REPARASJONSARBEID MÅ UTFØRES AV KVALIFISERT PERSONELL WARNING TO REDUCE THE RISK OF FIRE ELECTRIC S...

Page 5: ...AATTAA ALTISTAA KÄYTTÄJÄN TURVAL LISUUSLUOKAN 1 YLITTÄVÄLLE NÄKYMÄTTÖMÄLLE LASER SÄTEILYLLE VAROITUS TULIPALO SÄHKÖISKUVAARAN TAI TUOTETTA KOHTAAVAN MUUN VAHINGON VÄHENTÄMISEKSI EI LAI TETTA SAA ALTISTAA SATEELLE KOSTEUDELLE VESIPISAROILLE TAI ROISKEELLE EIKÄ NESTETTÄ SISÄLTÄVIÄ ESINEITÄ KUTEN ESIMERKIKSI MALJAKOITA SAA ASETTAA LAITTEEN PÄÄLLE VAROITUS ÄLÄ ASENNA TAI LAITA TÄTÄ LAITETTA KABINETTIT...

Page 6: ...2 Safety Information 04 Accessories 06 Precautions 08 Basic Operations Basic play 14 When a menu screen appears 15 Resume function 15 Skipping 16 Advanced Operations Changing soundtracks subtitle languages and angles 18 Enjoying virtual surround effects with 2 speakers or headphones V S S 19 Changing the play sequence 19 All group play 19 Program play 20 Random play 20 For Your Reference Connectin...

Page 7: ...djusting the brightness 21 Adjusting colour intensity 21 Playing the programs recorded on DVD RAM 22 Selecting programs to play DIRECT NAVIGATOR 22 Using the play list menu to play specific scenes 23 Using GUI screens 24 Common procedures 24 Shuttle screen 25 Screen for disc information 26 Screen for unit information 27 Using headphones 36 Watching video from a video camera 37 Using an optional ba...

Page 8: ... cleaning Do not use any type of abrasive pad scour ing powder or solvent such as alcohol or benzine Batteries 1 Built in battery and battery pack 1 Lithium ion battery pack 1 Use this unit to recharge the built in battery and battery pack 1 Do not use the built in battery and bat tery pack with equipment other than the specified player 1 Do not use charge or leave the built in battery and battery...

Page 9: ... the open air type designed to let you hear outside sounds don t turn up the volume so high that you can t hear what s around you Installation 1 Water and Moisture Do not use this unit near water for example near a bathtub washbowl swimming pool or the like Damp basements should also be avoided 2 Condensation Moisture may form on the lens in the following conditions 1 immediately after a heater ha...

Page 10: ... This unit has a DTS decoder so you can play DVDs with this mark Copy Protection Some DVD discs contain Copy Protection signal which can affect the video signal if the output of the player is fed through a VCR to the TV The picture may become unstable or the picture contrast may change drasti cally It is therefore very important to con nect this unit according to the diagram in these Operating Ins...

Page 11: ...display only cannot be changed Total number of chapters Type Capacity Recording format Non cartridge discs Discs that can be removed from their cartridges TYPE 2 and 4 12 cm 9 4 GB double sided and 4 7 GB single sided and 8 cm 2 8 GB double sided Discs recorded with DVD video recorders DVD video cameras personal computers etc using Version 1 1 of the Video Recording Format a unified video recordin...

Page 12: ...low Built in battery page 13 Optional car adaptor page 36 Optional battery pack page 37 Using the AC adaptor When the unit is not going to be used for a long time The unit consumes 1 2 W when in standby mode To conserve power disconnect the AC mains lead from the mains socket Note Refer to Precautions on pages 8 and 9 Note Do not expose the remote control signal sensor to bright light Do not place...

Page 13: ...it is off Connect to the household mains socket while the battery is attached see left CHG Recharging at 20 oC 3 hours 3 hours 3 hours LCD brightness level j5 0 5 LCD on 2 hours 30 minutes 2 hours 1 hour 30 minutes LCD off 3 hours 30 minutes 3 hours 30 minutes 3 hours 30 minutes Play time Full Low Recharge Using the built in battery Lithium ion battery pack Note Refer to Precautions on page 8 Appr...

Page 14: ...ontrol Press Í You cannot use the remote control to turn the unit on when it is being powered by the battery To see the elapsed play time Press DISPLAY to show the GUI screens page 24 Auto standby The unit automatically turns off after being stopped for 15 minutes 5 minutes when the battery is being used Note If appears on the LCD The operation is prohibited by the unit or disc When the disc ends ...

Page 15: ...cleared if you open the disc lid The unit saves the position even when you switch the unit to standby except when playing a play list page 23 CD VCD DVD V DVD A RAM Press PLAY to Chapter Review When a menu screen appears Press the numbered buttons to select an item Or Use 3 4 2 1 to highlight an item and press ENTER Selecting a 2 digit number e g 25 S10 2 5 Other buttons used to operate menus Read...

Page 16: ...rt play You cannot move backwards with Video CD during frame by frame and slow motion Frame by frame viewing and slow motion only work on the moving picture parts of DVD Audio 2 6 Backward 9 1 5 Forward Slow motion OOn the main unitN While paused Turn the shuttle dial OOn the remote controlN While paused Press 6 or 5 The picture stills again when you release the shuttle dial Fast forward and rewin...

Page 17: ...ber and press ENTER You can also select groups with the remote control s numbered buttons or GROUP 3 Use 3 4 to select the track number and press ENTER The selected group and track begin to play Playing all the groups in succession page 19 DVD A Remote control only 1 1 G T Playing bonus groups Some discs contain bonus groups To enjoy these groups you may have to enter a password Refer to the disc ...

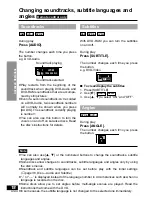
Page 18: ...les Some discs allow changes to soundtracks subtitle languages and angles only by using the disc s menus Soundtrack and subtitle languages can be set before play with the initial settings page 38 Disc Audio and Subtitle or is displayed instead of the language number in circumstances such as when no language is recorded on the disc Some discs allow you to set angles before multi angle scenes are pl...

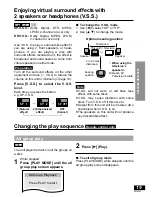
Page 19: ...UX MENU RETURN DISPLA Y VOL CHG Speaker Speaker or This unit Television Distance A 3 or 4 times distance A Seating position Note V S S will not work or will have less effect with some discs V S S may cause distortion with some discs Turn V S S off if this occurs Output from this unit will be in stereo two channels when V S S is on The speakers on this unit will not produce any discernable effect S...

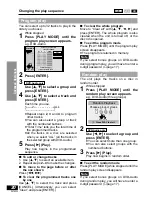
Page 20: ... groups with the numbered buttons 3 Press 1 Play Play now begins in random order To exit the random mode Press PLAY MODE while stopped until the random play screen disappears Note If you select bonus groups on DVD Audio during random play you will have to enter a 4 digit password page 17 DVD Audio only Changing the play sequence CD VCD DVD A PLAY MODE ENTER RETURN 6 1 5 Choose a group and track th...

Page 21: ...pear in the picture when the mode is switched to ZOOM but this is not an indication of malfunction Adjusting the brightness 1 Press BRIGHT on the main unit 2 Move 3 4 so points to BRIGHT 3 Use 2 1 to adjust the brightness j5 dark 5 light 4 Press BRIGHT to clear the display Power consumption increases with the level of brightness Adjusting colour intensity 1 Press COLOUR on the main unit 2 Use 2 1 ...

Page 22: ...essary To enter a 2 digit number e g 25 S10 2 5 3 Press 1 Play or ENTER Play of the program that was playing in the background continues To clear the program list Press TOP MENU The unit returns to the condition it was in before you called up the program list To display information about a selected program 1 Select the program steps 1 and 2 then use 1 to select Contents on the right side of the li...

Page 23: ... 4 2 1 to select Next and press ENTER Select Prev to move back You can also select a page of play list scenes by entering the page number with the numbered buttons The page numbers appear at the top right of the screen To enter a number e g 25 2 5 ENTER e g 111 1 1 1 ENTER To display information about a selected play list 1 Select the play list steps 1 and 2 2 Use 1 to select Contents on the right...

Page 24: ...2 1 ch Digital Î ENG ON 1 1 AB 1 2 3 OFF r100 j100 4 Use 3 4 to select the setting Items with 3 or 4 above and below can be changed by 3 4 Some items require different opera tions Read the explanations on the following pages Press ENTER if the setting does not change after using 3 4 To clear the GUI screens Press RETURN until they clear To change the position of the GUI screens You can lower the p...

Page 25: ...h 6 Backward 5 Forward VCD DVD V DVD A RAM DVD V DVD A RAM Shuttle screen There are 5 speeds for both backward and forward slow motion and search The numbers on either side of the shuttle screen indicate the maximum speeds of the search Slow motion only works on the moving picture parts of DVD Audio ...

Page 26: ...e time display Track elapsed time l l Track remaining time l Disc group remaining time Audio mode LR L R J VCD RAM CD VCD DVD A RAM DVD V DVD A DVD V CD VCD DVD A DVD V DVD A RAM RAM ENG ON 1 ENG 1 ON ON PBC Page 1 Content Soundtrack a Soundtrack language See a below for language abbreviations b Audio signal type See b at right for details Karaoke DVD only Karaoke vocal on off Solo OFF or ON Duet ...

Page 27: ...ront leftiFront rightiCenter Icon Content V S S mode page 19 SP V S S Dolby Digital DTS MPEG LPCM 2 channel or over only HP V S S Dolby Digital MPEG LPCM 2 channel or over only V S S level page 19 SP 1 HP 1 SP 2 HP 2 SP OFF HP OFF J Dolby Digital DTS 3 channel or over only Dialogue Enhancer ON OFF The volume of the dialogue from the center channel is raised when you select ON DVD V VCD DVD V RAM A...

Page 28: ...displayed instead of G You cannot use repeat play to repeat an entire DVD Video or to repeat all the play lists on a DVD RAM When a Video CD has playback control 1 During play press 2 Press the numbered buttons to select a track and start play 3 Select a repeat mode To return to menu play press twice to cancel resume then press 1 Play To repeat programmed tracks 1 Program the tracks and start play...

Page 29: ...ed point to mark the eleventh point and beyond While the marker icon is highlighted first select the group of 10 1 Use 2 1 to highlight the marker pin icon 2 Use 3 4 to select 11 20 you can select the next group of 10 2 when the current group is full To recall a marker 2 1 ENTER To erase a marker 2 1 CANCEL This feature only works if the elapsed playing time of the disc is shown Time page 26 All t...

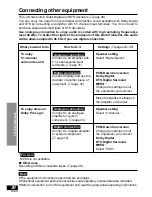
Page 30: ...itally and use the decoder in another piece of equipment page 32 Connect to an analogue amplifier or system component page 33 Connect to a digital amplifier or system component page 33 Digital connection Analogue connection Digital connection Analogue connection Settings pages 43 45 Speaker setting Select Multi channel PCM Down Conversion Dolby Digital DTS Digital Surround MPEG Change the settings...

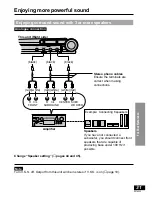
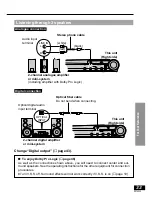
Page 31: ...reo if V S S is on page 19 VIDEO 5 1CH OUT AUDIO OPT OUT CENTER SUB WOOFER SURROUND FRONT R L R L This unit Right side black black black white red white red white red Stereo phono cables Ensure the terminals are correct when making connections Speakers If you have not connected a subwoofer you should connect front speakers that are capable of producing bass under 100 Hz if possible Example Connect...

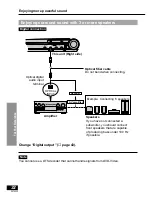
Page 32: ...hat cannot handle signals from DVD Video VIDEO 5 1CH OUT AUDIO OPT OUT OPTICAL INPUT AV amplifier Decoder Optical fiber cable Do not bend when connecting Speakers If you have not connected a subwoofer you should connect front speakers that are capable of producing bass under 100 Hz if possible This unit Right side Example Connecting 6 speakers Optical digital audio input terminal Amplifier ...

Page 33: ... connect center and sur round speakers See the operating instructions for the other equipment for connection procedures Turn V S S off Surround effects will not work correctly if V S S is on page 19 Optical fiber cable Do not bend when connecting Optical digital audio input terminal VIDEO 5 1CH OUT AUDIO OPT OUT LINE IN R L Audio input terminal white black This unit Right side 2 channel analogue a...

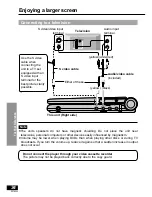
Page 34: ...video input terminal for the best picture clarity possible S video video input terminal Note The unit s speakers do not have magnetic shielding Do not place the unit near televisions personal computers or other devices easily influenced by magnetism Volume may be lower when playing DVDs than when playing other discs or during TV broadcasts If you turn the volume up reduce it again so that a sudden...

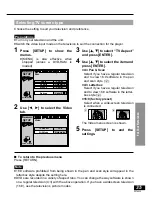
Page 35: ...ay software is shown on a regular television 4 3 with the above operation If you have a widescreen television 16 9 use the television s picture modes Disc SETUP SELECT ENTER RETURN Audio Subtitle Menus Ratings English English Automatic Level 8 SETUP Still Mode Automatic 16 9 TV Aspect Video ENTER RETURN SELECT 3 Use 3 4 to select TV Aspect and press ENTER 4 Use 3 4 to select the item and press ENT...

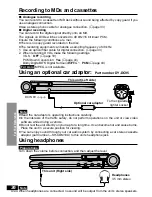
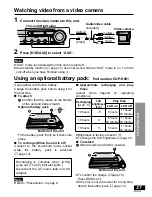
Page 36: ... S OFF page 19 3 PCM Down Conversion Yes page 43 3 Dolby Digital DTS Digital Surround MPEG PCM page 43 MPEG is not available Using an optional car adaptor Part number DY DC95 For Asia Note Read the car adaptor s operating instructions carefully In the interests of the traffic safety do not perform operations on the unit or view video software while driving a vehicle Do not rest the unit directly o...

Page 37: ...attery pack Bottom of the unit Bottom of the unit DC IN 9V LOCK UNLOCK 1 2 Approximate recharging and play times Actual times depend on operating conditions Fit the battery pack firmly so it clicks into place To recharge When the unit is off Connect to the household mains socket while the battery pack is attached page 12 To confirm the charge page 13 Press DISPLAY If the unit is not to be used for...

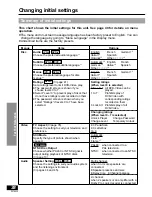
Page 38: ...ify the type of picture shown when paused NTSC Disc Output Choose whether PAL60 or NTSC signal is output during playback of NTSC discs page 10 Speaker Setting Choose the settings to suit your audio system and the listening environment pages 44 and 45 DVD V DVD A For Asia DVD V DVD V DVD A DVD V DVD A DVD V DVD A Options English French German 2 Italian 2 Spanish Original 3 Other 4 Automatic 5 Engli...

Page 39: ...Select how to output the audio signals on discs that do not have copyright protection page 43 Dolby Digital Digital output of Dolby Digital signals page 43 DTS Digital Surround Digital output of DTS Digital Surround signals page 43 MPEG 8 Digital output of MPEG signals page 43 D Range Compression Dolby Digital Only Change the dynamic range for late night viewing Audio during Search Choose whether ...

Page 40: ...s turned off Common procedures Changing initial settings See pages 38 and 39 for menu and option details 1 Press SETUP to show the menus MENU is also effective when stopped unless a DVD RAM is loaded The screen shows the disc settings menu first Disc SETUP SELECT ENTERRETURN Audio Subtitle Menus Ratings English English Automatic Level 8 3 Use 3 4 to select the item you want to change and press ENT...

Page 41: ...low the on screen instructions When setting ratings when level is 8 When changing ratings when level is set to 0 to 7 The password screen is shown when you select Ratings 1 Input your 4 digit password with the numbered buttons and press ENTER The password screen is shown when you select levels 0 to 7 1 Input a 4 digit password with the numbered buttons and press ENTER 1 If you enter a wrong number...

Page 42: ...elorussian 7577 Cambodian 6765 Catalan 9072 Chinese 6779 Corsican 7282 Croatian 6783 Czech 6865 Danish 7876 Dutch 6978 English 6979 Esperanto 6984 Estonian 7079 Faroese 7074 Fiji 7073 Finnish 7082 French 7089 Frisian 7176 Galician 7565 Georgian 6869 German 6976 Greek 7576 Greenlandic 7178 Guarani 7185 Gujarati 7265 Hausa 7387 Hebrew 7273 Hindi 7285 Hungarian 7383 Icelandic 7378 Indonesian 7365 Int...

Page 43: ...more if the setting is No and the equipment is unable to handle these signals Note Some equipment cannot handle 88 2 kHz signals even though they can handle 96 kHz signals Read the equipment s operating instructions carefully Signals are down sampled to either 48 kHz or 44 1 kHz despite the above set tings if they have a sampling frequency of 176 4 kHz or more or are copyright protected Dolby Digi...

Page 44: ...3 4 2 1 to select the item and press ENTER 2 Use 3 4 to select the setting and press ENTER Icon examples Surround speaker L Large When the speaker supports low frequency under 100 Hz reproduction Small Select when the speaker does not support low frequency reproduction SETUP SELECT ENTER RETURN m s m s d B 0 d B d B L Exit Test LS R SW C RS d B 0 0 0 0 0 b a c a a L a L c b R c R a c a Front L Cen...

Page 45: ...Channel balance c Front B C A Listening Position Front Subwoofer Center Surround L Surround R R L 1 Use 3 4 2 1 to select Test and press ENTER 1 A test signal is output from the front left speaker and proceeds clockwise 2 Use 3 4 to adjust the volume of the center and surround speakers so they are the same apparent volume as the front speakers between j3 dB and i3 dB 1 The front speakers cannot be...

Page 46: ... is made up of 2 alter nating fields so the picture may appear blurred but overall quality is high A field still is not blurred but it has only half the information of a frame still so picture quality is lower I P B MPEG 2 the video compression standard adopted for use with DVD Video codes frames using these 3 picture types I Intra coded picture I picture This is the standard picture and is a comp...

Page 47: ...lohertz kHz A high sampling frequency results in a sound close to the original when played back Title Chapter DVD Video are divided up into large sec tions titles and smaller sections chapters The numbers allocated to these sections are called title numbers and chapter numbers Track This is the smallest division on DVD Audio CD and Video CD and usually equates to a single song This product incorpo...

Page 48: ...that is too hot or too cold The built in battery and battery pack can only be recharged when the unit is off The charging time increases if the built in battery or battery pack is warm and charging may not be possible under some circumstances Wait for them to cool Check connection to the AC adaptor Make sure you have removed the insulation sheet The built in battery and battery pack have protectio...

Page 49: ...ed T Turn up the volume Check all connections and settings O R T U Check input mode of the other equipment The track may be non standard V S S may cause distortion with some discs Turn V S S off if this occurs C Output from this unit is in stereo 2 channels when V S S is on Turn V S S off when you have used analog connection and connected 3 or more speakers C Ensure the settings are appropriate to...

Page 50: ...k that the input mode on the television is correct Check the settings in Video TV Aspect S The unit and television are using different video systems Use a multi system or PAL television The LCD is constructed with precision technology so 99 99 of the pixels are active but of the remaining of 0 01 there are pixels that may be black or emit light constantly This phenomenon is not a malfunction Í and...

Page 51: ...g after H depends on the problem Turn the unit off and on again Alternatively turn the unit off disconnect the power source AC or battery reconnect the power and turn the unit on again If the service numbers fail to clear note the service number and contact a qualified service person Note The following do not indicate malfunction A sound is heard from the AC adaptor during recharging The built in ...

Page 52: ...a soft dry lint free cloth before using other discs Handling precautions Do not write on the label side with a ball point pen or other writing instrument Do not use record cleaning sprays ben zine thinner static electricity prevention liquids or any other solvent Do not attach labels or stickers to discs Do not use discs with exposed adhesive from tape or left over peeled off stickers Do not use s...

Page 53: ...perature range i5 to i35 oC Operating humidity range 5 90 RH no condensation Discs played DVD RAM DVD VR compatible DVD Video DVD Audio Compact disc CD DA Video CD CD R CD RW CD DA Video CD MP3 formatted discs DVD R DVD Video compatible Signal system PAL625 50 PAL525 60 PAL625 50 PAL525 60 NTSC selectable LCD screen 9q α Si TFT wide screen LCD Video output input Output input level 1 Vp p 75 Output...

Page 54: ...ONNEMENT LASER VISIBLE ET INVISIBLE EN CAS D OUVERTURE EXPOSITION DANGEREUSE AU FAISCEAU VORSICHT SICHTBARE UND UNSICHTBARE LASERSTRAHLUNG WENN ABDECKUNG GEÖFFNET NICHT DEM STRAHL AUSSETZEN ADVARSEL SYNLIG OG USYNLIG LASERSTRÅLING VED ÅBNING UNDGÅ UDSÆTTELSE FOR STRÅLING ADVARSEL SYNLIG OG USYNLIG LASERSTRÅLING NÅR DEKSEL ÅPNES UNNGÅ EKSPONERING FOR STRÅLEN VARNING SYNLIG OCH OSYNLIG LASERSTRÅLNIN...

Reviews: