Rechargeable Battery:
IMPORTANT
- This unit runs via internal rechargeable Lithium-ion battery.
- It can be also recharged with the provided AC-Charger.
- Please ensure your country’s AC-Charger is within the AC-Adaptor’s voltage range.
- Insert the small DC plug of the AC-Charger into the DC Socket at the back of the unit.
- Plug the AC-Charger into a wall outlet with AC power.
- The unit is charging if the charging LED indicator is on.
- Once the unit is fully charged, the charging LED indicator will automatically switch off.
- Once the unit has been charged, it can simply be unplugged and taken anywhere to be used.
- Total play time when fully charged can go upto 5-6 hours, depending on the type of music played
and the loudness level.
- When the unit is not being used, we suggest to keep it plugged in and charging.
PLEASE FULLY CHARGE THE UNIT BEFORE FIRST USE!
FOR BEST RESULT, FULLY CHARGE THE UNIT BEFORE USE EACH TIME.
IF THE BATTERY IS FULLY DRAINED, PLEASE ALLOW IT TO RECHARGE
FOR A FEW HOURS BEFORE USE.
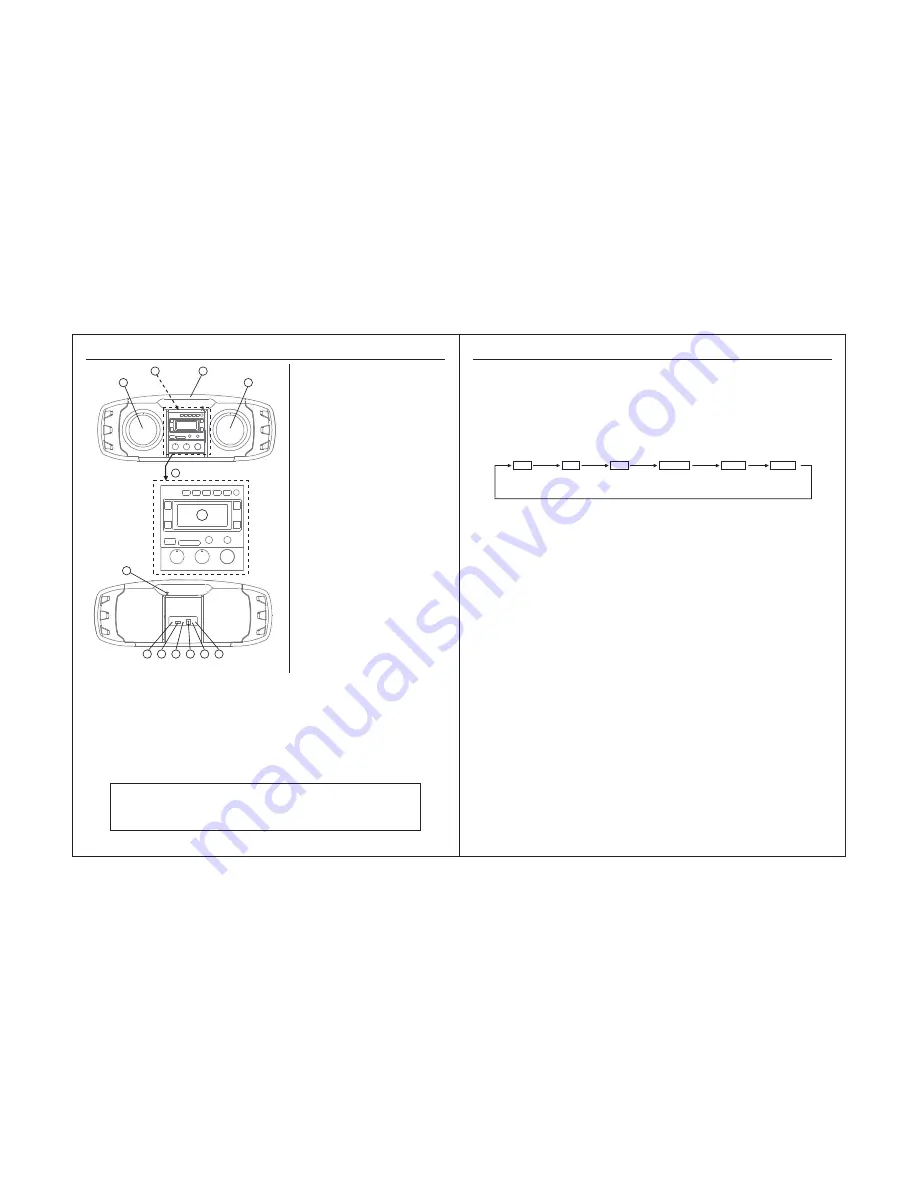
1. Main Speaker (Left/ Right)
2. Slot for placing your Smartphone/ Tablet
3. Handle
4. Function keys panel
5. Display key
6. Mode key
7. Stop / Prog. key
8. MEM - / Folder - key
9. MEM + / key
10. Power key (On/ Standby)
11. LCD display
12. Next / Tune + key
13. Back / Tune - key
14. Play / Pair key
15. Function Key
16. USB MP3 Socket
17. SD-Card Socket
18. Microphone Input Socket
19. Microphone Volume Knob
20. Bass Knob
21. Treble Knob
22. Volume Control Knob
23. Telescopic antenna
24. Aux input-1 socket
25. USB Charging Socket
26. Aux-Input 2 socket
27. DC Power Socket
28. Charge Indicator LED
29. Reset hole
E-4
LOCATION OF CONTROLS/ POWER SOURCES
E-3
OPERATION
USB charging port
This unit is equipped with a DC 5V USB charging port on the back panel. To utilize this function,
simply connect the device you would like to charge (eg: Smartphone or Tablet ) to a USB cord
and plug it into the USB charging port.
The device will be charged automatically when it is successfully connected, even during playback.
The USB port should only be used when the AC-Charger is plugged into the unit.
Radio
- Press “FUNC” key repeatedly until display shows FM.
- To improve radio reception, extend and adjust position of the telescopic antenna.
- After tuning into a desired station, use “MODE” key to select (MONO/ STEREO) mode.
In some cases, when the reception is poor, we recommend to use “MONO” mode
for better clarity.
Manual Frequency Adjustment (Scan Mode)
- Press & immediately release “TUNE+” or “TUNE-“ Key to manually adjust the radio frequency
1 step at a time.
- When the desired station is reached, it can be saved into one of the “MEMORY” positions.
(See “Radio Memory” section for further details).
FUNCTION KEY
Pressing the FUNCTION Key repeatedly will allow you to select one of the different source
functions, as follows :
BT
FM
USB
CARD
AUX-1
Bluetooth
Radio
MP3
player
SD-Memory Card
MP3 player
Input
Jack
Automatic Frequency Adjustment (Seek Mode)
- Press & Hold (For 2 seconds) “TUNE+” or “TUNE-“ key to seek the next available radio station
frequency.
- When the desired station is reached, it can be saved into one of the “MEMORY” positions.
(See “Radio Memory” section for further details).
Radio Memory
- After tuning into a desired station, it can be stored into one of the 20 available memory positions.
- Short Press “PROG.” key to go to memory tuning mode.
- Press & release “MEM+” or “MEM –“ key to choose the desired memory storage
position you would like to store into (CH01 to CH20).
- Short Press “PROG.” key again to confirm selection.
- To erase a saved radio station, simply replace it with a new station in same memory position.
AUX-2
Input
Jack
Recalling a saved memory station
- Short press “MEM+”/ “MEM-“key to find (recall) a desired memory position
.
(CH01 to CH20)
Enlarge view of the
Function keys panel:
4
23
24 25 26 27 28 29
1
2
3
1
5 6 7 8 9 10
12
14
13
15
11
16
17
18 19
20
21
22
Summary of Contents for PBT600
Page 4: ...E 8 ...


