77
Information
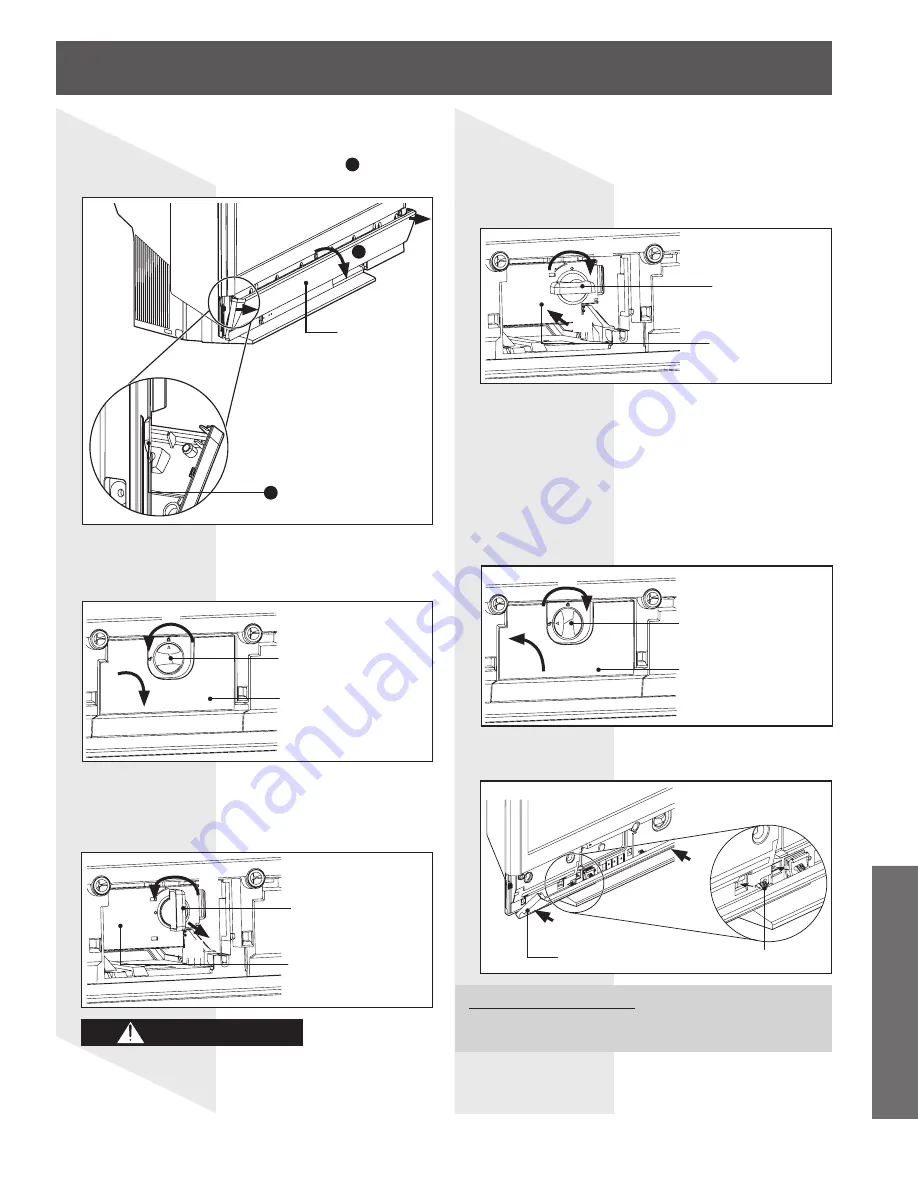
Pull on both ends of the Front Cover
1
with your
fingertips to remove it.
(1) Turn the Lamp Cover Lock/Open Knob to the
left.
(2) Pull the Lamp Cover out and down to open it.
Lamp Cover
Lock/Open Knob
Lamp Cover
(1) Turn the Lamp Unit Lock/Open Knob to the
left.
(2) Grasp the Lamp Unit Lock/Open Knob and
slowly remove the Lamp Unit as shown.
Lamp Unit
Lock/Open Knob
• The Lamp Unit is hot right after use and may cause
burns if touched.
• Please allow the Lamp Unit to cool before handling or
replacing it.
(1) Insert the new Lamp Unit being careful of the
insertion direction.
• Press on the arrow mark to confirm proper
insertion.
(2) Turn the Lamp Unit Lock/Open Knob to the
right until it clicks.
Notes:
• Properly dispose of the old lamp. Please see page 76.
• Secure the Lamp Unit and Lamp Unit housing door. If
they are not secured, a protective circuit will not allow the
lamp to turn on.
• At this point, confirm that the Lamp Unit will not come out
by pulling on the Lamp Unit Lock/Open Knob.
2
3
4
5
7
After lamp replacement, you must reset the lamp
time. Refer to the instructions enclosed with the
lamp unit (Part No.: TY-LA2006).
(1)
Lamp Unit
(2)
(1)
(2)
(1)
(2)
(1) Close the Lamp Cover.
(2) Turn the Lamp Cover Lock/Open Knob to the
right.
Lamp Cover
Lock/Open Knob
Lamp Cover
6
(2)
(1)
CAUTION
Lamp Unit
Lock/Open Knob
Lamp Unit
Front Cover
1
Note:
• Remove Front Cover after Front Door (p. 10) is opened.
Be sure that the Hook on the Front Cover is
securely fastened to the unit as shown.
Front Cover
Hook
2


