background image

2


z

T

ABLA


DE

 C

ONTENIDO

E

S

P

AÑOL

Tabla de Contenido

 Información Importante.................................. 1

Información sobre la convergencia.............................    1
Información importante acerca del uso de video juegos,  

computadoras, y otros tipos de imágenes fijas .......    1

Felicidades ....................................................... 3

Registro del usuario....................................................    3
Cuidado y limpieza .....................................................    3
Especificaciones .........................................................    3
Tabla de características..............................................    3

Instalación ........................................................ 4

Ubicación de la televisión ...........................................    4
Cables para la conexión por componentes ................    4
Cable de suministro de corriente alterna ....................    4
Conexión de cable / antena ........................................    4
Programación inicial ...................................................    4

Vista Frontal y Posterior del Televisor de 

Proyección de Alta Definición...................... 5

Conexiones de Equipo Opcional.................... 6

Conexión de la videocasetera ....................................    6
Conexión del Módulo de Cable Digital.........................  6
Conexión del decodificador de televisión digital ..........  6
Panel de control frontal...............................................    6
Conexión de entrada HDMI ........................................    7
Conexión de salida del Digital Audio Out ...................    8
Conexión de salida del programa (PROG OUT) ........    8
Conexión del amplificador de sonido (Analogo) .........    8

Operación de IDI y Pantalla de SPLIT ............ 9

Operación de IDI ........................................................    9
Operación de Split ......................................................    9
Operación de IDI y pantalla de SPLIT Botón..............    9
Botón TV/VIDEO.........................................................    9
Botón de Search  ........................................................    9

Botón de Move  ..........................................................    9
Botónes PIP MIN y PIP MAX .....................................   10
Botón de Freeze.........................................................   10
Función de congelamiento de la imagen principal .....   10
Tabla operacional de los botónes en modo IDI ó 
     SPLIT ....................................................................   10

Funciones Especiales de la Televisor de 

Proyección Alta Definición........................ 11

Botones Especiales del Control Remoto.... 12
Operación del Control Remoto.................... 13

Operación de componentes con el control remoto.....  14
Programando el control remoto..................................  16
Programando sin código ............................................  16
Códigos de componentes...........................................  16

Navegación básica de menú........................  19
Operación del Menús....................................  20

Imagen .......................................................................   20
Audio ..........................................................................   20
Canales ......................................................................   21
Operación del Photo Viewer™ ...................................   22
Cronómetro ................................................................   24
Ajuste .........................................................................  25
Bloqueo ......................................................................  28

Glosario y Acrónimos...................................  31
Cuadro de Localización de Fallas ...............  32
Indice..............................................................  34

Nota:

La Información acerca de la garantía y centro de servicio se encuentra al final de este manual.

P9 0474 S doc3  080403R.fm  Page 2  Wednesday, August 13, 2003  8:25 AM

Summary of Contents for PT-56TWD63

Page 1: ...DW WKLV SURGXFW ZLOO VXFFHVVIXOO UHFHLYH GLJLWDO WHOHYLVLRQ WUDQVPLVVLRQV WKDW FRQIRUP WR DQ DQG DOO RI WKH YLGHR IRUPDWV GHVFULEHG LQ WKH 76 LJLWDO 7HOHYLVLRQ 6WDQGDUG 7HOHYLVRU GH 3UR HFFLyQ GH OWD HILQLFLyQ QVWUXFFLRQHV GH 2SHUDFLyQ 74 35 17 1 86 035 62 1 88 POWER tVOLUME u CHANNEL p q TV VIDEO MENU OK S VIDEO VIDEO 4 L AUDIO R 37 37 37 7 37 7 ...

Page 2: ...n point within a triangle is intended to tell the user that important operating and servicing instructions are in the papers with the appliance The lightning flash with arrow head within a triangle is intended to tell the user that parts inside the product are a risk of electric shock to persons RISK OF ELECTRIC SHOCK DO NOT OPEN WARNING WARNING To reduce the risk of fire or electric shock do not ...

Page 3: ...radiate radio frequency energy and if not installed and used in accordance with the instructions may cause harmful interference to radio communications However there is no guarantee that interference will not occur in a particular installation If this equipment does cause interference to radio or television reception which you can determine by turning the equipment off and on try to correct the in...

Page 4: ...nection 7 Digital Audio Out connection 8 Program Out Connection 8 Amplifier Connection Analog 8 PIP Operation 9 PIP Operation 9 Split Operation 9 PIP And Split Operational Buttons 9 TV Video Button 9 Search Button 9 Move Button 9 PIP MIN and PIP MAX Buttons 10 Freeze Button 10 Main Picture Freeze Feature 10 PIP Split and Freeze Mode Buttons Operational Chart 10 Special Feature of the High Definiti...

Page 5: ...o not spray any type of cleaning fluid directly on the screen Cabinet and Remote Control For cabinets and remote control use a soft cloth dampened with water or a mild detergent solution Avoid excessive moisture and wipe dry Do not use benzene thinner or other petroleum based products Specifications Specifications are subject to change without notice or obligation Feature Chart Manufactured under ...

Page 6: ...NTENNA Mode for ANTENNA A in the Set Up menu If you have both Cable and Antenna the Cable must be connected to ANT A First Time Setup For your convenience First Time Set up menu will be displayed on screen when the set is turned on for the first time If needed follow the menus and procedures displayed on screen for setting up the features Input Setup To select the configuration of RF input dependi...

Page 7: ... 3 1 8 7 2 4 TV VIDEO VOL POWER OK CH CH MENU VOL 1 2 3 4 6 5 7 8 ON OFF Indicator LED SD Slot PC Slot 9 1 2 3 4 5 6 7 8 9 Item Description Antenna Inputs ANT A Connect Cable Antenna or Terrestrial Antenna to this input to receive Digital channels ANT B If you have both Cable antenna and Terrestrial antenna connect the Terrestrial antenna to ANT B DCM INTERFACE POD INTERFACE Insert the DCM Digital...

Page 8: ...e TV and not see the thin black horizontal lines venetian blind effect associated with interlaced TV pictures Use this diagram to connect the DTV STB or DVD player to the back of your projection television Note There are two set of three video iacks Y PB and PR Separate component color inputs provide luminance and color separation Use the L left and R right audio inputs Front Control Panel The fro...

Page 9: ... the HDMI input on the back of the PTV Press TV VIDEO button on the remote control to select HDMI input The connector on the PTV is HDMI Type A connector If the external device has DVI output only use a DVI to HDMI adaptor cable 3 to connect to the HDMI jack on the PTV Also connect the Audio Out signal from the external device set top box or DVD player to the Audio In 4 jacks below the HDMI input ...

Page 10: ... is selected for main picture Program Out signal is available when receiving digital channel However all digital formats are down converted to composite NTSC video When receiving digital or analog channels signals and the analog or digital CC is ON Program Out connector will output open caption text in the NTSC video picture If CC is OFF only analog CC closed caption code is passed out the Program...

Page 11: ... Split screen Note PIP or SPLIT frame cannot display digital channel signal You can display digital channel as the Main picture and analog channel in PIP SPLIT frame or analog channels in both Main and PIP SPLIT frame Swap is possible when both Main picture and PIP SPLIT picture are analog channels or video input sources PIP and Split Operational Buttons TV VIDEO Button Press when PIP or Split fra...

Page 12: ...cture freeze frame Note While Main Picture freeze frame is displayed only MOVE button is active for PIP all other PIP and Split buttons have no effect see chart PIP Split and Freeze Mode Buttons Operational chart This chart indicates the buttons that are operational with PIP Split or Main Picture Freeze mode PIP MOVE PIP PIP Frame Main Picture PIP PIP MIN PIP MAX PIP Main Picture MAX MIN PIP SPLIT...

Page 13: ...utton The following is an example of tuning to channel 15 1 The HDTV Projection Television will tune to channel 15 1 Channel Banner Minimized The minimized Channel Banner will display the antenna input channel number and the station identification if available Channel Banner Maximized Press the RECALL button to display the maximized channel banner While the channel banner is displayed you can add ...

Page 14: ...ending on Input Signal Format INPUT SIGNAL DISPLAY ON SCREEN ASPECT BUTTON OPTIONS 1080i 16 9 only No options 480p 16 9 Default to 16 9 4 3 Full or Zoom see below 480p 4 3 Default to FULL mode 4 3 Full or Zoom see below 480i Default to JUST mode 4 3 Full Just or Zoom see below Input Signal ASPECT 4 3 Image on 16 9 Screen Size 4 3 480i or 480p This will display a 4 3 picture at its standard 4 3 siz...

Page 15: ...V VCR Press to switch to TV or VCR Press to display or delete PIP frame Press to display or delete Split frame In analog mode press to access audio modes Stereo SAP or Mono In digital mode press to access next audio track Press to illuminate remote buttons Press to switch to A or B RF antenna input Press to turn BBE OFF or ON Press to display or delete Channel banner Press to exit menus Press to c...

Page 16: ... Tape PIP MIN REW Pause PAUSE Change to TV or VCR Mode FREEZE TV VCR On screen VCR Display TO DO THIS PRESS Turn on off Select a Channel Change Channels Up Down Back to previous channel R TUNE POWER TV VIDEO PIP CH DVD VCR CH RECALL POWER 1 2 3 4 5 6 7 8 9 0 CH CH TO DO THIS PRESS Turn on off Display DBS menu Menu Navigation Select a Channel Program Information Back to previous channel R TUNE Sele...

Page 17: ...TO DO THIS PRESS Turn on off Audio Mute RCVR VOl Up Down Tuner Pre set stations Up Down To select AV Inputs or Components Press Remote numeric Keypad Surround VOL Down PIP MIN REW Surround VOL UP PIP MAX FF Center CH VOL Up Down POWER VOL VOL POWER M U T E VOL VOL CH CH AV 1 Press 1 AV 2 Press 2 AV 3 Press 3 AV 4 Press 4 CD Press 5 TUNER Press 6 PHONO Press 7 TAPE Press 8 AUX Press 9 PIP CH DVD VC...

Page 18: ...Confirm that the external component is plugged in and on Turn the component off Press and together for at least 5 seconds Press appropriate component button on the Remote Control Press VOL to move forward to the next code Press VOL to move backward Press the Remote Control to test the component If the procedure was successful the component will turn on Note Repeat the above steps until the compone...

Page 19: ... 306 Tatung 310 311 339 Teac 310 311 339 Technics 321 322 323 324 Teknika 324 Toshiba 301 346 Vector Research 311 Wards 306 309 335 336 344 Yamaha 305 310 311 339 Zenith 306 344 Codes For Cable Box Brand Code ABC 124 Archer 125 132 Cableview 105 132 Citizen 105 122 Curtis 112 113 Diamond 124 125 132 Eagle 129 Eastern 134 GCbrand 105 132 Gemini 122 General Instrument Jerrold 111 119 120 121 122 124...

Page 20: ...21 Philips 123 Pioneer 105 107 Quasar 118 119 121 RCA 103 105 127 130 131 Sansui 103 111 139 Sharp 134 137 Sony 122 Soundesign 138 Teac 111 112 113 Technics 118 119 121 Victor 132 133 Yamaha 101 102 Codes For CD Player Brand Code Admiral 226 Aiwa 233 235 Carver 229 Denon 242 Emerson 239 Fisher 205 Harman Kardon 219 220 221 223 Hitachi 207 Jensen 234 JVC 240 241 245 Kardon 223 Kenwood 200 201 211 2...

Page 21: ...CH VOL VOL OK MENU MENU EXIT Press Press Press to select Other Adj to display the Main Menu to select thedesired icon sub Menu Field Press Press NORMAL PICTURE Press to enter the sub menu field Press to select desired sub menu feature Note For sub menu with OTHER ADJ Press to select desired sub menu Note To EXIT menus repeatedly until normal Press to access Other Adj sub menu Press to adjust or se...

Page 22: ...nge color parameters manually for the best picture quality VM VELOCITY MODULATION To increase picture sharpness and provides crisp white to black transitions FREEZE This feature is used to freeze main picture and display it in a PIP or SPLIT frame when the FREEZE button on the remote control is pressed Press FREEZE again to delete frame Note SWAP SIZE SEARCH PIP MIN and PIP MAX buttons are not fun...

Page 23: ... Procedure Press OK button while Manual Labels is selected to select RF Input then press VOL or VOL to select Antenna A or Antenna B Note Only input with signal will be selectable Press OK button to underline your selection Press CH to select Channel then press VOL or VOL to select available channel number Press CH to select CAPTION Press VOL to select first character position then press CH or CH ...

Page 24: ...tial entry screen from the main menu It shows the total number of images on the card Filename folder number and the number of the thumbnail that is highlighted the date the picture was taken and the pixel resolution of the picture Procedure Press MENU button to display the Main menu Highlight Photo Viewer Icon using the navigation Left Right Up Down keys Press OK button to display the thumbnail sc...

Page 25: ...for longer than 10 minutes Image shift refer to page 26 feature will be activated to prevent image retention The image on screen will zoom in and zoom out in 4 four steps To exit this mode press OK button or select another slide or press any button During the Slide show the Image shift feature will activate if the image is displayed longer than 5 five minutes The image will be shifted horizontally...

Page 26: ...el number using the numeric keypad and the PROG button if necessary The television will tune to this channel when timer is activated Turn Off the set The television will turn On at the selected time and the channel will be the channel selected before turning the TV off Notes Clock must be set before you can set Timer Use navigation buttons to highlight the Timer Icon The television automatically t...

Page 27: ...to Scan To automatically Scan All available channels Antenna A Analog Antenna A Analog Digital Antenna B Analog and Antenna B Analog Digital Procedure Highlight Auto Scan and press OK to enter the sub menu Use CH and CH to select and press OK to start the auto scan After Auto Scan is completed press MENU to return to the previous screen Manual Program To add or delete channels from either channels...

Page 28: ...ox Back Opacity and the outline of the dropshadow if selected under style Colors sub menu Procedure In digital closed captioning sub menu select Colors and press OK button to display the colors sub menu Note When digital caption is used on ATSC the monitor output Prog Out will also output the CC information This means if you tape the program the CC information will also be recorded on tape To avoi...

Page 29: ... cross pattern appears white with a minimum of color protrusion Press 0 on the remote control keypad to display the BLUE correction screen then repeat procedure To exit convergence screen press OK button then press EXIT to quit all menus Cable Module Info This menu is used to provide information when a DCM Digital Cable Module is inserted into the DCM INTERFACE POD INTERFACE slot on the back of th...

Page 30: ... or Antenna B and block out up to four 4 channels from each input Password is required to view these blocked channels RF Input Select either Antenna A or Antenna B Channel Select up to four 4 channels to be blocked out These channels will be blocked out regardless of the program rating Procedure In Lock Set choose Channel Lock and press OK button Press MENU button to return to the previous menu Hi...

Page 31: ...propriate for children under 13 R RESTRICTED Under 17 requires accompanying parent or adult guardian NC 17 NO ONE 17 AND UNDER ADMITTED X ADULTS ONLY Age based Group Age based Ratings Possible Content Selections NR Not Rated TV NR Viewable Blocked Youth TV Y Viewable Blocked TV Y7 FV Fantasy Violence Viewable Blocked Guidance TV G Viewable Blocked TV PG D L S V all selected Any combination of D L ...

Page 32: ...n Channel Lock is selected The on screen display will be displayed when you attempt to tune the channels that are locked in the Channel Lock menu When the rating level is exceeded If the program you are viewing exceeds the set rating level a rating level exceeded message is displayed You are prompted to enter your password to view the blocked channel Note Entering the password will override the bl...

Page 33: ... Table FAT 12 or FAT 16 File systems used in formatting the memory cards HDMI High Definition Multimedia Interface Interface that supports every uncompressed digital format as well as all existing multi channel audio format on a single cable JPEG Joint Photographic Experts Group A system used for compressing decoding color still pictures MPAA Motion Picture Association of America Guild governing r...

Page 34: ...Cable Mode Properly Check Antenna Cables No Audio No Video No PIP Check Power Cord is Plugged into Active Outlet Adjust Brightness and Audio Controls Change Channel Check Cable Connections Program the Remote Control Again Check Second Video Source Operation Poor ATSC signal strength Re orient the ATSC antenna Audio Break up Digitalization of image Image freeze up Re orient the ATSC antenna Check s...

Page 35: ...deo in HDMI input from devices with HDMI or DVI output due to bad communication between the TV and the devices Should this happens unplug the HDMI DVI device and plug it back on Wrong Audio Normal Video If using HDMI input change the audio of the HDMI device to Linear PCM Check the Audio setting for HDMI refer to page 21 If there is functional problem with Digital Audio please use Analog audio Int...

Page 36: ...6 Information Regarding Convergence 1 Information Regarding memory cards 22 Input Labels 21 Input Setup 4 25 Inserting and Removing SD or PCMCIA card 22 Installation 4 Interval 23 L Lock 28 Lock Set 28 M Main Picture Freeze Feature 10 Manual Labels 21 Manual Program 25 Menu button 12 Menu Operations 20 Move Button 10 MPAA 28 N Natural Color 20 Nine Point Convergence Correction 27 Normal 20 O Opera...

Page 37: ...NOTES 35 z ENGLISH ...

Page 38: ...us autoridades locales o a la alianza de industrias electrónicas HTTP WWW EIAE ORG AVISO AMBIENTAL Aviso de la FCC Lea estas instrucciones completamente antes de operar la Televisión El contenido está sujeto a cambios sin previo aviso u obligación Derechos Reservados 2003 por Matsushita Electric Corporation of America Todos los Derechos Reservados La copia y distribución sin autorización es violac...

Page 39: ...er instalado y utilizado de acuerdo a las instrucciones puede ocasionar interferencia nociva a comunicaciones de radio Sin embargo no existe garantía de que no ocurra interferencia en alguna instalación en particular Si este equipo causa interferencia a recepción de radio o televisión la cual puede ser determinada al encender y apagar el equipo intente corregir la interferencia con una o más de la...

Page 40: ...t 8 Conexión de salida del programa PROG OUT 8 Conexión del amplificador de sonido Analogo 8 Operación de IDI y Pantalla de SPLIT 9 Operación de IDI 9 Operación de Split 9 Operación de IDI y pantalla de SPLIT Botón 9 Botón TV VIDEO 9 Botón de Search 9 Botón de Move 9 Botónes PIP MIN y PIP MAX 10 Botón de Freeze 10 Función de congelamiento de la imagen principal 10 Tabla operacional de los botónes ...

Page 41: ... rociar cualquier tipo de limpiadores directamente sobre la pantalla Gabinete y Control Remoto Para gabinetes y control remoto use un paño humedecido con agua o una solución detergente suave Evite el exceso de humedad y frote hasta secar No use benceno diluyentes u otros productos a base de petróleo Especificaciones Las especificaciones están sujetas a cambio sin previo aviso ni obligación alguna ...

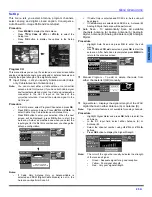
Page 42: ...dispuesta de fábrica Usuarios de antena deberán cambiar a modalidad de Antena en el menú de Setup Si tiene cable y antena el cable debe ser conectado al conector ANT A First Time Setup Programación Inicial Para su conveniencia el menú de auto programación será desplegado en pantalla cuando el set sea encendido por primera vez De ser necesario siga los menús y los procedimientos para ajustar las ca...

Page 43: ...7 5 6 1 3 4 2 8 TV VIDEO VOL POWER OK CH CH MENU VOL 1 2 3 4 6 5 7 8 9 Indicador Apagado Encender Abertura PC Abertura SD 1 2 3 4 5 6 7 8 9 Refere ncia Descripción Entradas de antena ANT A Conecte una antena terrestre o de cable a esta entrada para recibir canales digitales ANT B Si tiene ambas antenas terrestre y cable conecte la antena terrestre a ANT B DCM INTERFACE POD INTERFACE Introduzca el ...

Page 44: ...lazadas Utilice este diagrama para conectar el decodificador de Televisión Digital Panasonic DTV STB ó DVD a su Televisor El televisor tiene dos grupos de entradas de video compuesto cada grupo tiene tres entradas Y PB y PR Los entradas separadas para las señales compuestas de color proveen una mejor separación de luminancia y color Panel de Control Frontal El panel de control frontal puede ser us...

Page 45: ...el control remoto para seleccionar la entrada HDMI El conector en este PTV es HDMI tipo A Conecte la salida HDMI del set top box o reproductor de DVD a la entrada HDMI IN en la parte posterior del PTV Si el dispositivo externo solo tiene salida DVI utilice un adaptador 3 de DVI a HDMI para conectarse al conector HDMI en el PTV Además conecte la señal de salida de audio del dispositivo externo set ...

Page 46: ...dio y video no es permitida La señal de Program Out no estará disponible cuando la imagen principal sea de la entrada por componentes La señal Program Out estará disponible cuando reciba un canal digital Pero todos los formatos digitales serán convertidos a video NTSC compuesto Cuando reciba una canal digitales o análogos y los subtítulos análogos o digitales estén activados la salida del conector...

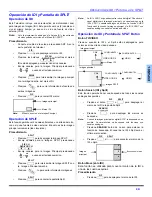
Page 47: ...para cancelar la pantalla Split Nota La IDI o SPLIT no pueden mostrar un canal digital Puede ver el canal digital como la imágen principal y un canal análogo en la IDI ó SPLIT ó canales análogos en ambos La función SWAP funcíona sólo cuando la imágen principal y la IDI ó SPLIT son canales análogos o señal de entrada de video Operación de IDI y Pantalla de SPLIT Botón Botón TV VIDEO Presione quando...

Page 48: ... congelada este desplegada solo el boton MOVE esta activo para IDI cualquier otro botón para IDI o SPLIT no tendra effecto ver tabla Tabla operacional de los botones en modo IDI ó SPLIT Esta tabla muestra los botones que están activos cuando se encuentra en modo IDI ó SPLIT MOVE PIP Marco IDI Imágen principal PIP PIP MIN PIP MIN PIP Imágen principal MAX MIN PIP SPLIT FREEZE TV VCR FREEZE TV VCR PI...

Page 49: ...uiente es un ejemplo de como sintonizar el canal 15 1 El televisor de proyección de alta definición sintonizará el canal 15 1 Barra de información de canal minimizada La barra de información de canal minimizada mostrará la antena utlizada el número de canal y la identificación de la estación si esta disponible Barra de información de canal maximizada Presione RECALL para mostrar la barra de inform...

Page 50: ...r canales a su lista de canales favoritos Botón R TUNE Press to switch to previously viewed channel Photo Viewer or input modes Opciones de despliegue de imagen según la señal de entrada Señal de entrada Formato en pantala Opciones para botón ASPECT 1080i Solo 16 9 Sin opción 480p 16 9 Default a 16 9 4 3 Comp o Acerc Ver sig columna 480p 4 3 Default a modo COMP Nota La imagen es estimada Horizonta...

Page 51: ...onar entre modo TV o VCR en su videocasetera Presione para desplegar o cancelar el marco IDI Presione para desplegar o cancelar la pantalla SPLIT Presione para accesar los modos de audio Stereo SAP o Mono Presione para iluminar los bones del control remoto Presione para seleccionar la entrada de antena de RF A o B Presione para encender o apagar Presione para desplegar o cancelar la información de...

Page 52: ...AY Detener STOP Adelandar PIP MAX FF Regresar PIP MIN REW Pausar PAUSE Cambiar a modo TV o Videocasetera FREEZE TV VCR Despliegue en pantalla PARA HACER ESTO OPRIMA Encender Apagar Seleccionar un canal Cambiar el canal Arriba Abajo Sintonizar el canal previo R TUNE POWER TV VIDEO PIP CH DVD VCR CH RECALL POWER 1 2 3 4 5 6 7 8 9 0 CH CH PARA HACER ESTO OPRIMA Encender Apagar Desplegar menú DBS MENU...

Page 53: ...REW Pausa PAUSE PARA HACER ESTO OPRIMA Encender Apagar Mudo Vol Estaciones pre grabadas Para Seleccionar la modalidad de entrada ó componente Oprimar el teclado numerico del control remoto Envolvente PIP MIN REW Envolvente PIP MAX FF Canal Central POWER VOL VOL POWER M U T E VOL VOL CH CH AV 1 Presione 1 AV 2 Presione 2 AV 3 Presione 3 AV 4 Presione 4 CD Presione 5 Radio Presione 6 Phono Presione ...

Page 54: ...cuando menos 5 segundos Presione el botón de la función apropiada del componente en el Control Remoto Presione el botón VOL para ubicarse en el siguiente código Presione el botón VOL para regresar al código anterior Presione el botón de el Control Remoto para probar el componente Si éste procedimiento ha sido exitoso el componente se encenderá Nota Repita los pasos anteriores hasta que el código d...

Page 55: ...para VCR Cont Marca Código Orion 320 326 Panasonic 321 322 323 324 Penney 300 305 310 311 324 339 345 Pentax 300 311 345 Philco 320 323 324 326 331 343 Philips 323 324 331 Pioneer 323 Proscan 300 301 302 323 324 331 333 345 346 Quasar 321 322 323 324 Radio Shack 305 309 324 333 336 340 RCA 300 301 302 323 324 331 333 345 346 Realistic 305 309 324 336 340 Samsung 302 304 333 Sansui 320 326 339 352 ...

Page 56: ...9 114 Optimus 103 127 130 131 Panasonic 118 119 121 Philips 123 Pioneer 105 107 Quasar 118 119 121 RCA 103 105 127 130 131 Sansui 103 111 139 Sharp 134 137 Sony 122 Soundesign 138 Teac 111 112 113 Technics 118 119 121 Victor 132 133 Yamaha 101 102 Códigos para reproductor de CD Marca Código Admiral 226 Aiwa 233 235 Carver 229 Denon 242 Emerson 239 Fisher 205 Harman Kardon 219 220 221 223 Hitachi 2...

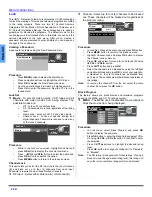
Page 57: ...ubmenu Presione para seleccionar el submenu deseado Nota Para Sub menu con Other Adjust Presione para seleccionar el sub menu deseado Nota Para salir de menu Presione para accesar el sub menú de Other Adj Presione para seleccionar o ajustar el submenu deseado Presione campo para el sub sub menu para seleccionar o ajustar el sub menu o para regresar a la imagen normal MENU P i c t u r e P i c M o d...

Page 58: ...ión regular de TV NTSC Nota Cuando esté viendo una señal de DTV en un formato no estándar puede cambiar los parámetros de color manualmente para obtener una mejor calidad de imágen MV Velocidad de modulación Incrementa la nitidez de la imágen y da mejor transición de blancos a negros FREEZE Esta función es usada da para congelar la imagen principal y desplegarla en la IDI or pantalla SPLIT cuando ...

Page 59: ...ulos Manuales Para introducir los números y titulos manualmente Procedimiento Presione OK cuando Titulos Manuales esta seleccionado a la señal de entrada RF luego presione VOL o VOL para seleccionar Antena A o Antena B Nota Solo entradas con señal podran ser seleccionadas Presione OK para subrayar su selección Presione CH para seleccionar CHANNEL luego presione VOL o VOL para seleccionar el número...

Page 60: ...antalla de previsualización es la primera pantalla accesada desde el menú principal Muestra la cantidad total de imagenes en la tarjeta el nombre del archivo número de folder y el número de la previsualización seleccionada la fecha en que la foto fué tomada y la resolución de la misma Procedimiento Presione MENU para accesar el menú principal Seleccione el icono Photo Viewer usando los botones de ...

Page 61: ... Viewer Notas Si las previsualizaciones o una imagen son mostradas por más de 10 minutos Movimiento de imagen Image shift ver pág 26 se activará para prevenir la retención de imagen La imagen en pantalla se agrandará y reducirá en cuatro 4 pasos Para salir de este modo presione OK o seleccione otra imagen o presione otro botón Durante el Slide show el movimiento de imagen será activado si la image...

Page 62: ...ara salir del menú Introduzca el canal deseado con los botones numéricos y el botón PROG en caso necesario El televisor sintonizará este canal cuando el cronómetro se active Apague el televisor El televisor se encenderá a la hora seleccionada y a el canal que se tenia al momento de apagar el televisor Notas El reloj debe ser ajustado antes de programar Timer Use los botones de navegación para sele...

Page 63: ... Si Cable Antenna es seleccionado y el módulo POD está conectado Antenna B Analog y Digital Auto scan se llevarán a cabo Auto Scan Auto Programación Programa automáticamente todos los canales disponibles Procedimiento Coloquese en Auto Scan y presione OK para entrar al sub menú Use CH y CH para seleccionar Scan All y presione OK para iniciar Una vez terminada la auto programación presione MENU par...

Page 64: ...evitar esto apague los subtítulos digitales o utilize los análogos Other Adj Otros ajustes El menú Other Adj le permite configurar el auto encendido la convergencia el movimiento de imagen y la magnificación Auto Power On Autoencendido Seleccione SET para encender la televisión al mismo tiempo que el Decodificador de Cable u otros componentes o seleccione Off Image Shift Movimiento de imagen Esta ...

Page 65: ...to Para salir presione el botón OK después presione EXIT para salir todos menús Cable Module Info Información del módulo del Cable Este menú es usado para proveer información cuando un módulo DCM Módulo de Cable Digital es introducido en el conector DCM INTERFACE POD INTERFACE en la parte posterior del televisor Si no hay un DCM conectado y trata de accesar la información del módulo de cable el me...

Page 66: ...n le permite seleccionar la señal de entrada por RF Antenna A o Antenna B y bloquear hasta cuatro 4 canales por cada una La contraseña es requerida para ver estos canales RF Input Seleccione Antenna A o Antenna B Channel Seleccione hasta cuatro 4 canales para que sean bloqueados Estos canales serán bloqueados independientemente de su clasificación Procedimiento En Lock Set seleccione Channel Lock ...

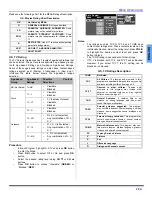
Page 67: ...RESTRINGIDO Menores de 17 años necesitan ir acompañados de uno de los padres ó un adulto NC 17 NO SE ADMITE A NADIE DE 17 AÑOS O MENOS X SOLO ADULTOS Tabla de Clasificacion de Programas de EEUU Grupo basado en edad Clasificación basada en edad Posibles selecciones de contenido NR Sin clasificación TV NR Viewable Visible Blocked Bloqueado Youth TV Y Viewable Visible Blocked Bloqueado TV Y7 FV Viole...

Page 68: ...trados de video Cuando Channel Lock es seleccionado El siguiente mensaje es desplegado cuando se intenta sintonizar algún canal bloqueado en el menú Channel Lock Cuando el nivel de clasificación se exede Si el Block Program está activado y el programa excede el limite de clasificación ajustado por el usuario aparecerá el mensaje de bloqueo Su código secreto le será solicitado para ver el canal blo...

Page 69: ...emas de archivo usados para formatear las tarjetas de memoria HDMI High Definition Multimedia Interface Interfase que soporta todos los formatos digitales no comprimidos asi como todos los formatos de audio multi canal en un solo cable JPEG Joint Photographic Experts Group Sistema usado para comprimir decodificar imagenes fijas a color MPAA Motion Picture Association of America Gremio que gobierna...

Page 70: ...es de la Antena Sin Sonido Sin Imagen Sin IDI Revise que el Cable de Corriente este Enchufado a una toma de Corriente Activa Ajuste los Controles de Brillo y Audio Cambie el Canal Revise las Conexiones del Cable Programe el Control Remoto otra vez Revise la Operación de la Segunda Fuente de Video Señal ATSC débil Redireccione la antena Sonido Distorsionado Digitalización de la imágen Congelamiento...

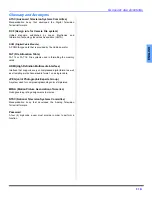
Page 71: ...rá imagen por la entrada HDMI cuando este conectado a aparátos con salida HDMI o DVI debido a mala comunicación entre el televisor y los aparátos Si esto sucede desconecte el aparáto HDMI DVI y vuelvalo a conectar Sin Sonido Sin Imagen Sonido Erróneo Imagen Normal Si usa la entrada HDMI cambie el audio del aparáto HDMI a PCM Lineal Revise el ajuste de Audio para HDMI ver pág 21 Si hay problema con...

Page 72: ...pecificaciones 3 F Freeze 20 Vista Frontal y Posterior del Televisor de Proyección de Alta Definición 5 Función de congelamiento de imagen principal 10 Funciones especiales del Televisor de proyección de Alta Definición 11 G Gabinete y Control Remoto 3 H How Long Cuanto tiempo 30 I Image Shift 26 Imagen 20 Información Importante Acerca Del Uso De Video Juegos 1 Información sobre la Convergencia 1 ...

Page 73: ...NOTAS 35 z ESPAÑOL ...

Page 74: ...UUDQW SHULRG WKHUH ZLOO EH QR FKDUJH IRU SDUWV RX PXVW FDUU LQ RXU SURGXFW RU DUUDQJH IRU LQ KRPH VHUYLFH GXULQJ WKH ZDUUDQW SHULRG I QRQ UHFKDUJHDEOH EDWWHULHV DUH LQFOXGHG WKH DUH QRW ZDUUDQWHG 7KLV ZDUUDQW RQO DSSOLHV WR SURGXFWV SXUFKDVHG DQG VHUYLFHG LQ WKH 8QLWHG 6WDWHV RU 3XHUWR 5LFR 7KLV ZDUUDQW LV H WHQGHG RQO WR WKH RULJLQDO SXUFKDVHU RI D QHZ SURGXFW ZKLFK ZDV QRW VROG DV LV SXU FKDVH U...

Page 75: ...FHQWHU RU RWKHU XWKRUL HG 6HUYLFHU RU GDPDJH WKDW LV DWWULEXWDEOH WR DFWV RI RG 7 5 5 12 35 66 55 17 6 37 6 67 81 5 0 7 55 17 29 5 7 55 1725 6 127 25 1 17 25 216 48 17 0 6 5 68 7 1 520 7 86 2 7 6 352 8 7 25 5 6 1 287 2 1 5 2 7 6 55 17 V H DPSOHV WKLV H FOXGHV GDPDJHV IRU ORVW WLPH FRVW RI KDYLQJ VRPHRQH UHPRYH RU UH LQVWDOO DQ LQVWDOOHG XQLW LI DSSOLFDEOH RU WUDYHO WR DQG IURP WKH VHUYLFHU RU ORVV...

Page 76: ...VVLVWDQFH LWHUDWXUH 5HTXHVW HDOHU RFDWLRQV DQG DOO XVWRPHU 6HUYLFH LQTXLULHV SOHDVH FRQWDFW 9 379 0RQGD ULGD DP SP 6DWXUGD 6XQGD DP SP 67 HE 6LWH KWWS ZZZ SDQDVRQLF FRP RX FDQ SXUFKDVH SDUWV DFFHVVRULHV RU ORFDWH RXU QHDUHVW VHUYLFHQWHU E YLVLWLQJ RXU HE 6LWH FFHVVRU 3XUFKDVHV XVWRPHU 2UGHUV 2QO 3DQDVRQLF 6HUYLFHV RPSDQ WK YHQXH 6RXWK HQW DP WR SP 0RQGD ULGD DP WR DP 6DWXUGD 367 9LVD 0DVWHU DUG LV...

Page 77: ...127 127 ...

Page 78: ...XQGHU FRS ULJKW ODZ WKDW LV WR VD D ZRUN FRQWDLQLQJ WKH 3URJUDP RU D SRUWLRQ RI LW HLWKHU YHUEDWLP RU ZLWK PRGLILFDWLRQV DQG RU WUDQVODWHG LQWR DQRWKHU ODQJXDJH HUHLQDIWHU WUDQVODWLRQ LV LQFOXGHG ZLWKRXW OLPLWDWLRQ LQ WKH WHUP PRGLILFDWLRQ DFK OLFHQVHH LV DGGUHVVHG DV RX FWLYLWLHV RWKHU WKDQ FRS LQJ GLVWULEXWLRQ DQG PRGLILFDWLRQ DUH QRW FRYHUHG E WKLV LFHQVH WKH DUH RXWVLGH LWV VFRSH 7KH DFW RI UX...

Page 79: ...LUHG WR DFFHSW WKLV LFHQVH VLQFH RX KDYH QRW VLJQHG LW RZHYHU QRWKLQJ HOVH JUDQWV RX SHUPLVVLRQ WR PRGLI RU GLVWULEXWH WKH 3URJUDP RU LWV GHULYDWLYH ZRUNV 7KHVH DFWLRQV DUH SURKLELWHG E ODZ LI RX GR QRW DFFHSW WKLV LFHQVH 7KHUHIRUH E PRGLI LQJ RU GLVWULEXWLQJ WKH 3URJUDP RU DQ ZRUN EDVHG RQ WKH 3URJUDP RX LQGLFDWH RXU DFFHSWDQFH RI WKLV LFHQVH WR GR VR DQG DOO LWV WHUPV DQG FRQGLWLRQV IRU FRS LQJ ...

Page 80: ... WKH FRS ULJKW OLQH DQG D SRLQWHU WR ZKHUH WKH IXOO QRWLFH LV IRXQG 2QH OLQH WR JLYH WKH SURJUDP V QDPH DQG DQ LGHD RI ZKDW LW GRHV RS ULJKW HDU QDPH RI DXWKRU 7KLV SURJUDP LV IUHH VRIWZDUH RX FDQ UHGLVWULEXWH LW DQG RU PRGLI LW XQGHU WKH WHUPV RI WKH 18 HQHUDO 3XEOLF LFHQVH DV SXEOLVKHG E WKH UHH 6RIWZDUH RXQGDWLRQ HLWKHU YHUVLRQ RI WKH LFHQVH RU DW RXU RSWLRQ DQ ODWHU YHUVLRQ 7KLV SURJUDP LV GLV...

Page 81: ...VLRQ RI WKH OLEUDU PXVW EH FRQVLVWHQW ZLWK WKH IXOO IUHHGRP RI XVH VSHFLILHG LQ WKLV OLFHQVH 0RVW 18 VRIWZDUH LQFOXGLQJ VRPH OLEUDULHV LV FRYHUHG E WKH RUGLQDU 18 HQHUDO 3XEOLF LFHQVH 7KLV OLFHQVH WKH 18 HVVHU HQHUDO 3XEOLF LFHQVH DSSOLHV WR FHUWDLQ GHVLJQDWHG OLEUDULHV DQG LV TXLWH GLIIHUHQW IURP WKH RUGLQDU HQHUDO 3XEOLF LFHQVH H XVH WKLV OLFHQVH IRU FHUWDLQ OLEUDULHV LQ RUGHU WR SHUPLW OLQNLQJ ...

Page 82: ... ZKROH PXVW EH RQ WKH WHUPV RI WKLV LFHQVH ZKRVH SHUPLVVLRQV IRU RWKHU OLFHQVHHV H WHQG WR WKH HQWLUH ZKROH DQG WKXV WR HDFK DQG HYHU SDUW UHJDUGOHVV RI ZKR ZURWH LW 7KXV LW LV QRW WKH LQWHQW RI WKLV VHFWLRQ WR FODLP ULJKWV RU FRQWHVW RXU ULJKWV WR ZRUN ZULWWHQ HQWLUHO E RX UDWKHU WKH LQWHQW LV WR H HUFLVH WKH ULJKW WR FRQWURO WKH GLVWULEXWLRQ RI GHULYDWLYH RU FROOHFWLYH ZRUNV EDVHG RQ WKH LEUDU Q...

Page 83: ...KH VDPH ZRUN EDVHG RQ WKH LEUDU XQFRPELQHG ZLWK DQ RWKHU OLEUDU IDFLOLWLHV 7KLV PXVW EH GLVWULEXWHG XQGHU WKH WHUPV RI WKH 6HFWLRQV DERYH E LYH SURPLQHQW QRWLFH ZLWK WKH FRPELQHG OLEUDU RI WKH IDFW WKDW SDUW RI LW LV D ZRUN EDVHG RQ WKH LEUDU DQG H SODLQLQJ ZKHUH WR ILQG WKH DFFRPSDQ LQJ XQFRPELQHG IRUP RI WKH VDPH ZRUN RX PD QRW FRS PRGLI VXEOLFHQVH OLQN ZLWK RU GLVWULEXWH WKH LEUDU H FHSW DV H S...

Page 84: ...2 266 2 7 25 7 1 5 1 5 1 85 7 25 266 6 6867 1 28 25 7 5 3 57 6 25 85 2 7 5 5 72 23 5 7 7 1 27 5 62 7 5 9 1 68 2 5 25 27 5 3 57 6 1 9 6 2 7 3266 7 2 68 0 6 1 2 7 506 1 21 7 216 RZ WR SSO 7KHVH 7HUPV WR RXU 1HZ LEUDULHV I RX GHYHORS D QHZ OLEUDU DQG RX ZDQW LW WR EH RI WKH JUHDWHVW SRVVLEOH XVH WR WKH SXEOLF ZH UHFRPPHQG PDNLQJ LW IUHH VRIWZDUH WKDW HYHU RQH FDQ UHGLVWULEXWH DQG FKDQJH RX FDQ GR VR ...

Page 85: ...127 127 ...

Page 86: ...127 127 ...

Page 87: ...127 127 ...

Page 88: ...LWD OHFWULF RI 3XHUWR 5LFR QF 36 YH GH QIDQWHUtD P 6DQ DEULHO QGXVWULDO 3DUN DUROLQD 3XHUWR 5LFR 7 HO D 3DQDVRQLF RQVXPHU OHFWURQLFV RPSDQ LYLVLRQ RI 0DWVXVKLWD OHFWULF RUSRUDWLRQ RI PHULFD 2QH 3DQDVRQLF D 6HFDXFXV 1HZ HUVH ZZZ SDQDVRQLF FRP ...

Reviews: