background image

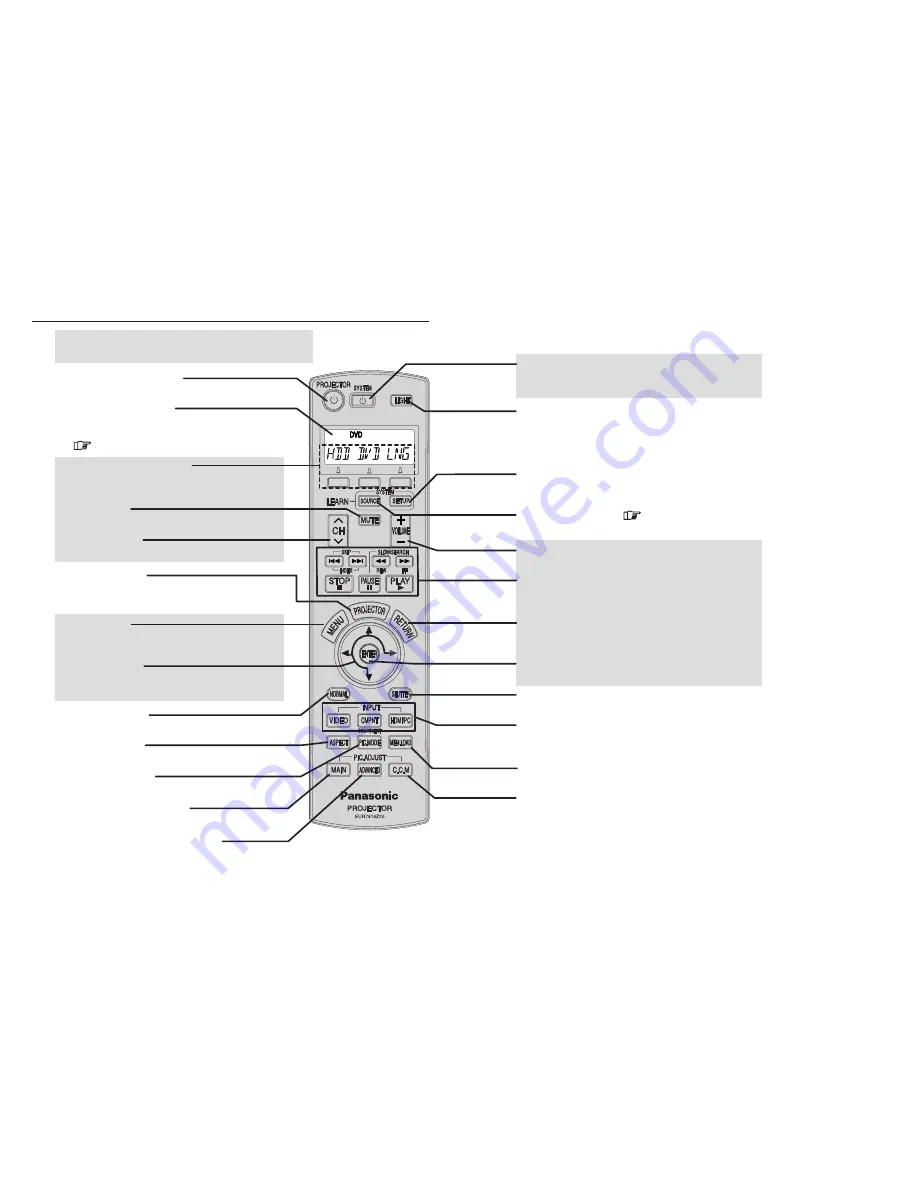
Function buttons (A/B/C) 

These operate the displayed functions for the 
selected equipment.

4

Names and functions of each part

5

Liquid crystal display

The top shows the selected device, the bottom shows 
the functions of that device that can be operated.
(

✱ 

        pp. 20-21)

Buttons shown in this colour are buttons that 
can be used for learnt functions.

Projector power button

This turns the projector power on and off.

MUTE button

This mutes the sound.

Channel button

This selects the channel.

Projector button

This switches the remote control functions to 
projector mode.

MENU button

This switches to menu mode for the selected 
equipment.

FGHI

 button

This moves the selection up or down or to the left 
or right.

NORMAL button

This returns setting values to their factory defaults.

PIC.MODE button

This switches to the image menu.

ASPECT button

This switches the aspect ratio.

MAIN adjustment button

This displays the “PICTURE” menu.

ADVANCED adjustment button

This displays the “Advanced” menu.

System power button

This turns the power supply for equipment other than 
the projector on and off.

LIGHT button

Turn the backlight for this remote control on and off.

SETUP button

This switches to setup mode for the selected system 
equipment.

SOURCE button 

(

✱ 

        p.6)

This selects the equipment to be operated.

VOLUME button

This adjusts the sound volume.

ENTER button

This button accepts the selected item.

DVD/video playback buttons

These buttons are used for functions related to DVD 
and video playback.

RETURN button

When a menu is displayed, this button returns to the 
previous menu.

SHUTTER button

This button lets you momentarily hide images.

Input select buttons

These buttons select the input signals from 
connected equipment.

MEM.LOAD button

This displays the “Memory Load” menu.

C.C.M. (Cinema Color Management) button

This displays the “Color management” menu.

Summary of Contents for PT-AE900U

Page 1: ...heatre system in addition to operating the projector PT AE900U Be sure to read this Remote Control Operating Guide carefully in order to use the devices safely Also be sure to read the instructions for the projector and the home theatre system carefully when using the remote control After reading this Operating Guide keep it in a safe place for later reference ...

Page 2: ...n the recorded devices can be displayed on the remote control s LCD Up to 3 characters alphabetical numeric and symbols can be entered for each function button that has been learnt to create your own preferred name to be displayed for that function BYou can make a macro to turn the power for selected devices on or off all at once You can turn the power on and off simultaneously for up to 8 devices...

Page 3: ...nu ASPECT button This switches the aspect ratio MAIN adjustment button This displays the PICTURE menu ADVANCED adjustment button This displays the Advanced menu System power button This turns the power supply for equipment other than the projector on and off LIGHT button Turn the backlight for this remote control on and off SETUP button This switches to setup mode for the selected system equipment...

Page 4: ...er to Setting remote control signals for home theatre systems p 7 BThe default settings for USER1 3 are for these settings to be empty BIf you do not press anything for 10 seconds or more during this procedure the LCD will switch off BIf the light is on it will switch off if no operations are carried out for 10 seconds or more BIf the LCD switches off while a device is flashing as a result of a de...

Page 5: ...emote control signals for home theatre systems 2 1 Press ENTER 2 2 Select the device to be set 2 1 B When DVD VCR AMP is selected When USER 1 3 is selected Note BFor device codes that have a power remote control signal the power remote control signal for the device will be transmitted when the device code is selected Turn the power for the device on as a test BTwo or more equipment codes cannot be...

Page 6: ...vice to be set and then press ENTER B When TV TNR is selected Continue to step 4 Continue to step 4 TV CBL SAT B When USER 1 3 is selected Press the up or down button to select SEARCH and then press ENTER Select the device to be set and then press ENTER DVD AMP SCREEN LIGHTING SAT CBL HVAC TV RCV VCR Press NORMAL Point the remote control at the home theatre system device and press the up button on...

Page 7: ...could not be carried out correctly Return to step 5 and repeat the learning operation To record another button repeat step 5 Note BIf the batteries of the remote control are spent the signals will not be recorded correctly BEach button must be recorded separately BIf no operations are carried out for 60 seconds or more during learning the setting mode will be cancelled To carry out learning correc...

Page 8: ... to delete remote control signals that have been recorded learnt by deleting button functions one by one DELETE or by deleting all settings for USER 1 3 OPS RESET To finish press SETUP Press SETUP for 3 seconds or more Select USER 1 3 and then press ENTER Select OPS RESET and then press ENTER Press ENTER To finish press SETUP If ERROR is displayed ERROR will be displayed if no function has been le...

Page 9: ...hat can be displayed Upper case letters A Z Numerals 0 9 Symbols _ space Press SETUP for 3 seconds or more Select USER 1 3 and then press ENTER Select KEY EDIT and then press ENTER Press the button to be changed Use the left and right keys to move to the character to be changed and use the up and down keys to select the character 6 Press ENTER During setting the space character will be displayed a...

Page 10: ...l turn on 6 4 5 Example When USER1 is selected Setting the macro function Using the macro function Example When USER3 is selected Example When USER3 is selected Press SYSTEM once more To finish press SETUP and then check operation The length of time required for the macro function to finish operating effectively will vary depending on the number of devices that have been recorded The display will ...

Page 11: ...layed when an operation is completed correctly OPS RESET RESET Displayed when you are to select whether or not to reset RESET ERROR Displayed when an error occurs during a reset operation Redo the operation RESET OK Displayed when the reset operation is successful SAVED Displayed when a button guide has been recorded SEARCH SEL SOURCE Displayed when selecting a device type SOURCE Displayed when se...

Page 12: ...o projector operation Projector function only Projector function only Projector function only Projector function only Projector function only Projector function only Projector function only Projector function only Projector function only Projector function only Projector function only Projector function only INPUT PIC ADJUST SLOW SEARCH Button display Selected device Device code at time of shipmen...

Page 13: ...067 0081 Kenwood 0067 LG 0037 0042 0045 MITSUBISHI 0000 0043 0048 0067 0081 0642 Philips 0000 0081 0226 0618 0739 Pioneer 0042 0067 0081 SAMSUNG 0045 0432 0739 SANYO 0048 0067 0104 0348 SHARP 0037 0048 SONY 0000 0032 0034 0636 1972 TOSHIBA 0042 0043 0045 0067 0081 0352 0432 1503 1972 Victor 0067 Panasonic 0490 0503 0703 1010 1011 1362 1462 1490 1762 1834 1905 1908 DENON 0490 1634 GE 0522 0717 HITA...

Page 14: ...Printed in Japan S0905 0A Matsushita Electric Industrial Co Ltd Web Site http www panasonic co jp global C 2005 Matsushita Electric Industrial Co Ltd All Rights Reserved ...

Reviews: