- 35 -
6
Brightness content display icon
The brightness contents that already registered to timetable
to change the brightness of light source are displayed when
clicked.
7 Power supply content display icon
The power contents that already registered to timetable to
switch on/off the power are displayed when clicked.
8 Music content display icon
Click this to display the music content to play music files
registered in the timetable.
9 Playback information
The information of still image/movie/external input/music
contents being played is displayed.
10
Display scale
Sets the display scale of the timetable.
11
[Play]/[Stop] button
Click this to start playing a schedule, or to stop playing the
schedule. (“Starting the playback of schedule” (
x
page 20))
12
[Interrupt] button
Click this to display the [Interruption playback] screen. (“Setting
the interruption playback” (
x
page 105))
13
Timetable
Displays the timetable currently assigned.
[Schedule] page
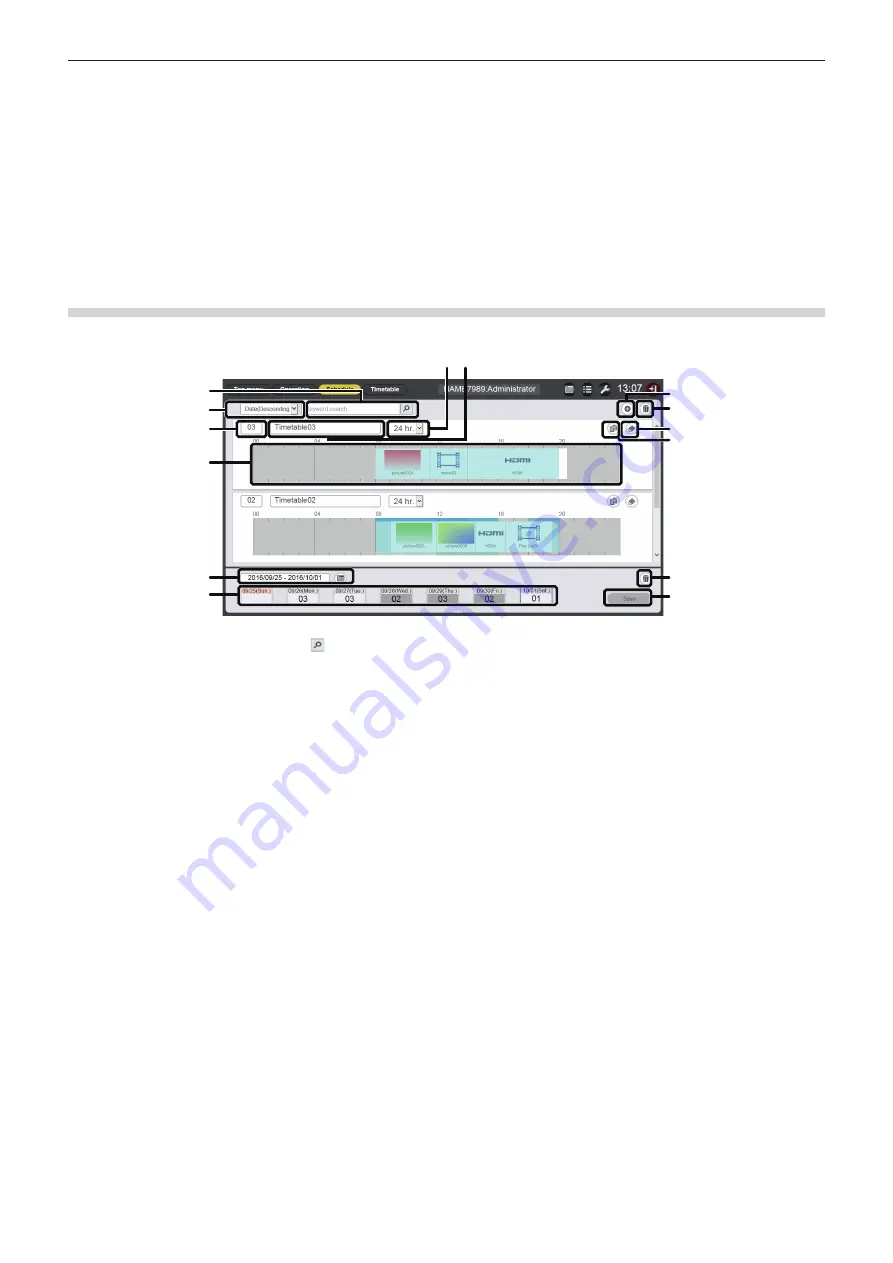
The [Schedule] page is displayed after clicking the [Schedule] button on the schedule screen.
1
10
9
11
12
14
13
2
4
3
5
6
7 8
1
[Keyword search]
Enter the string to be searched and click to search the
timetables saved in the “PRIVATE” folder in the SD card by the
timetable name.
2 Sort timetables
Sets the display order of timetables.
[Date(Ascending)]/[Date(Descending)]:
Displays timetables in the order of registration date.
[ID(Ascending)]/[ID(Descending)]:
Displays timetables in the order of timetable ID.
[Content name(Ascending)]/[Content name(Descending)]:
Displays timetables in the order of timetable name.
3
Timetable ID
Displays the timetable ID.
4 Timetable
Displays the contents registered in timetable.
5 Period setting
Sets the period (week) to be displayed in a schedule.
When selected, the calendar is displayed.
6
Schedule
Displays the schedule of the specified week.
When selected, the [Assigned timetable] display screen is
displayed. (“[Assigned timetable] screen” (
x
page 36))
7 Display scale
Sets the display scale of timetable.
8 Timetable name
Displays the timetable name.
9 Timetable addition icon
Adds and registers a timetable in the SD card.
Click this to display the [Timetable] page. (“Creating a timetable”
(
x
page 16))
10
Timetable deletion icon
Deletes the timetable registered in the SD card. (“Deleting the
timetable” (
x
page 62))
11
Timetable edit icon
Edits a registered timetable. (“Editing the timetable”
(
x
page 56))
12
Timetable duplication icon
Duplicates a registered timetable. (“Duplicating the timetable”
(
x
page 62))
13
Schedule deletion icon
Deletes the timetable registered in a schedule. (“Deleting the
schedule” (
x
page 67))
14
[Save] button
Registers the schedule currently displayed in the SD card.


