- 36 -
r
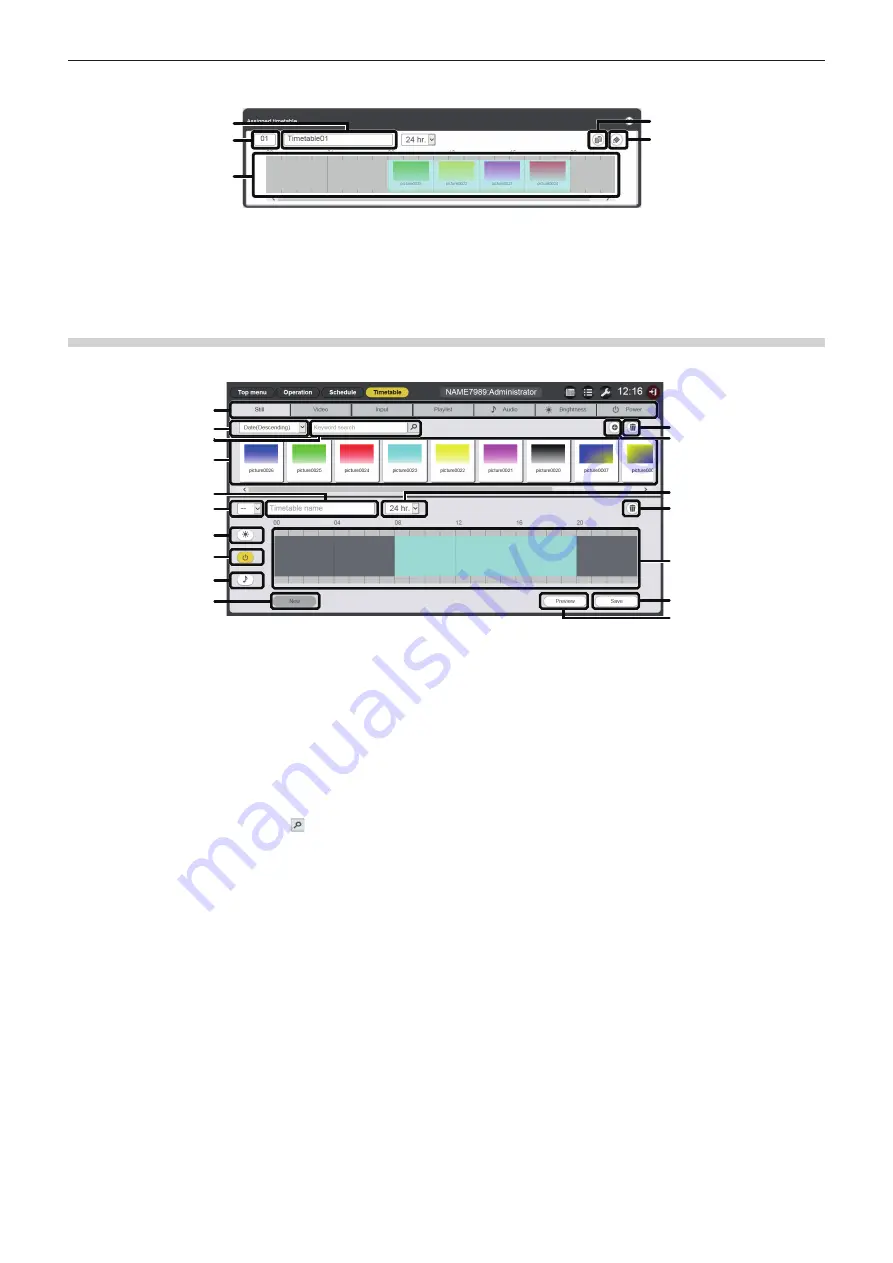
[Assigned timetable] screen
4
5
3
1
2
1
Timetable name
Displays the timetable name.
2 Timetable ID
Displays the timetable ID.
3
Timetable
Displays the content registered in a timetable.
4 Timetable duplication icon
Duplicates the timetable being displayed. (“Duplicating the
timetable” (
x
page 62))
5 Timetable edit icon
Edits the timetable being displayed. (“Editing the timetable”
(
x
page 56))
[Timetable] page
The [Timetable] page is displayed when clicking the [Timetable] button on the schedule screen.
1
11
12
13
14
15
16
17
2
3
4
5
6
7
8
9
10
1
Content selection tab
Select the type of content to register in a timetable.
Clicking the tab changes the “Content list” display.
2 Sort content
Select the display order of the “Content list”.
[Date(Ascending)]/[Date(Descending)]:
Displays contents in the order of registration date.
[Content name(Ascending)]/[Content name(Descending)]:
Displays contents in the name order.
[File name(Ascending)]/[File name(Descending)]:
Displays contents in the file name order.
3
[Keyword search]
Enter string to be searched and click to search contents
in the “PRIVATE” folder in the SD card. Search target varies
depending on the content.
Still image/movie/music content: content name and file name
Playlist: playlist name
Brightness content: brightness
Search result is displayed in the “Content list”.
4 Content list
Displays the content registered in the SD card.
5 Timetable name
Enter a timetable name.
Or, the timetable name being edited is displayed. Click it to edit
the timetable name.
6
Timetable ID
Displays the ID of the timetable being edited.
It is assigned automatically when a timetable is registered.
Click it to change the target timetable to be edited.
7 Brightness content display icon
This icon becomes yellow when selected, and displays the
registered brightness content in a timetable. Click the icon again
to cancel the selection, then the icon color changes to white.
8 Power supply content display icon
This icon becomes yellow when selected, and displays the
registered power supply content in a timetable. Click the icon
again to cancel the selection, then the icon color changes to
white.
9 Music content display icon
This icon becomes yellow when selected, and displays the
registered music content in a timetable. Click the icon again to
cancel the selection, then the icon color changes to white.
10
[New] button (only for administrator rights)
Click this to discard the timetable being edited and create a new
timetable.
11
Content addition icon (only for administrator rights)
Adds and registers contents in the SD card.
12
Content deletion icon (only for administrator rights)
Deletes contents registered in the SD card.
13
Display scale
Sets the display scale for “Timetable”.
14
Content in timetable deletion icon (only for administrator
rights)
Deletes the content registered in a timetable.
15
Timetable
Displays the content registered in a timetable.
16
[Save] button (only for administrator rights)
Click this to register the timetable setting being edited in the SD
card.
17
[Preview] button
Click this to display the timetable being edited on the web
browser, or to display the preview of it on the projection screen.


