INF - 22
6. 4. Troubleshooting
K
P
P
P
B
B
* The letters in the left of inspection items indicate the P.C. Boards related to their respective descriptions.
* Please be sure to perform check, after assembling a lighting block completely.
■
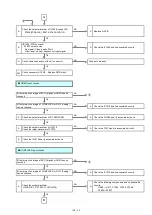
Power does not turn ON. (The power indicator does not light in red.)
* If the top cover is not attached well, inter- lock will work.
A A2 connector is removed and checked short-circuits.
1-2, 7-8, 11-12
A Replace A-PCB.
B Confirm the short circuit of each parts.
Q9731(D-S),Q9732(D-S),Q9731(D-S),Q9732(D-S)
B Replace B-PCB.
Confirm each cable and connector connection.
K1
~
P1
、
P3
~
A2
Connect the connectors or install top cover properly.
Follow the section "A-PCB operation checks".
■
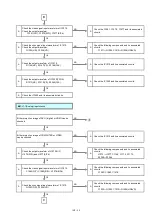
The projector does not change from standby mode to an operating mode.
(The power indicator does not change from red to green.)
Confirm the fuse.
⇒
F8101
、
F8201
Replace P-PCB.
P
・
Confirm the short circuit of ZNR.
⇒
Z8101, Z8102
・
Confirm the short circuit of each parts.
D8101,D8106,D8107,Q8102(D-S),Q8103(D-S)
・
Confirm the short circuit of each parts.
D8102,D8103,D8108,D8109
Replace P-PCB.
Confirm the fuse.
⇒
F9701
Replace B-PCB.
Follow the section "A-PCB operation checks".
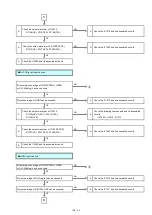
Confirm the connection of each connectors.
Connect properly.
A A2 connector is removed and checked short-circuits.
1-2, 7-8, 11-12
A Replace A-PCB.
A 13 pin output voltage of A2 connector checks
whether it has changed from "Hi" to "Low".
OK
NG
NG
OK
①
OK
NG
NG
OK
NG
①
OK
NG
OK
NG
NG
OK
NG
OK
OK
②
Summary of Contents for PT-RZ470 Series
Page 6: ...6 2 Specifications...
Page 7: ...7...
Page 9: ...INF 2 1 The name of each part 1 1 Projector body 1 2 Control panel...
Page 10: ...INF 3 1 3 Connecting terminals 1 4 Remote control...
Page 11: ...INF 4 2 OSD Menu Navigation...
Page 12: ...INF 5...
Page 13: ...INF 6...
Page 26: ...INF 19 5 Select Log SYSTEM and click Get button 6 Log is displayed...
Page 84: ......


