Fig. M15
4. Readjust Black Screw (A), shown in Fig. M13, for maximum output.
5. Disconnect the oscilloscope.
5. HORIZONTAL POSITION ADJUSTMENT OF A/C HEAD
Purpose :
To adjust the Horizontal Position of the A/C Head.
Symptom of Misadjustment :
If the Horizontal Position of the A/C Head is not properly adjusted, a maximum
envelope cannot be obtained at the Neutral Position of the Tracking Control Circuit.
Place a jumper between TP6003 and +5V(TP6009) on the System Control Section of
the Main C.B.A. to defeat Auto Tracking.
1. Eject the tape and insert it again, to access the Neutral Tracking position. Connect
the oscilloscope to TP3002 on the Video Signal Process Section of the Main C.B.A.
Use TP6205 as a trigger.
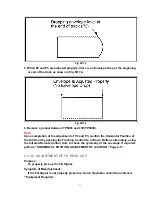
2. Play back the monoscope portion of the alignment tape (VFMS0001H6) and confirm
that the RF envelope appears, as in Fig. M17-1.
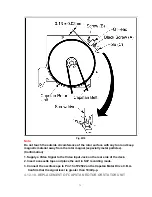
3. If adjustment is required, loosen the Black Screw with 2 Washers (D) and tighten
the Screw lightly. Set the H-Position ADJ. Screwdriver into the Hole (E) shown in
Fig. M16. Then slowly turn the fixture either clockwise or counterclockwise so that
the envelope is at maximum.
4. Before finding the center of the maximum period of the envelope, rotate the fixture
back and forth slightly to confirm the limits on either side of the maximum period.
5. Push the Tracking Control Up Button (on the Remote Control) several times (count
the number of times pushed) until the maximum envelope is reduced to 1/2.
6. Reset the tracking to the neutral position by ejecting the tape and reinserting it.
Push the Tracking control DOWN Button (on the Remote Control) several times
(count the number of times pushed) until the maximum envelope is reduced to 1/2.
70
Summary of Contents for PV-4601 A
Page 14: ...Fig 2 3 14 ...
Page 27: ...Fig 11 1 1 27 ...
Page 40: ...Fig D1 40 ...
Page 42: ...Fig D2 42 ...
Page 43: ...Fig D3 43 ...
Page 44: ...Fig D4 44 ...
Page 45: ...Fig D5 45 ...
Page 46: ...Fig D7 46 ...
Page 47: ...Fig D8 47 ...
Page 51: ...Fig M2 1 Fig M2 2 51 ...
Page 53: ...Fig M4 1 53 ...
Page 77: ...Fig M19 77 ...
Page 84: ...Fig J5 84 ...
Page 85: ...Fig J6 85 ...
Page 87: ...Fig J9 87 ...
Page 88: ...Fig J10 88 ...
Page 89: ...Fig J11 89 ...
Page 90: ...Fig J12 90 ...
Page 91: ...Fig J13 91 ...
Page 92: ...Fig J15 92 ...
Page 93: ...93 ...
Page 96: ...96 ...
Page 102: ...with the holes on the Pinch Lift Cam as shown in Fig A6 102 ...
Page 103: ...103 ...
Page 105: ...Fig K1 105 ...
Page 106: ...Fig K2 106 ...
Page 107: ...Fig K3 107 ...
Page 109: ...Fig B1 109 ...
Page 114: ...Fig E1 4 3 2 HOW TO READ THE ADJUSTMENT PROCEDURES 114 ...
Page 115: ...Fig E2 115 ...
Page 134: ...R6004 ERJ6GEYJ333V MGF CHIP 1 10W 33K 134 ...
Page 136: ...R6085 ERJ6GEYJ223V MGF CHIP 1 10W 22K 136 ...
Page 140: ...C4601 ECEA1CKA100 ELECTROLYTIC 16V 10 140 ...
Page 147: ...R6065 ERJ6GEYJ223V MGF CHIP 1 10W 22K 147 ...
Page 167: ...9 11 Operation Block Diagrams 1 167 ...
Page 178: ......
Page 204: ......
Page 205: ......


