5.1.8. HOW TO REMOVE A JAMMED
TAPE
CAUTION:
Wiper Arm Unit may be damaged or its spring may be
out of place when the jammed tape is removed by force.
Remove a jammed tape as follows:
5.1.8.1. Manual Method
When a tape jam is encountered, check the tape loading
condition and use the following procedure to remove a tape
jam.
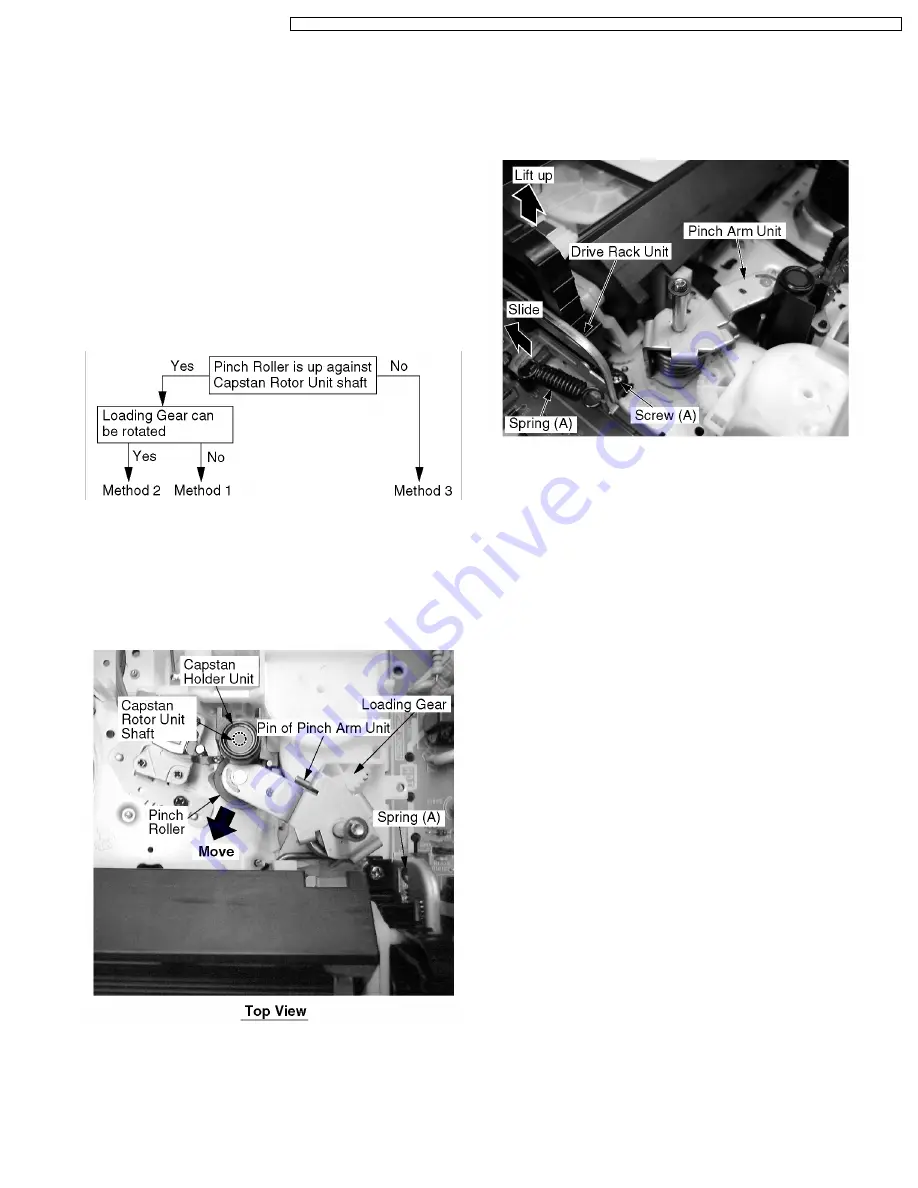
Fig. 6-1
5.1.8.1.1. Method -1:
1. Move the Pinch Roller Unit out by unhooking the Pin of
Pinch Arm Unit so that the Pinch Roller is separated from
the Capstan Rotor Unit shaft.
Fig. 6-2
2. Remove the tape from the tape path.
3. Rewind the tape into the cassette by rotating the Center
Clutch Unit counterclockwise.
4. Unhook Spring (A) of the Drive Rack Arm.
5. Remove Screw (A).
6. Lift the Cassette Up Ass'y. While pulling the Cassette Up
Ass'y out far enough so that it clears the Drive Rack Arm,
slide the Drive Rack Unit as indicated by the arrow to
remove the cassette tape from the Cassette Up Ass'y.
7. Check the cause of mechanical trouble and repair.
Fig. 6-3
5.1.8.1.2. Method -2:
1. Rotate Loading Motor counterclockwise with needlenose
pliers, etc. so that the Pinch Roller is separated from the
shaft of the Capstan Rotor Unit.
2. Perform Step 2 through Step 7 of Method -1.
5.1.8.1.3. Method -3:
1. Perform Step 2 through Step 7 of Method -1.
Note:
After repairing mechanical trouble, make sure that all gear
alignments are correct, especially the Wiper Arm Unit and
Drive Rack Unit of Cassette Up Ass'y. (Refer to "EJECT
Position
Confirmation"
in
DISASSEMBLY/ASSEMBLY
PROCEDURES.)
17
PVQ-1310 / PV-C1320 / PV-C1330W / VV-1300 / VV-1310W / PV-C1340 / PV-C1350W / PV-C2010 / PV-C2020 / PV-C2030W / VV-2000 / PV-C2060


