6.1.2.1. Notes in chart
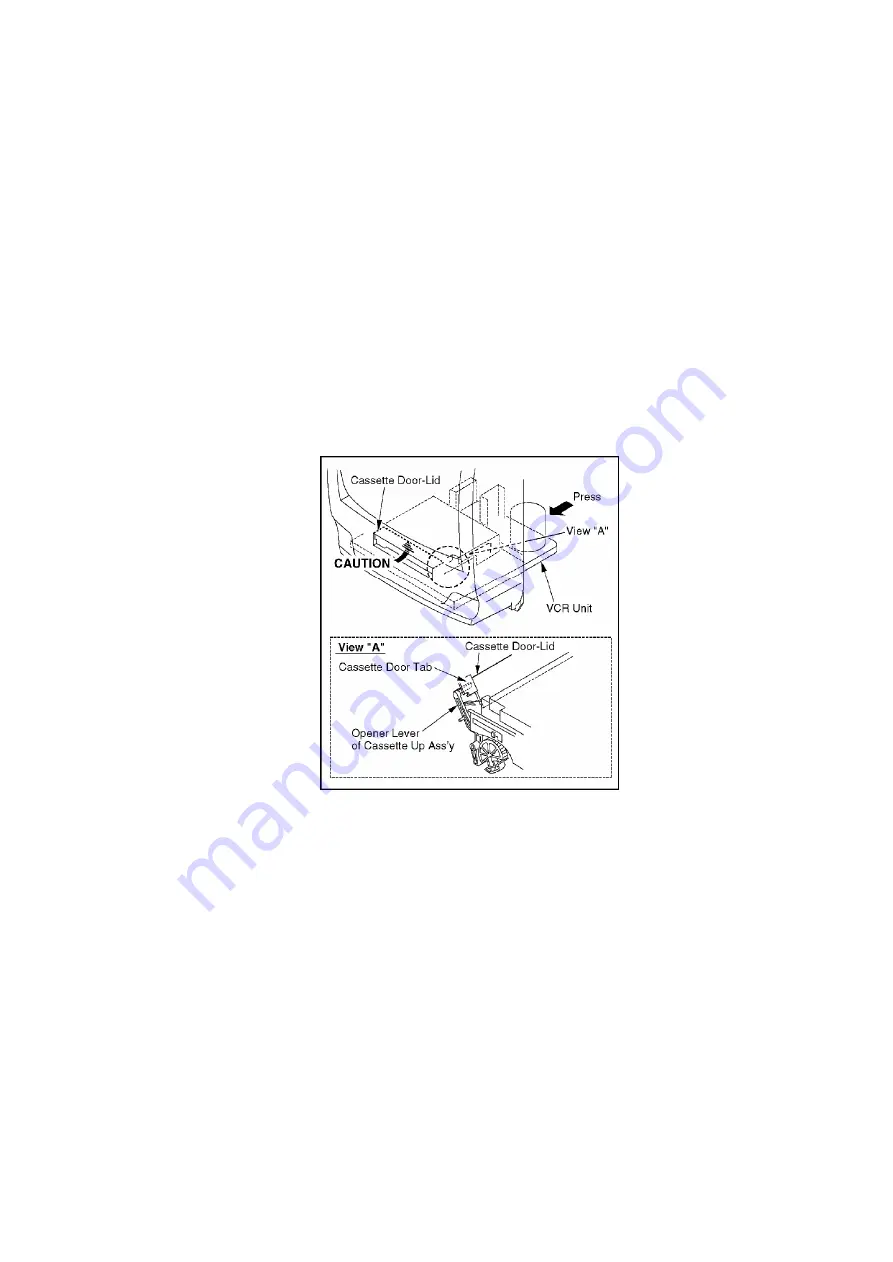
1. Installation of VCR Unit
CAUTION:
Opener Lever may be damaged when VCR Unit is installed, with
Cassette Door-Lid and Opener Lever of Cassette Up Ass'y set
incorrectly.
A. When installing the VCR Unit, swing the Cassette Door-Lid all
the way open until the Cassette Door tab clears the Opener
Lever.
B. Make sure that all guide tabs are aligned properly.
Then, press the VCR Unit straight in.
Fig. D6
2. Removal of CRT Unit
Place the Unit face down on a soft cloth before removing the CRT
Unit.
Installation of CRT Unit (Model: A, B, C, D, E, F, G)
When installing Degaussing Coil, place the Degaussing Coil
correct position.
Fig. D7
26
Summary of Contents for Quasar PVQ-1310
Page 25: ...Fig D5 25 ...
Page 29: ...6 2 2 Inner Parts Location Fig J1 1 29 ...
Page 30: ...6 2 3 EJECT Position Confirmation Fig J1 2 30 ...
Page 31: ...6 2 4 Grounding Plate Unit Full Erase Head and Cylinder Unit Fig J2 1 31 ...
Page 44: ...6 3 CASSETTE UP ASS Y SECTION 6 3 1 Top Plate Wiper Arm Unit and Holder Unit Fig K1 1 44 ...
Page 82: ...82 ...
Page 86: ...11 2 MECHANISM BOTTOM SECTION 86 ...
Page 87: ...11 3 CASSETTE UP COMPARTMENT SECTION 87 ...
Page 88: ...11 4 CHASSIS FRAME SECTION 1 A B C D E F G 88 ...
Page 89: ...11 5 CHASSIS FRAME SECTION 1 H I J K L 89 ...
Page 90: ...11 6 CHASSIS FRAME SECTION 2 90 ...
Page 91: ...11 7 PACKING PARTS AND ACCESSORIES SECTION A B C D E F G 91 ...
Page 92: ...11 8 PACKING PARTS AND ACCESSORIES SECTION H I J K L 92 ...
Page 113: ...R4021 ERJ6GEYJ473V MGF CHIP 1 10W 47K 113 ...
Page 115: ...R5515 ERDS2TJ332 3 3K 115 ...
Page 135: ...R885 ERDS2TJ104 100K 135 ...


