VQT5J78
3
ENGLISH
3
The rechargeable battery (installed in the unit) is not charged initially. Charge
the battery before using the unit.
1
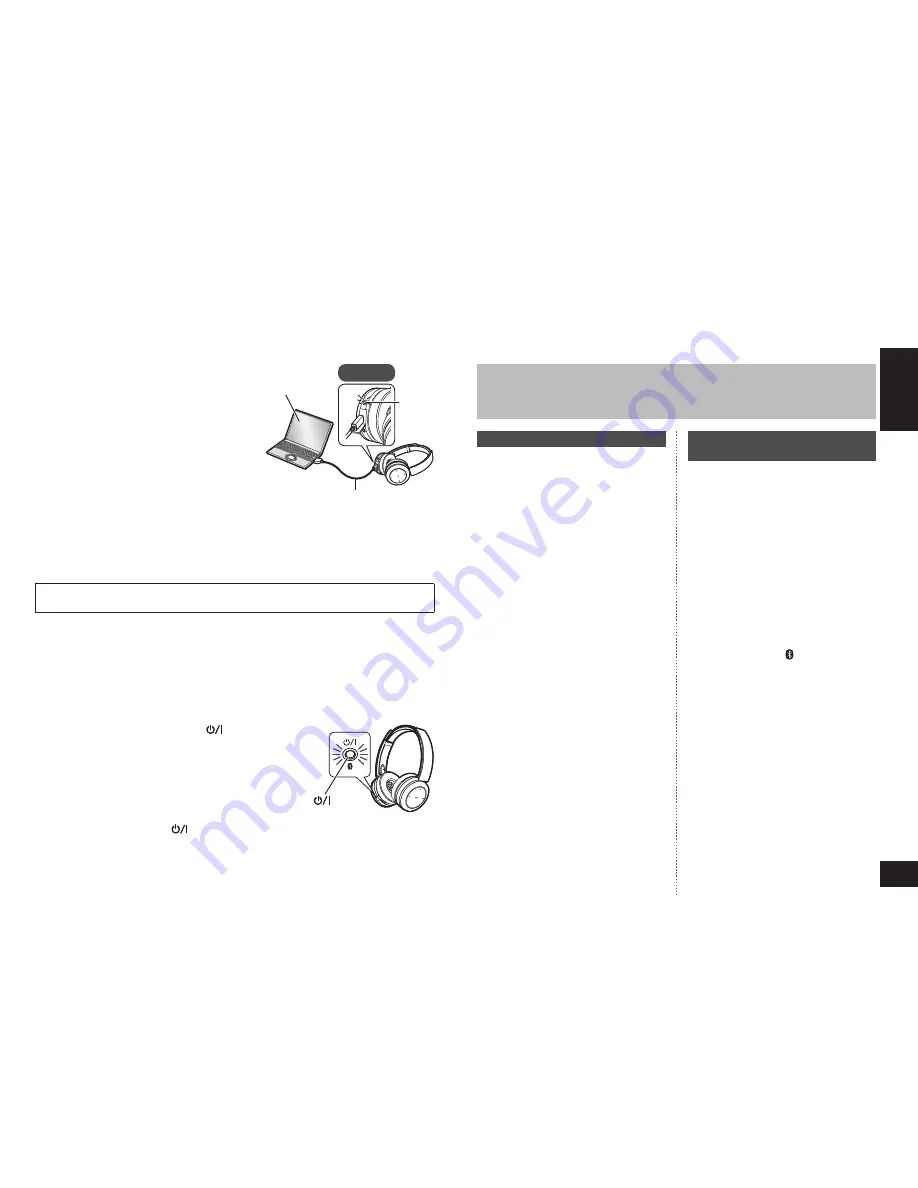
Connect this unit to a computer
using the USB charging cord
• During charging, the LED on the left
speaker will light in red. When charging
is completed, the LED will go out.
• Charging will take approximately
4.5 hours from empty state to fully
charged.
Left
Computer
LED
USB charging cord (supplied)
■
Note
• The Bluetooth
®
feature cannot be used when this unit is connected to a computer
using the USB charging cord.
• Recharge in a room temperature between 10 °C and 35 °C (50 ºF and 95 ºF).
• The power cannot be turned on while charging.
• Do not use any other USB charging cords except the supplied one.
Caution: Use only the supplied USB charging cord when connecting to a
computer.
Charging
To establish a wireless connection, register the unit with Bluetooth
®
compatible
devices.
Preparation on the Bluetooth
®
device
• Turn on the power, and enable the Bluetooth
®
feature.
• Place the device within 1 m (3.3 feet) from the unit.
• Check the device operation in its operation instructions, as required.
Power on for the first time
1
Turn on the unit
• The unit will start searching for
the Bluetooth
®
device to connect
to, and the LED on the left
speaker will blink in blue and red
alternately. (Only one operation
after purchase)
2
When the unit (“RP-BTD10”)
is detected by the Bluetooth
®
device, select it
• If prompted for a passkey, input
“0000 (four zeros)”.
• If the Bluetooth
®
profile selection
screen appears, select the
“A2DP” profile. If “A2DP” is not
supported or if you want to just
use phone calls, select the “HSP”
or “HFP” profile. (For details on
profiles, see “Listening to music”
(
→
P. 4) and “Making a phone
call” (
→
P. 5))
3
Check the connection with
the Bluetooth
®
device on the
unit
• First the LED on the left speaker
lights in blue and repeats on
and off. When the connection is
established, blinking pattern will
change.
Connection after the second
time
<Connect the same Bluetooth
®
device>
When the unit is turned on, it will
search for the previously setup
Bluetooth
®
device and automatically
start connecting to it. First the LED
on the left speaker lights in blue
and repeats on and off. When the
connection is established, blinking
pattern will change.
<Connect a different Bluetooth
®
device>
Disable the Bluetooth
®
feature on
the previously connected device.
Check that the unit is turned off. Press
and hold the pairing button for
approximately 5 seconds. The unit will
start searching for other Bluetooth
®
device. The LED on the left speaker
will blink in blue and red alternately. A
beep will sound.
Continue steps
2
and
3
.
Connecting a Bluetooth
®
device
■
Note
• If connection to a device is not
established within approximately
5 minutes, the unit will be turned off.
Start from step
1
again.
• 2 or more Bluetooth
®
devices cannot
be connected to the unit at the same
time.
• You can pair up to 8 devices with
this unit. If a 9th device is paired, the
device with the oldest connection will
be replaced. To use it, pair it again.
1
Press and hold the power
button for
approximately 2 seconds
• A beep will sound and the LED on the left speaker
will blink.
Power
button
To turn the power off
• Press and hold the power
button for 2 seconds or more. A beep will sound
and the power will be turned off.
■
Note
• When the unit is not operated for approximately 5 minutes, the power will
automatically turn off. (See “Auto power off” (
→
P. 5))
Turning the power on/off

