English
English
Français
2
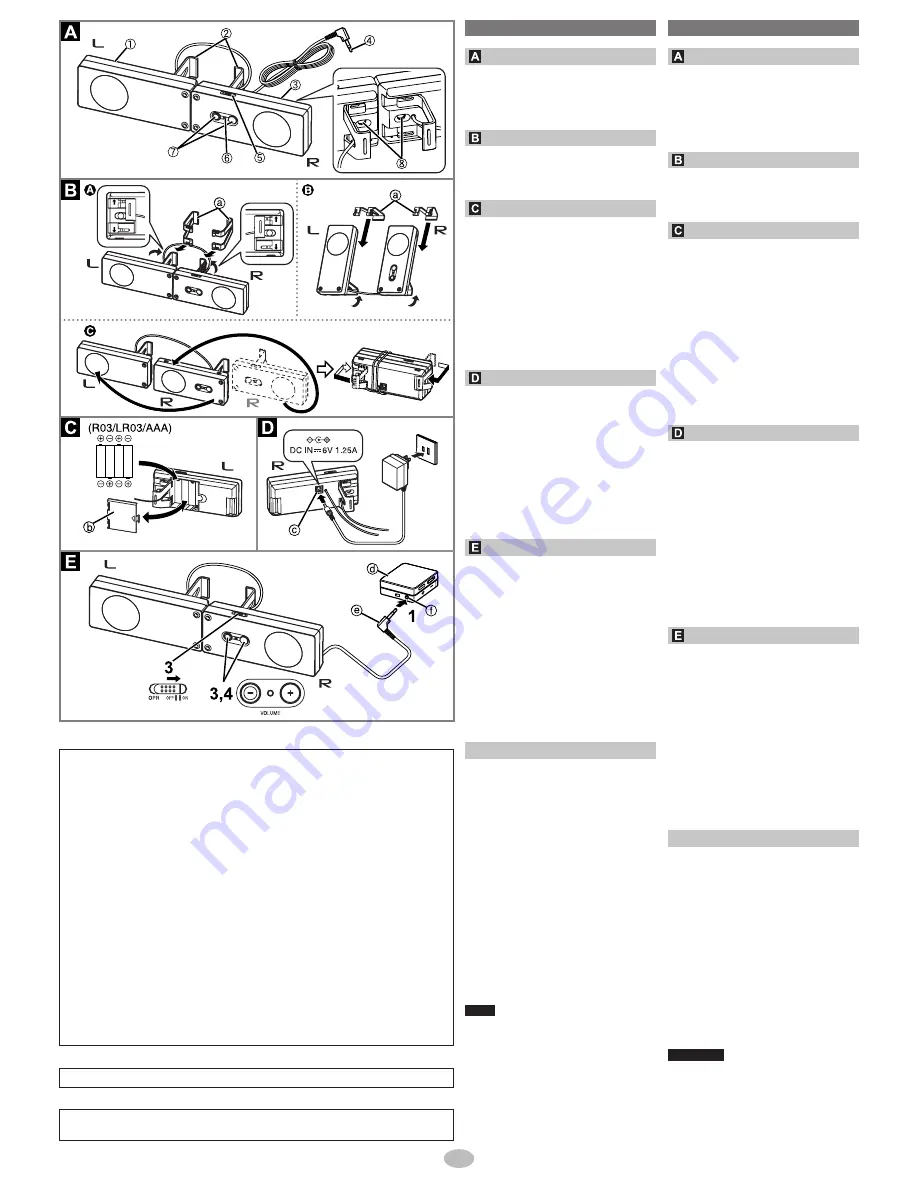
Names of the parts
a
Left speaker
b
Stand (L, R)
c
Right speaker
d
AUDIO IN plug
e
Power switch [OPR, ON/OFF]
f
Operation indicator [OPR]
g
Volume control
h
Bass sound output area
Installation
a
Attach stand L to the left speaker and
stand R to the right speaker.
±
Horizontal positioning
≤
Vertical positioning
≥
Carrying
Using the batteries
1. Open the battery lid
b
.
2. Insert the 4 batteries (not included).
Press down on the
-
end.
Match the poles (
+
and
-
).
3. Close the battery lid
b
.
If rechargeable batteries are to be used,
rechargeable batteries manufactured by
Panasonic are recommended.
When to change the batteries
Replace with new batteries when the [OPR]
indicator starts to fade and/or flash. Also
replace when sound becomes distorted or
fades.
Using the AC adaptor
Connect the AC adaptor (not included).
c
DC IN jack (right speaker)
• Use a DC 6 V (1.25 A) AC adaptor.
• Using an AC adaptor with a capacity lower
than 1.25 A may cause the AC adaptor to
fail.
• The power source switches over to AC
power if you connect the AC adaptor even
when batteries have been inserted.
The unit is in the standby condition when the
AC adaptor is connected. The primary circuit
is always “live” as long as the AC adaptor is
connected to an electrical outlet.
Connection and usage
1. Turn down the volume of the digital
audio player, etc.
d
, and insert the
AUDIO IN plug
e
(3.5 mm stereo) into
the phone jack
f
.
2. Adjust the volume to a level at which
the sound from the sound source will
not be distorted.
3.
Turn down the volume level of
[VOLUME], and set the [OPR] switch
to “ON”.
The [OPR] indicator turns green.
4. Adjust [VOLUME].
If the sound is distorted, turn down the volume
of the unit or the sound source. Using the
unit with the sound distorted may cause the
unit to fail.
Specifications
Speaker unit:
40 mm (1-9/16 in.) full range
Impedance:
4
Ω
Frequency range:
140 Hz - 20 kHz (at –16 dB)
Output power:
2 W + 2 W (10% THD, 1 kHz)
Power requirements:
DC 6 V,
4 batteries (R03/LR03, AAA)
or AC adaptor (6 V, 1.25 A)
Approximate play times:
60 hours (alkaline batteries)
Plug:
L-type 3.5 mm (1/8 in.) stereo
Cord length:
0.5 m (1.6 ft.)
Dimensions (W × H × D):
140 mm × 56 mm × 30 mm (without stand)
(5-1/2 in. × 2-3/16 in. × 1-3/16 in.) (without stand)
140 mm × 56 mm × 82 mm (using the stand)
(5-1/2 in. × 2-3/16 in. × 3-1/4 in.) (using the stand)
144 mm × 56 mm × 60 mm (carrying)
(5-11/16 in. × 2-3/16 in. × 2-3/8 in.) (carrying)
Mass (without batteries):
L:
120
g
(4.2 oz.), R: 140
g
(4.9 oz.)
Note
The actual life of the battery depends on
operating conditions.
Specifications are subject to change without
notice.
Mass and dimensions are approximate.
THE FOLLOWING APPLIES ONLY IN THE U.S.A.
FCC Note:
This equipment has been tested and found to comply with the limits for a Class B digital
device, pursuant to Part 15 of the FCC Rules. These limits are designed to provide
reasonable protection against harmful interference in a residential installation. This
equipment generates, uses and can radiate radio frequency energy and, if not installed
and used in accordance with the instructions, may cause harmful interference to radio
communications. However, there is no guarantee that interference will not occur in a
particular installation. If this equipment does cause harmful interference to radio or television
reception, which can be determined by turning the equipment off and on, the user is
encouraged to try to correct the interference by one or more of the following measures:
•
Reorient or relocate the receiving antenna.
•
Increase the separation between the equipment and receiver.
•
Connect the equipment into an outlet on a circuit different from that to which the receiver
is connected.
•
Consult the dealer or an experienced radio/TV technician for help.
Any unauthorized changes or modifications to this equipment would void the user’s
authority to operate this device.
This device complies with Part 15 of the FCC Rules. Operation is subject to the following two
conditions: (1) This device may not cause harmful interference, and (2) this device must accept
any interference received, including interference that may cause undesired operation.
Responsible Party:
Panasonic Corporation of North America
One Panasonic Way
Secaucus, NJ 07094
Telephone No.: 1-800-211-7262
THE FOLLOWING APPLIES ONLY IN CANADA
This Class B digital apparatus complies with Canadian ICES-003.
CE QUI SUIT NE S’APPLIQUE QU’AU CANADA
Cet appareil numérique de la classe B est conforme à la norme NMB-003 du
Canada.
Nomenclature des pièces
a
Haut-parleur gauche
b
Support (L, R)
c
Haut-parleur droit
d
Fiche AUDIO IN
e
Interrupteur d’alimentation [OPR, ON/
OFF]
f
Témoin de fonctionnement [OPR]
g
Commande de volume
h
Zone de sortie des graves
Installation
a
Fixez le support L au haut-parleur gauche
et le support R au haut-parleur droit.
±
Positionnement horizontal
≤
Positionnement vertical
≥
Transport
Utiliser les piles
1. Ouvrez le couvercle du logement à piles
b
.
2. Insérez 4 piles (non fournies).
Appuyez sur l’extrémité
-
.
Faites correspondre les pôles (
+
et
-
).
3. Fermez le couvercle du logement à
piles
b
.
Si l’on doit utiliser des batteries rechargeables,
il est recommandé d’utiliser des batteries
rechargeables de marque Panasonic.
Quand changer les piles
Remplacez les piles par des neuves lorsque
le témoin [OPR] commence à pâlir et/ou à
clignoter.
Remplacez-les aussi lorsque le son devient
distordu ou lorsqu’il faiblit.
Utiliser l’adaptateur secteur
Branchez l’adaptateur secteur (non
fourni).
c
Prise DC IN (haut-parleur droit)
• Utilisez un adaptateur secteur CC 6 V
(1,25 A).
• Si vous utilisez un adaptateur secteur
d’une capacité inférieure à 1,25 A, il risque
de subir des dommages.
• Même si les piles sont insérées, la source
d’alimentation commutera sur l’alimentation
secteur si vous branchez l’adaptateur.
L’appareil est en mode de veille lorsque
l’adaptateur secteur est branché. Le circuit
primaire demeure sous tension tant que
l’adaptateur secteur est branché sur une
prise de courant.
Raccordement et utilisation
1. Baissez le volume du lecteur audio
numérique, etc.
d
, et insérez la fiche
AUDIO IN
e
(3,5 mm stéréo) dans la
prise audio
f
.
2. Réglez le volume sur un niveau pour
lequel le son de la source sonore ne
sera pas distordu.
3. Baissez le niveau de [VOLUME], et
réglez le commutateur [OPR] sur
“ON”.
Le témoin [OPR] devient vert.
4. Réglez [VOLUME].
Si le son est distordu, baissez le volume de
l’appareil ou de la source sonore. L’appareil
risque de subir des dommages si vous
l’utilisez avec le son distordu.
Fiche technique
Haut-parleur:
40 mm, gamme étendue
Impédance:
4
Ω
Plage de fréquence:
140 Hz - 20 kHz (à –16 dB)
Puissance de sortie:
2 W + 2 W (DHT 10%, 1 kHz)
Consommation:
4 piles CC 6 V (R03/LR03, AAA),
ou adaptateur secteur (6 V, 1,25 A)
Temps de lecture approximatifs:
60 heures (piles alcalines)
Fiche:
3,5 mm stéréo, type L
Longueur du cordon:
0,5 m
Dimensions (L × H × P):
140 mm × 56 mm × 30 mm (sans support)
140 mm × 56 mm × 82 mm (utiliser le support)
144 mm × 56 mm × 60 mm (transport)
Poids (sans les piles):
L : 120
g
, R : 140
g
Remarque
La durée de vie effective de la pile dépend
des conditions d’utilisation.
Spéci
fi
cations sont sujettes à modi
fi
cations
sans préavis.
Les poids et les dimensions sont
approximatifs.
;;;;
;;;;
;;;;
;;;;
;;;;
;;;;
;;;;
;;;
;;;
;;;
;;;
;;;
;;;
;;;
;;
;;
;;
;;;
;;;
;;;
;;;
;;;
;;;
;;;
;;;;
;;;;
;;;;
;;;;
;;;;
;;;;
;;;;
;;;;


