background image

VQT3T13

43

Ad

vanced Operations

Playing tracks registered to the playlist

1

Select the playlist (from P1 to P5) (

 page 11).

2

Press +, – to select the 

fi

 le to play and press 

[

q

 OK].

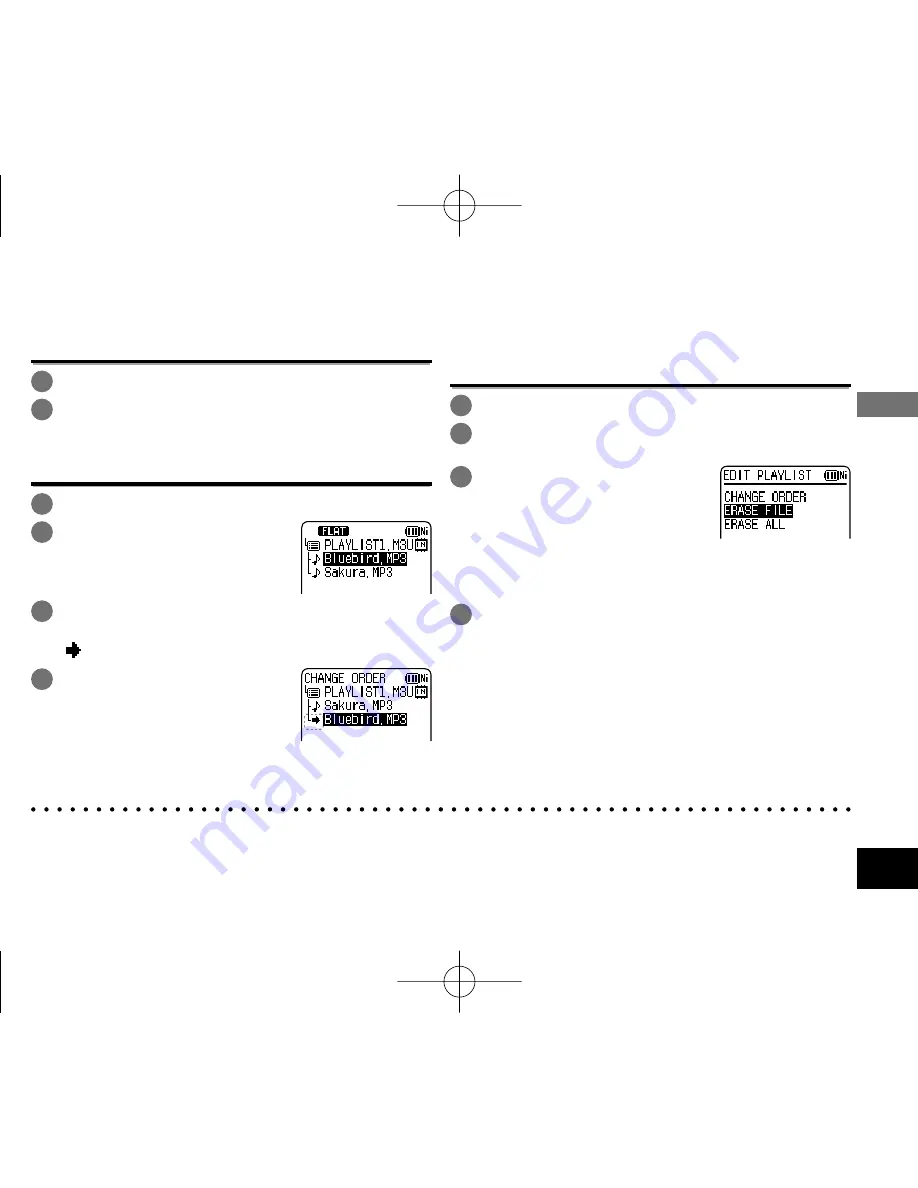
Changing the order of playlist tracks

1

Select the playlist (from P1 to P5) (

 page 11).

2

Press +, – to select the 

fi

 le 

that you want to change 
and press [F1 (EDIT)].

3

Press +, – to select “CHANGE ORDER” and 
press [

q

 OK] to enter.

” is added to the left side of the selected file name.

4

Press +, – to move the 
selected 

fi

 le to the desired 

position and press [

q

 OK] 

to enter.

The track order is changed.

Canceling tracks registered to the 

playlist

1

Select the playlist (from P1 to P5) (

 page 11).

2

Press +, – to select the 

fi

 le that you want to 

erase and press [F1 (EDIT)].

3

Press +, – to select “ERASE 
FILE” and press [

q

 OK] to 

enter.

When canceling all registered tracks:

1

 Press +, – to select “ERASE ALL” and press [

q

 OK] 

to enter.

4

Press +, – to select “YES” and press [

q

 OK] 

to enter.

*

Even if files are erased from the playlist, the original file is not deleted from the unit.

*

If the original file is deleted, the playback elapsed time and file total playback time are displayed as “-:--”.  If this file is 
played, playback skips to the next file after approx. 2 seconds.

*

If you have deleted an original file, also delete the registered file from the playlist.

VQT3T13̲RR-XS410̲400-PP̲En.indd   43

VQT3T13̲RR-XS410̲400-PP̲En.indd   43

2011/06/22   18:35:21

2011/06/22   18:35:21

Summary of Contents for RR-XS410

Page 1: ... or adjusting this product please read the instructions completely Please keep this manual for future reference PP Owner s Manual IC Recorder RR XS410 RR XS400 Model No En Cf For U S A and Puerto Rico only The warranty can be found on pages 86 and 87 Please register via the Internet at www Panasonic com register For Canada only The warranty can be found on pages 84 and 85 VQT3T13 RR XS410 400 PP E...

Page 2: ... rechargeable battery As for the U S A and Puerto Rico contact us for rechargeable battery replacement Accessory Purchases United States and Puerto Rico on page 87 Supplied accessories Recording Recorded file WMA MP3 music file Connecting this unit to a computer Recording Playback using the Timer Playing back to listen Recharge Use USB power Move and organize recording music data files You can rec...

Page 3: ...Self timer 25 Preventing unnecessary recording VAS 26 Past recording function PRE RECORD 27 Recording by connecting an external microphone 28 Copying to other devices 29 Recording from other devices 30 Index function 33 Changing the playback speed 34 A B Repeat play 34 Playback from a specified position TIME SEARCH 35 Slight return playback 35 Repeat play REPEAT 36 Skip at regular intervals TIME S...

Page 4: ... 66 Troubleshooting guide 71 Specifications 78 Care and use 80 Maintenance 83 Product Service 83 Limited Warranty ONLY FOR CANADA 84 Limited Warranty ONLY FOR U S A AND PUERTO RICO 86 The serial number of this product can be found on either the back or the bottom of the unit Please note it in the space provided below and keep for future reference MODEL NUMBER ______________________ SERIAL NUMBER U...

Page 5: ...cover crUSB plug cover csUSB plug ctSD card slot cover dkSD card slot 1Built in microphone 2LCD display 3F1 4F2 The F1 and F2 buttons operate the function shown in the display 5g STOP RETURN 6 REC 7 Volume up 8u Fast backward 9q OK bkLIST bl Volume down The enclosed Canadian French label sheet corresponds to English display on the unit 1 2 bo cp cq bp bq br bs bt 3 5 8 7 4 cl cm cn ck bn bm bl bk ...

Page 6: ... 52 OVER indication page 14 Low cut filter page 21 Synchro recording page 32 Remaining recording time Input Built in microphone External microphone page 28 Line in page 30 Microphone sensitivity page 21 Recording level page 22 VAS page 26 Screen display during playback Repeat indication pages 34 36 Sound EQ page 38 Status indication page 34 File name page 61 Playback elapsed time Playback status b...

Page 7: ...and slide until a click sound is heard Storing the USB plug 2 Insert the unit s USB plug into the computer Insert the USB plug straight in the same direction as that of the terminal The first time you connect the unit to your PC Because multiple Found New Hardware messages will appear do not disconnect the unit from your PC until all messages disappear Never disconnect the unit or remove the SD ca...

Page 8: ...tch Hold off once and switch Hold on again If the temperature of this unit has risen or an undesignated rechargeable battery has been inserted is displayed page 71 When the computer is in sleep mode or is restarted recharging may be impossible Charging is possible even during data transfer The rechargeable battery does not need to be fully depleted before recharging The rechargeable battery or thi...

Page 9: ...s unit may be used for a while if turned on again However the unit may suddenly turn off during operation due to the low level of battery Some level of battery is required when recording or performing Deleting files page 17 Dividing files page 44 Deleting index page 33 FORMAT page 53 If the battery indicator shows blinking and these operations are performed the power turns OFF due to the battery e...

Page 10: ...dication method and press i 24H and AM PM are displayed for the 24 hour display and the 12 hour display respectively 8 Press to set the hour and press i 9 Press to set the minute To change the setting press u i to move between the items and then press again to make the setting 10 Press q OK to enter The date and time are set and the clock starts to operate To exit the setting screen press F2 CLOSE...

Page 11: ...ed data is called a file Folder This is where files are stored This unit has the following folders A B C and D folders for microphone recording page 13 L folder for files recorded from other devices connected to this unit page 30 folder Recycle where deleted files are placed page 47 M folder for music page 41 Using each folder according to the purposes of recording enables you to search files easi...

Page 12: ...r details of folder hierarchy see page 63 Pressing u several times on the screen in step 5 will switch the screen to screens in steps 3 or 4 Also it is possible to move among folder hierarchies to select folders and files When there is no file in the selected folder No File is displayed The A B C D L M and recycle bin folders are displayed as MIC_A MIC_A_SD MIC_B MIC_B_SD MIC_C MIC_C_SD MIC_D MIC_...

Page 13: ...size exceeds 2 GB during recording the recording stops tentatively at the point when the data reaches 2 GB Then the recording resumes with a new file Recording is not available during the interval approx 2 seconds from when the recording stops to when the recording resumes Note if your finger or an object touches this unit during recording the noise will be recorded through the microphone 3 Press ...

Page 14: ...ossible recording time in the selected recording mode 7 Microphone sensitivity page 21 See page 6 for other screen displays Note when recording This unit is equipped with a high sensitivity microphone Accordingly if a breath or wind directly hits the microphone during recording the wind cutting sound may be recorded or voice may be difficult to hear 1 This can be prevented by blocking the wind wit...

Page 15: ...a file and the playback jumps to the beginning of the file To return to the previous file press u within approx 1 second from the beginning of the file Fast backward Fast forward Search Press and hold u i To stop Press g STOP RETURN Playing Press u i to select Each time you press the file number changes Folder name Memory usage indication Screen display example while stopped File number Total numb...

Page 16: ...urrent time This is not displayed for the M MUSIC folder To exit the information screen Press g STOP RETURN Playing Connect stereo earphones not included Plug type ø 3 5 mm 1 8 stereo mini plug Listening to the audio using earphones Built in speaker Insert securely Monitoring the recording in progress Adjusting the volume You can adjust the volume by pressing but the recording level page 22 is not...

Page 17: ...E Then the screen to delete the file appears Select the folder and press ERASE Then the screen to delete all files in the folder appears When the recycle bin function is ON files are moved to the recycle bin folder When the recycle bin function is OFF files are deleted immediately without being moved to the recycle bin folder page 47 Files in the MUSIC M folder are deleted immediately irrespective...

Page 18: ...You can register your own settings Recording mode 20 MP3 192 kbps MP3 320 kbps PCM 48 kHz MP3 64 kbps MP3 192 kbps MP3 192 kbps MP3 192 kbps Microphone sensitivity 21 HIGH HIGH HIGH HIGH HIGH HIGH HIGH Recording level 22 AUTO MANUAL MANUAL AUTO AUTO AUTO AUTO Low cut filter 21 ON OFF OFF ON ON ON OFF Recording peak limiter 23 OFF ON OFF OFF OFF OFF OFF Self timer recording 25 OFF OFF OFF OFF OFF O...

Page 19: ...to enter To select the changed recording scene select LOAD page 18 To exit the setting screen press F2 CLOSE Initializing recording scene settings Returns individual recording scenes whose settings have been changed to the factory settings Press g STOP RETURN to stop the unit 1 Press F1 SCENE 2 Press u i to select the recording scene you want to initialize and press q OK to enter 3 Press to select...

Page 20: ... mode is displayed You can change the sound quality This allows you to provide the best sound quality for the particular purpose Depending on the recording mode setting the sound quality and remaining recording time page 79 will differ High quality recording Long recording Recording format PCM 48 kHz PCM 44 1 kHz MP3 320 kbps MP3 192 kbps MP3 128 kbps MP3 64 kbps MP3 32 kbps When the recording mod...

Page 21: ...he microphone sensitivity is High or Low or is displayed respectively Switching microphone sensitivity Sound of low frequency range is reduced during microphone recording This is effective when reducing noise of air conditioning equipment etc while recording at a meeting etc Press g STOP RETURN to stop the unit 1 Press MENU 2 Press to select MIC REC MENU and press q OK to enter 3 Press to select L...

Page 22: ...nter 3 Press to select REC LEVEL ADJ and press q OK to enter 4 Press to select MANUAL and press q OK to enter To exit the setting screen press F2 CLOSE The recording level is displayed Adjusting the recording level manually Set the recording level adjustment to MANUAL beforehand When the recording level adjustment is AUTO the unit does not enter the recording standby 1 Press and hold REC for 1 sec...

Page 23: ...W CUT FILTER page 21 and recording EQ page 24 can be set Setting the recording peak limiter to ON Even if the recording level adjustment is MANUAL when the excessive volume is input the recording level is automatically adjusted and the sound distortion is reduced Press g STOP RETURN to stop the unit 1 Press MENU 2 Press to select MIC REC MENU and press q OK to enter 3 Press to select PEAK LIMITER ...

Page 24: ...mode name is not displayed after exiting the setting screen Pressing REC starts recording EQ mode Effect and application FLAT This basic mode does not emphasize a specific sound range EXTRA BASS Emphasize the bass range strongly BASS Emphasize the bass range slightly MIDDLE Emphasize the middle range BASS TREBLE Emphasize the bass and treble ranges slightly TREBLE Emphasize the treble range slight...

Page 25: ...the time and press q OK to enter The factory setting is OFF To exit the setting screen press F2 CLOSE When REC is pressed countdown starts Then recording starts after the set time The recording indicator blinks during countdown Once the self timer is set the setting is preserved until the self timer setting is set to OFF or the settings of this unit are initialized page 54 Pressing REC during coun...

Page 26: ...ording pause state and lights up While is blinking the AUTO POWER OFF page 52 function does not operate Preventing unnecessary recording VAS Set the recording level adjustment to AUTO beforehand page 22 Press g STOP RETURN to stop the unit 1 Press MENU 2 Press to select MIC REC MENU and press q OK to enter 3 Press to select VAS and press q OK to enter 4 Press to select ON and press q OK to enter T...

Page 27: ...ss REC The recording indicator lights and recording is started continuing directly after the preserved audio data To stop Press g STOP RETURN The sound that occurs when the recording button is pressed is also recorded When the built in microphone is used etc When the recording level adjustment page 22 is set to MANUAL the unit enters the past recording standby and recording standby at the same tim...

Page 28: ...ecording by connecting an external microphone to the external microphone Line in jack of this unit Read the operating instructions for the connected device If the recording level is too low or high adjust the microphone sensitivity page 21 The built in microphone of this unit does not work if another device is connected to the external microphone Line in jack If the connected external microphone i...

Page 29: ...l device 2 Start recording on the external device 3 Play the file that you want to copy on this unit Read the operating instructions for the connected device Use the connection cable that matches monaural stereo of the connected device Wrong connection may cause recording trouble i e Only 1 channel is copied The copied sound quality may differ from the sound quality of this unit Adjust the volume ...

Page 30: ...the line output terminal of portable device or the line output terminal of component stereo select HIGH MEDIUM or LOW respectively The factory setting is HIGH 6 Press F2 CLOSE 7 Connect the external device L R Insert securely Audio Cable without resistor not included Audio device To LINE OUT audio out terminal To audio output headphone terminal Plug type ø 3 5 mm 1 8 stereo mini plug Connect with ...

Page 31: ...e line input are saved to the L folder This unit has the following synchro recording function This function detects the silence between tracks etc and then records each track into different files such as a first track second track etc If detecting sound from the external device recording starts automatically If detecting silence for approx 2 seconds or more recording is paused Detecting sound agai...

Page 32: ...rehand 1 Perform steps 1 to 11 on pages 30 and 31 When connecting to the headphone output terminal of the external device the synchro recording may not function properly When approx two seconds or more of silence cannot be detected or depending on the combination of external devices the synchro recording may not function Selecting line recording mode The sound quality can be changed when recording...

Page 33: ...ted when the file is deleted or divided When the battery indicator shows blinking indexes cannot be added Also adding the index may be impossible on the border of and blinking During playback even if you press u at the position within approx 2 seconds after the index point playback does not stop at the point Deleting index Select a file which has Index to be deleted page 15 Press g STOP RETURN to ...

Page 34: ...e displayed as and respectively The speed cannot be adjusted for playback using folder cue page 42 or timer playback page 48 Changing the playback speed Playback repeats between the start point A and finish point B if those points are set 1 Press A B while playing The start point A is set and blinking and are displayed 2 Press A B at the finish point B The display changes to lighting and repeat pl...

Page 35: ...ayback from a specified position TIME SEARCH Slight return playback This function returns a short amount of time during playback to enable you to listen again It is a useful function for language learning or if you miss hearing something 1 Press q OK during playback Each time the button is pressed playback rewinds by approx 3 seconds factory setting Setting the return time Put the unit into the st...

Page 36: ...last file in one folder The unit is stopped when the playback finishes ONE Plays one file repeatedly FOLDER REPEAT Plays all files in the folder repeatedly FOLDER RANDOM Plays all files within the folder repeatedly in random order ALL REPEAT For the MUSIC M folder all files within the folder are played repeatedly For other folders the operation is the same as that for FOLDER ALL RANDOM For the MUS...

Page 37: ...ress q OK to enter 4 Press to select the time and press q OK to enter You can set the skip interval to 5 sec 10 sec 30 sec 1 min 5 min 10 min or 15 min The factory setting is 5 sec To exit the setting screen press F2 CLOSE Skip at regular intervals TIME SKIP This function skips the set time using skip operation page 15 during playback This allows you to quickly move to a position for playback or r...

Page 38: ...s displayed EQ mode Effect and application FLAT The sound equalizer function is not used You hear the original sound without any change BASS Emphasize the bass range strongly CLEAR Emphasize the treble range strongly HEAVY Emphasize the bass and treble ranges slightly SOFT Emphasize the middle range VOICE Reduce noise to make human voice easily heard USER This mode enables adjustment of frequency ...

Page 39: ...out 1 2 3 This unit is compatible with 2 GB microSD cards and 4 GB to 16 GB microSDHC cards As of June 2011 This unit may not operate correctly depending on the manufacturer or type of SD card For details on SD cards that are confirmed to operate correctly according to our manufacturing standards see the support site below http panasonic net support If an SD card is inserted but microSD is not dis...

Page 40: ...LE SEARCH Only files in the recycle bin folder are displayed in a list File search 1 Press LIST while the unit is stopped microSD CARD is only displayed when an SD card is inserted 2 Press to select R FILE SRCH and press q OK to enter 3 Press to select the type of file search and press q OK to enter When CALENDAR SRCH is selected Press u i to select the recorded date and press q OK to enter The cu...

Page 41: ... folder up to 199 files per one folder can be recognized and played back If subfolders are created number of files playable is reduced by the equivalent number of subfolders created Only WMA MP3 files and PCM WAV files recorded on this unit can be played Copyright protected MP3 music files cannot be played WMA MP3 music files with variable bit rate may be played but the playback elapsed time displ...

Page 42: ...acks in the MUSIC M folder to a playlist and play them in the desired order Registering your favorite tracks to a playlist 1 Select the MUSIC M folder page 11 2 Press to select the file or the folder and press F1 PLAYLIST to enter When selecting folders or selecting files by switching folders press u and you can move within hierarchies For details of file and folder selection methods see page 12 3...

Page 43: ...ylist 1 Select the playlist from P1 to P5 page 11 2 Press to select the file that you want to erase and press F1 EDIT 3 Press to select ERASE FILE and press q OK to enter When canceling all registered tracks 1 Press to select ERASE ALL and press q OK to enter 4 Press to select YES and press q OK to enter Even if files are erased from the playlist the original file is not deleted from the unit If t...

Page 44: ... setting screen left 3 Press to select YES and press q OK to enter While the file is being divided the status indicator flashes Files within the MUSIC M folder and recycle bin folder cannot be divided A file length of approx 2 seconds or more is necessary for dividing a file You cannot divide a file at the beginning of the file Divided files cannot be recovered It is recommended that you make a ba...

Page 45: ...tus indicator flashes If you press F2 CLOSE before combining is complete the combine process is canceled Combined files cannot be returned to their original state It is recommended that you make backup copies of the files in advance If indexed files are combined the indexing is erased The combined file is saved in the same folder as the previous files Files cannot be combined in following cases Fi...

Page 46: ...eing copied the status indicator flashes Moving files Select MOVE in step 1 on the left to move files The operation is the same as that for file copy Editing Copying or moving files If you press F2 CLOSE before copying or moving is complete the process is canceled Files in the MUSIC M folder or recycle bin folder cannot be copied or moved When the battery indicator displays blinking or files canno...

Page 47: ...r flashes and the selected file is returned to the end of the original folder Press q OK to return to the screen in step 3 If FOLDER FULL CAN T RESTORE is displayed folder has reached the maximum recordable number 199 Delete files in the folder and then try the procedure again from the beginning Emptying the recycle bin folder When the recycle bin folder is emptied all of the files in the recycle ...

Page 48: ...select the setting and press q OK to enter Repeat steps 1 and 2 to complete the settings 5 Press to select OK and press q OK to enter To exit the setting screen press F2 CLOSE Be sure to perform the OK operation in step 5 If this operation is not performed the timer will not operate correctly If a button such as F2 CLOSE is pressed while setting the timer REGISTER SETTING may be displayed Select Y...

Page 49: ...the alarm sound FILE Plays a file The file list of the folder being selected is displayed Press to select the file and press q OK When selecting files by switching folders press u and you can move within hierarchies For details of file and folder selection methods see page 12 SOURCE 3 MIC Microphone recording LINE Records sound from an external device MODE 3 PCM 48kHz PCM 44 1kHz MP3 320kbps MP3 1...

Page 50: ...k if the set file is deleted the alarm sounds for approx 30 seconds at the timer start time When the file length of the specified file is shorter than the period from timer start time until timer end time the timer playback is stopped before the timer end time set for the timer playback If the repeat setting is set to items other than OFF the selected file is repeatedly played back with 1 track re...

Page 51: ...et OFF No operation beep ON Operation beep is ON The factory setting is ON When ON is selected press to select your preferred volume and press q OK to enter The factory setting is MIDDLE REC LED Recording indicator You can choose whether to set the recording indication light ON or OFF OFF Not lit ON Lit The factory setting is ON Even if it is set to OFF REC LED lights on blinks as a status indicat...

Page 52: ...hen you forget to turn off the power AUTO POWER OFF 0 min OFF to 15 min The factory setting is 15min You can set the time in 1 minute increments When OFF is set the AUTO POWER OFF function does not operate BACKLIGHT Set the backlight lighting time when the button is pressed Lighting time OFF does not light 5 sec 15 sec always ON The factory setting is 15 sec The backlight may not light when the re...

Page 53: ...restored FORMAT All files on the internal memory or SD card are deleted Deleted files cannot be recovered 1 Select INTERNAL MEMORY or microSD CARD and press q OK to enter 2 Select YES and press q OK to enter Save necessary files to the computer or external devices before formatting When formatted files in the recycle bin are also deleted and cannot be restored Canceling is not possible while forma...

Page 54: ...ault state Select YES press q OK to enter and the settings are initialized LANGUAGE Set the language displayed on the screen The factory setting is ENGLISH VERSION You can check the firmware version of this unit Common menu VQT3T13 RR XS410 400 PP En indd 54 VQT3T13 RR XS410 400 PP En indd 54 2011 06 22 18 35 22 2011 06 22 18 35 22 ...

Page 55: ...ntries MPEG Layer 3 audio coding technology licensed from Fraunhofer IIS and Thomson IBM and PC AT are registered trademarks of International Business Machines Corporation of the U S Macintosh and Mac OS are trademarks of Apple Inc Other system names and product names appearing in this document are in general the registered trademarks or trademarks of the respective developer companies Note that t...

Page 56: ...USB extension cable with a ferrite core when connecting to computer The first time you connect the unit to your PC Because multiple Found New Hardware messages will appear do not disconnect the unit from your PC until all messages disappear Screen display during connection with PC ACCESS During connection During file transfer This unit cannot be operated while connected to the computer When the un...

Page 57: ...or the computer g Disconnecting the unit Double click the icon Windows XP Windows Vista Windows 7 on the task tray at the bottom of the computer screen and follow the on screen instructions to remove the unit The icon may not be displayed depending on the OS settings After the unit is removed this unit turns off When this unit is turned on after deleting etc files on this unit using the computer U...

Page 58: ...ower source indication g Disconnecting the unit After switching off the unit s power disconnect the unit When using USB power the continuous recording time for 1 file is a maximum of 24 hours However if the file size exceeds 2 GB during recording recording is stopped at 2 GB and recording is then restarted as a new file Recording is not performed for the approx 2 seconds between recording stopping...

Page 59: ... click to open the IC RECORDER G this unit Folder structure on this unit page 63 3 Right click to open the folder This unit s files are displayed Depending on the computer settings a file with the extension INX may be displayed This file contains index information If this file is deleted from your computer the index information will be deleted Opening folders of this unit This example assumes that...

Page 60: ...IC_A MIC_B MIC_C MIC_D LINE and MUSIC folders are generated next time this unit is turned on The files in the folders with changed names cannot be played on this unit Do not change the folder names Connect this unit to a Computer beforehand page 56 Importing files recorded on this unit to a computer 1 Select the recorded file in this unit right click and select Copy 2 Select a folder in the comput...

Page 61: ...by file deletion or editing Deleting combining a recorded file on this unit will move subsequent files forward and file numbers are automatically reassigned example When 002_110925_0905A0 MP3 is deleted 001_110920_1720A0 MP3 002_110925_0905A0 MP3 003_111003_1233A0 MP3 004_111231_1915A0 MP3 001_110920_1720A0 MP3 002_111003_1233A0 MP3 003_111231_1915A0 MP3 File number parts of all file names followi...

Page 62: ...es 41 65 File name in the MUSIC folder and order of playback If numbers are added at the beginning of file names in the MUSIC folder playback is performed from the file with the smallest number in priority Up to 3 digits of number can be identified If additional methods differ such as 1 01 001 then 001 to 999 takes the first priority 01 to 99 takes the second and 1 to 9 takes the third priority Yo...

Page 63: ...D MIC_C MIC_C_SD MIC_D MIC_D_SD LINE LINE_SD MUSIC 001_110920_1720A0 MP3 002_110925_0905A0 MP3 DATA RECYCLE Album A1 Music A1 1 MP3 Album A2 Album A2 1 PLAYLIST1 M3U PLAYLIST2 M3U The MUSIC folder is used when transferring WMA MP3 music files etc from the computer You can create subfolders in the MUSIC folder The structure example is shown as below Playback is available to the second hierarchy Fil...

Page 64: ...in and are completely deleted from the unit irrespective of the recycle bin function settings Numbers such as 001_ are attached to the start of file names for files moved to the recycle bin to show the order in which they were moved This number is only displayed on a computer Folder structure on this unit VQT3T13 RR XS410 400 PP En indd 64 VQT3T13 RR XS410 400 PP En indd 64 2011 06 22 18 35 23 201...

Page 65: ...sed on the numbers page 62 g Transferring DRM protected WMA files This unit supports PD DRM Transferring DRM protected WMA files purchased at a music distribution site to portable devices this unit etc may be restricted Use Windows Media Player to transfer music files DRM10 is not supported You can enjoy music by transferring music files stored in the computer to this unit This unit can play back ...

Page 66: ...t be played Q A Frequently Asked Questions Error message Checkpoints NO PLAYABLE FILES NO FILE This is displayed when there are no files in the folder and you attempt to play back perform Time Search or delete a file PLEASE INSERT microSD CARD This is displayed when you attempt to format without the SD card inserted This is displayed when copying or moving a file within the LINE folder without the...

Page 67: ...folder page 11 INDEX FULL This is displayed when you attempt to add the index exceeding the maximum number 36 of indexes that can be added in 1 file INDEX ERROR This is displayed when you attempt to add the index at the same position This is displayed when you attempt to add the index while the battery indicator shows blinking CAN T CREATE ANY MORE FILES IN THIS FOLDER The file cannot be divided b...

Page 68: ...layed when the total size of files to be combined exceeds 2 GB CAN T COMBINE DIFFERENT FILE FORMATS REC QUALITY This is displayed when you attempt to combine files whose recording modes differ from each other LOW BATTERY CHARGE BATTERY BEFORE FILES LOW BATTERY REPLACE BATTERY BEFORE FILES This is displayed when you attempt to copy combine or move files while the battery indicator shows blinking or...

Page 69: ...istered with each playlist page 42 CAN T ADD ALL FILES TO PLAYLIST This is displayed when not all files can be registered because the number of files exceeds the maximum number 99 of files that can be registered while registering the files with playlist page 42 CAN T EDIT PLAYLIST NO FILE The editing operation for the playlist is impossible because there are no files registered in the selected pla...

Page 70: ...d the playback range max 3 000 files for all repeat random of MUSIC file or when you attempt to set all repeat random while selecting files beyond the playback range max 3 000 files page 36 indication differs depending on the operations Error messages VQT3T13 RR XS410 400 PP En indd 70 VQT3T13 RR XS410 400 PP En indd 70 2011 06 22 18 35 23 2011 06 22 18 35 23 ...

Page 71: ...connect the unit from the computer and leave it for a while Then recharge the battery again Are you trying to recharge a battery other than the specified rechargeable battery or an alkaline battery Insert the specified rechargeable battery included and recharge it The rechargeable battery is not properly inserted Remove the battery completely once Then insert it again Is alkaline battery set in th...

Page 72: ...ding data may not be updated There may be no space left in the memory Sound skipping on the recorded file You formatted the internal memory of this unit or the SD card using the computer If they are formatted using the computer the optimum performance of this unit may not be achieved Format it on this unit page 53 This unit may not operate correctly depending on the SD card manufacturer or type of...

Page 73: ...ng mode page 20 or microphone sensitivity page 21 and set the most appropriate recording environment Recorded sound differs from the actual sound Is Recording EQ page 24 or LOW CUT FILTER page 21 set Recorded sound is too loud or too low Is the recording level adjustment set to manual page 22 If so set the proper recording level page 23 or set the recording level adjustment setting to AUTO Switch ...

Page 74: ...files per one folder can be recognized and played back If subfolders are created number of files playable is reduced by the equivalent number of subfolders created Transferred files exceeding the maximum number cannot be played Copyright protected files cannot be played even if they are transferred via Explorer Transfer them via Windows Media Player page 65 Was the file erased after registered wit...

Page 75: ...le battery recharge it page 7 Is there sufficient space in the internal memory Delete unneeded files page 17 Is the unit connected to the computer etc Disconnect it from the computer If the unit is still used even if the timer playback time comes the current operation is prioritized Stop operations except when the unit is stopped If another recording is in progress even if the timer recording star...

Page 76: ...red from the computer are Read only or subfolders are created in the MUSIC folder they cannot be deleted on this unit Delete them on the computer page 60 Free space does not increase even after files were deleted Empty the recycle bin folder page 47 Cannot divide a file Is there sufficient space in the internal memory 199 recorded files maximum recordable number may be present in the folder If the...

Page 77: ...the hub once and directly connect this unit to the USB terminal Is the network drive assigned If the network drive is assigned the drive letters alphabet letters in the drive name conflict and this unit s drive name may become invisible Change the assignment of the network drive before connection The file name of the recorded file or recording date and time information differ from the real date an...

Page 78: ...21 000 Hz MP3 320kbps 40 Hz to 20 000 Hz MP3 192kbps 40 Hz to 17 000 Hz MP3 128kbps 40 Hz to 7 500 Hz MP3 64kbps 40 Hz to 6 500 Hz MP3 32kbps Built in microphone S N 45 dB PCM 44 1 kHz Filter JIS A USB USB2 0 Hi Speed DC 5 V 500 mA Audio Output Earphone ø 3 5 mm 1 8 16 Ω Max 12 12 mW Speaker Output ø 16 mm 5 8 8 Ω 80 mW RMS Audio Input External Microphone Line in ø 3 5 mm 1 8 1 00 mV plug in power...

Page 79: ...ding indicator OFF recording level adjustment setting AUTO 2 When audio is output from speaker Volume 9 Playback speed control 100 Standard recordable time may be less depending on the operating conditions RR XS410 When using the internal memory 4 GB Recording mode Recording time Bit rate PCM 48kHz Stereo approx 5 h 30 min 1536 kbps PCM 44 1kHz Stereo approx 6 h 1411 kbps MP3 320kbps Stereo approx...

Page 80: ...t to recharge dry cell batteries Battery mishandling can cause electrolyte leakage which can damage items the fluid contacts and may cause a fire If electrolyte leaks from the batteries consult your dealer Wash thoroughly with water if electrolyte comes in contact with any part of your body Keep the AAA LR03 batteries and the rechargeable batteries out of reach of children to prevent swallowing Ac...

Page 81: ...ommercially sold data erasing software for PC or format the internal memory or SD card and then perform recording in soundless state to overwrite them g Allergies Discontinue use if you experience discomfort with the earphones or any other parts that directly contact your skin Continued use may cause rashes or other allergic reactions microSDHC Logo is a trademark of SD 3C LLC This product is prot...

Page 82: ...ing Over time your hearing comfort level adapts to higher volumes of sound So what sounds normal can actually be loud and harmful to your hearing Guard against this by setting your equipment at a safe level BEFORE your hearing adapts To establish a safe level Start your volume control at a low setting Slowly increase the sound until you can hear it comfortably and clearly and without distortion On...

Page 83: ...ety check After repairs or service ask the servicer to perform safety checks to confirm that the unit is in proper working condition Product information For product information or assistance with product operation In the U S A and Puerto Rico refer to Customer Services Directory United States and Puerto Rico on page 87 In Canada contact the Panasonic Canada Inc Customer Care Centre at 1 800 561 55...

Page 84: ...not sold as is and which product was delivered to you in new condition in the original packaging IN ORDER TO BE ELIGIBLE TO RECEIVE WARRANTY SERVICE HEREUNDER A PURCHASE RECEIPT OR OTHER PROOF OF DATE OF ORIGINAL PURCHASE SHOWING AMOUNT PAID AND PLACE OF PURCHASE IS REQUIRED LIMITATIONS AND EXCLUSIONS This warranty ONLY COVERS failures due to defects in materials or workmanship and DOES NOT COVER ...

Page 85: ...t for illustration only In certain instances some jurisdictions do not allow the exclusion or limitation of incidental or consequential damages or the exclusion of implied warranties so the above limitations and exclusions may not be applicable This warranty gives you specific legal rights and you may have other rights which vary depending on your province or territory CONTACT INFORMATION For prod...

Page 86: ...no charge for parts This Limited Warranty excludes both parts and labor for non rechargeable batteries antennas and cosmetic parts cabinet This warranty only applies to products purchased and serviced in the United States or Puerto Rico This warranty is extended only to the original purchaser of a new product which was not sold as is Mail In Service For assistance in the U S A and Puerto Rico in o...

Page 87: ...warranty lasts so the exclusions may not apply to you This warranty gives you specific legal rights and you may also have other rights which vary from state to state If a problem with this product develops during or after the warranty period you may contact your dealer or Service Center If the problem is not handled to your satisfaction then write to the warrantor s Consumer Affairs Department at ...

Page 88: ... or relocate the receiving antenna Increase the separation between the equipment and receiver Connect the equipment into an outlet on a circuit different from that to which the receiver is connected Consult the dealer or an experienced radio TV technician for help FCC Caution To assure continued compliance follow the attached installation instructions and use only shielded interface cables with fe...

Reviews: