RQT5685
5
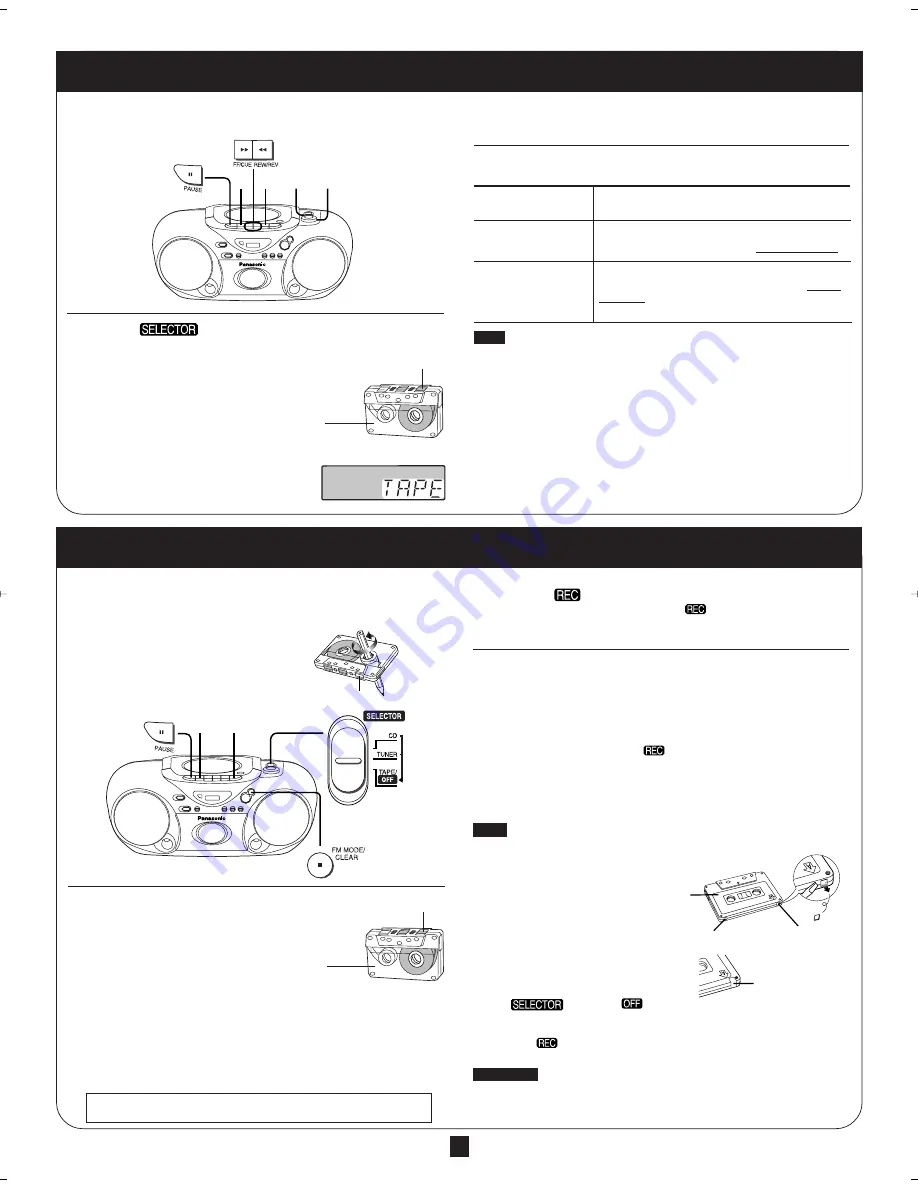
This unit is suitable for playing normal tapes, but high and metal position
tapes will not be played to their full potential.
1
Switch [
] to “TAPE/
S
”.
○
○
○
○
○
○
○
○
○
○
○
○
○
○
○
○
○
○
○
○
○
○
○
○
○
○
○
○
○
○
○
○
2
Press [
L
/
c
STOP/EJECT] to open the
tape lid and load the tape.
Close the tape lid by hand.
○
○
○
○
○
○
○
○
○
○
○
○
○
○
○
○
○
○
○
○
○
○
○
○
○
○
○
○
○
○
○
○
3
Press [
-
PLAY] to start play.
Power comes on and play starts.
Note
• The unit’s power is on in the pause mode. Stop tape to turn the unit off by
pressing [
L
/
c
STOP/EJECT] when leaving the unit.
• Do not press [
-
PLAY] when rewinding or fast-forwarding, as this may
jam the tape.
Be sure to press [
L
/
c
STOP/EJECT] before the next operation.
Full auto-stop
The automatic stop system will release the buttons when the tape reaches
the end during play, recording, fast forwarding or rewinding.
○
○
○
○
○
○
○
○
○
○
○
○
○
○
○
○
○
○
○
○
○
○
○
○
○
○
○
○
○
○
○
○
4
Adjust the volume.
To stop play
Press [
L
/
c
STOP/EJECT]. (Power is switched off.)
You can record radio broadcasts or CDs.
Before recording
• This unit is suitable for recording normal tapes, but it cannot record
onto high and metal position tapes to their full potential and prior
recordings will not be erased correctly.
• The recording level is set automatically.
• Take up the leader tape before proceeding.
1
Press [
L
/
c
STOP/EJECT] to open
the tape lid and load the tape.
Close the tape lid by hand.
○
○
○
○
○
○
○
○
○
○
○
○
○
○
○
○
○
○
○
○
○
○
○
○
○
○
○
○
○
○
○
○
2
Select the source to be recorded.
When recording radio broadcasts
Tune in the station.
(Do steps 1–4 of “Normal tuning” on page 3.)
When recording CDs
Insert the CD to be recorded.
(Do steps 1–3 of “Normal play” on page 4.)
If you want to record programmed tracks, program desired
tracks before proceeding to step 3.
○
○
○
○
○
○
○
○
○
○
○
○
○
○
○
○
○
○
○
○
○
○
○
○
○
○
○
○
○
○
○
○
3
Press [
[
] to start recording.
[
-
PLAY] is also depressed with [
[
].
Recording starts (one side only).
The CD also starts playing if in CD mode.
To stop recording
Press [
L
/
c
STOP/EJECT]. (The CD does not stop.)
To stop recording temporarily
Press [
J
PAUSE]. (The CD does not stop.)
Press once again to resume recording.
To record on the other side of the tape
Turn the tape over and press [
[
].
If the CD finishes before the tape
Recording continues. Press [
L
/
c
STOP/EJECT] to stop it.
If the tape finishes before the CD
The CD continues playing. Press [
L
] to stop it.
Note
Noise may be recorded if this unit is near a TV. Keep the units at least 1.5
meters apart.
Erasure prevention
Use a screwdriver or similar
object to break out the tab.
To re-record on a protected cassette
Cover the hole with adhesive tape.
To erase a tape
1. Set [
] to “TAPE/
”.
2. Insert the tape with the side to be erased facing towards you and the
exposed tape facing up.
3. Press [
[
].
[
-
PLAY] is depressed at the same time.
Reference
Changes to volume and sound quality do not affect recording.
To prevent interruptions to recording, supply AC power to the unit or re-
place the batteries.
To pause
To rewind/
fast-forward
To find a particular
spot
Press [
J
PAUSE] during playback.
To resume, press [
J
PAUSE].
Press [
(
REW/REV] (to rewind) or
[
)
FF/CUE] (to fast-forward) in the stop mode.
Press [
(
REW/REV] (to search backward)
or [
)
FF/CUE] (to search forward) during
playback.
Play is resumed when the button is released.
Listening to tapes
Recording
Leader tape (Recording cannot be made.)
Exposed tape facing
upward
Side to be recorded
facing you
Exposed tape facing
upward
Side to be played
facing you
Tab for Side A
Tab for Side B
Adhesive tape
Side A
3
4
1
2
3
1
p5-7
3/25/05, 4:06 AM
5


