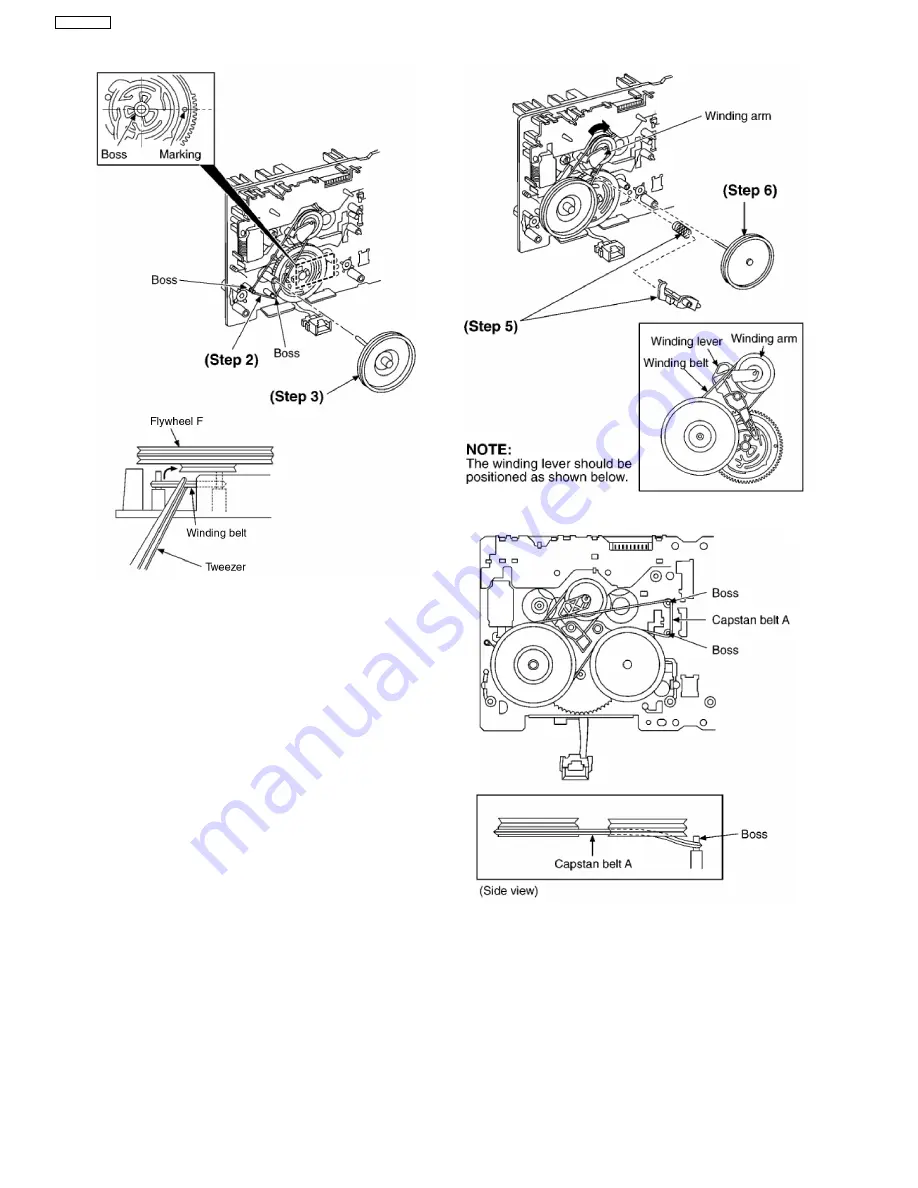
Step 2
Put the winding belt on the pulley temporarily.
Step 3
Install the flywheel F.
Step 4
Put the winding belt on the flywheel F.
Step 5
Install the winding lever and spring while pressing the
winding arm in the direction of arrow.
Step 6
Install the flywheel R.
Step 7
Put the capstan belt A temporarily as shown below.
Step 8
Put the capstan belt B on the motor ass’y pulley.
Step 9
Install the sub chassis to the mechanism, and then
tighten screws.
36
SA-AK640PL
Summary of Contents for SA-AK640PL
Page 12: ...7 Accessories Remote Control FM Antenna Wire AC Cord AM Loop Antenna 12 SA AK640PL ...
Page 13: ...8 Operating Instructions Procedures 13 SA AK640PL ...
Page 14: ...14 SA AK640PL ...
Page 23: ...10 3 Main Parts Location 23 SA AK640PL ...
Page 39: ...39 SA AK640PL ...
Page 41: ...12 2 Checking and Repairing of Transformer P C B 41 SA AK640PL ...
Page 42: ...12 3 Checking and Repairing of Panel Deck Deck Mechanism P C B 42 SA AK640PL ...
Page 43: ...12 4 Checking and Repairing of Power P C B 43 SA AK640PL ...
Page 48: ...48 SA AK640PL ...
Page 49: ...14 2 Power P C B Transformer P C B 49 SA AK640PL ...
Page 50: ...14 3 Waveform Chart 50 SA AK640PL ...
Page 51: ...51 SA AK640PL ...
Page 58: ...58 SA AK640PL ...
Page 60: ...SA AK640PL 60 ...
Page 62: ...SA AK640PL 62 ...
Page 68: ...SA AK640PL 68 ...
Page 70: ...SA AK640PL 70 ...
Page 76: ...SA AK640PL 76 ...
Page 84: ...SA AK640PL 84 ...
Page 89: ...21 Exploded Views 21 1 Cabinet Parts Location SA AK640PL 89 ...
Page 90: ...SA AK640PL 90 ...
Page 91: ...21 2 Deck Mechanism Parts Location RAA4502 S SA AK640PL 91 ...
Page 92: ...21 3 Packaging SA AK640PL 92 ...


