34
35
12.3. Disassembly Procedure
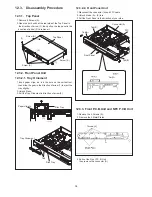
12.3.1. Top Panel
1.Remove 6 Screws (A).
2.Open the both ends at the rear side of the Top Panel in
the direction of arrow (1), then pull up the top panel in the
direction of arrow (2) to remove it.
12.3.2. Front Panel Unit
12.3.2.1. Tray Ornament
1.Insert paper clips, etc. into the hole on the unit bottom,
then slide the gear in the direction of arrow (1) to eject the
tray slightly.
2.Unlock 2 tabs.
3.Pull the Tray Ornament in direction of arrow (2).
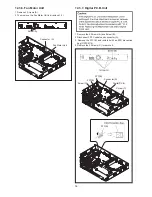
12.3.2.2. Front Panel Unit
1.Disconnect the connector (A) and FFC cable.
2.Unlock 5 tabs (A) - (E) turn.
3.Pull the Front Panel in the direction of your side.
12.3.3. Front P.C.B.Unit and NFC P.C.B Unit
1.Remove the 5 Screws (A).
2.Remove the 2 Metal Plates .
3.Pull out the Front P.C.B. Unit,
then remove the connector (A).
Top Panel
(2)
(1)
(1)
Disc Tray
Paper clip,etc.
Tray Ornament
(1)
Tab
Disc Tray
(2)
Tab(E)
Tab(A)
Tab(B)
Front Panel
Connector(A)
FFC
Screw (A)
Screw (A)
Screw (A)
36
12.3. Disassembly Procedure
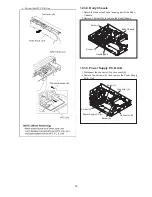
12.3.1. Top Panel
1. Remove the 6 screws (A).
2. Slide Top Panel rearward and open the both ends at rear
side of the Top Panel a little and lift the Top Panel in the
direction of the arrows.
12.3.2. Front Panel Unit
12.3.2.1. Tray Ornament
1. Insert paper clips, etc. into the hole on the bottom of the
main unit, and slide the lever in the direction of (1) to eject
the disc tray slightly.
2. Unlock 2 tabs turn,
Pull the Tray Ornament in direction of (2).
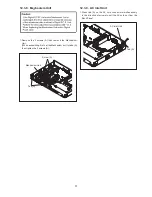
12.3.2.2. Front Panel Unit
1. Detach the lead wires fixed at hooking part of the Body
Chassis.
2. Remove the connector (A) and flex (A).
3. Unlock 5 tabs (A) - (E) turn.
Pull with the Front Panel Unit in the direction of (1).
12.3.3. Front P.C.B. Unit / NFC P.C.B. Unit
1. Remove the 5 screws (A).
2. Remove the 2 Metal Plates.
3. Pull out the Front P.C.B. Unit,
then remove the connector (A).


