8.3. Class-D Amplifier
8.3.1. How are digital amplifiers different?
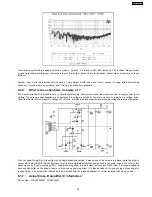
A digital amplifier incorporates a switching output stage that operates according to a principle known as pulse width modulation
(PWM). In contrast to the low-frequency control signal used in a conventional analog amplifier output stage, the switching output
stage of a digital amplifier is controlled by a high-frequency digital signal. The high-frequency digital signal is a PWM signal, in
which the music is modulated into a fixed-frequency carrier signal. In a digital amplifier, the modulation process is based on a digital
pulse code modulated (PCM) representation of the music signal (or other signal that needs amplification) from a CD player, a DVD
player, or some other device.
8.3.2. What are the advantages of digital amplification technology?
·
High power efficiency, i.e., smaller heat sinks and/or no fan required
·
Compact (reduced PCB area)
·
Low weight (reduced transformer size)
·
Good sound quality (low signal distortion/THD)
8.3.3. Why is the digital amplifier so efficient?
A class-D amplifier is one in which the output transistors are operated as switches. When a transistor is off, the current through it
is zero. When it is on, the voltage across it is small, ideally zero. In each case, the power dissipation is very low.
8.3.4. Does the “D” in class-D mean DIGITAL?
No. This is not correct because the operation of the class-D amplifier is based on analog principles. There is no digital coding of
the signal. Before the advent of the class-D amplifier, the standard classes were class-A, class-AB, class-B, and class-C. The “D”
is simply the next letter in the alphabet after “C.” Indeed, the earliest work on class-D amplifiers involved vacuum tubes and can
be traced to the early 1950s.
23
SA-HT640WPL
Summary of Contents for SA-HT640WPL
Page 4: ...23 2 Packaging 109 24 Replacement Parts List 110 24 1 Component Parts List 111 4 SA HT640WPL ...
Page 10: ...10 SA HT640WPL ...
Page 16: ...16 SA HT640WPL ...
Page 19: ...8 2 Detail Block Diagram Receiver module 19 SA HT640WPL ...
Page 31: ...31 SA HT640WPL ...
Page 37: ...10 1 Disassembly Flow Chart 37 SA HT640WPL ...
Page 38: ...10 2 Main Components and P C B Locations 38 SA HT640WPL ...
Page 46: ...Step 3 Push tray assembly to the direction of arrow shown 46 SA HT640WPL ...
Page 53: ...14 2 Main P C B 53 SA HT640WPL ...
Page 60: ...SA HT640WPL 60 ...
Page 68: ...SA HT640WPL 68 ...
Page 70: ...70 SA HT640WPL ...
Page 80: ...SA HT640WPL 80 ...
Page 86: ...SA HT640WPL 86 ...
Page 88: ...SA HT640WPL 88 ...
Page 97: ...97 SA HT640WPL ...
Page 104: ...21 3 4 2 Receiver Module P C B 104 SA HT640WPL ...
Page 106: ...23 Explode Views 23 1 Cabinet Parts Location 106 SA HT640WPL ...
Page 107: ...107 SA HT640WPL ...
Page 108: ...108 SA HT640WPL ...
Page 109: ...23 2 Packaging 109 SA HT640WPL ...

