32
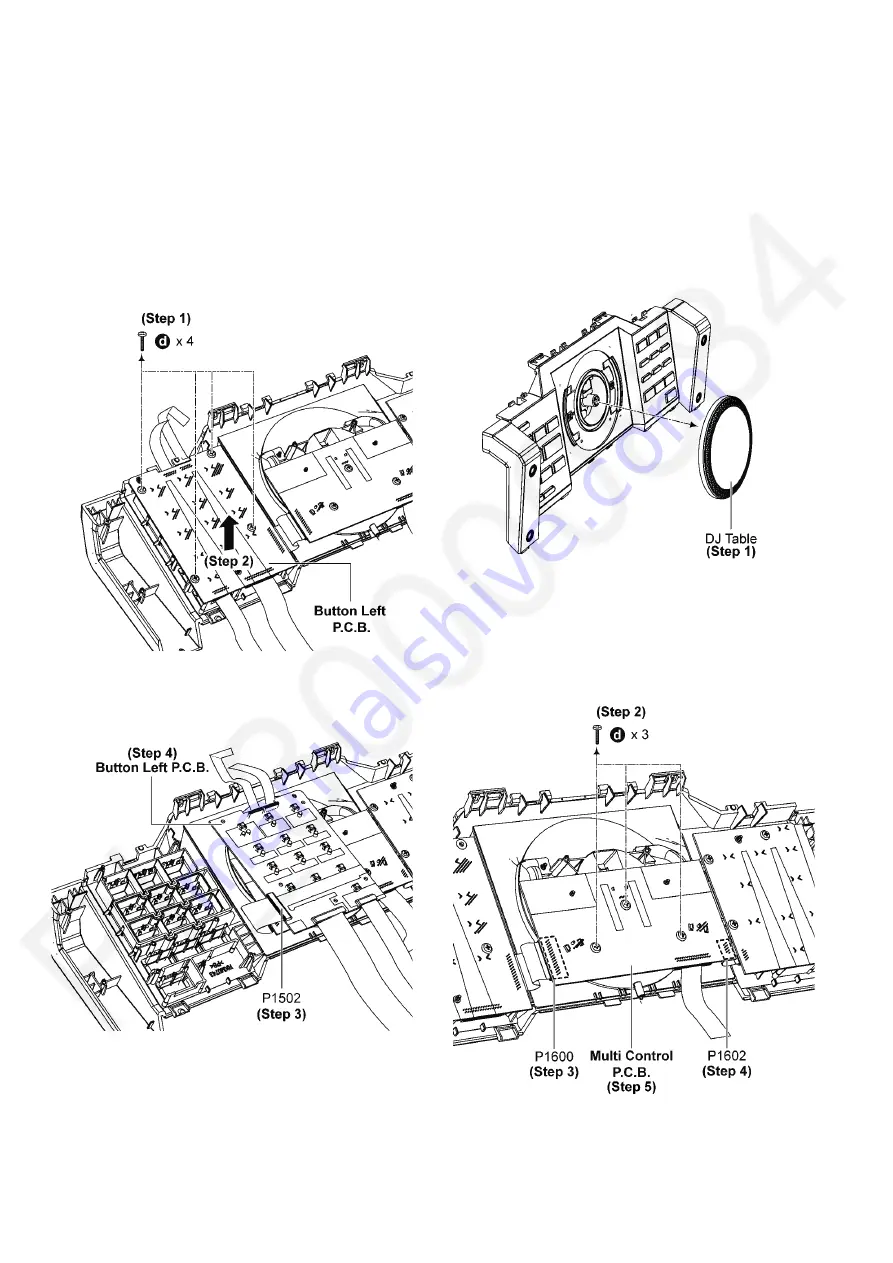
8.13. Disassembly of Button Left
P.C.B.
• Refer to “Disassembly of Top Cabinet”.
• Refer to “Disassembly of Front Panel Unit”.
• Refer to “Disassembly of FL Display P.C.B.”.
• Refer to “Disassembly of Illumination Jog P.C.B.”.
• Refer to “Disassembly of BT&NFC P.C.B.”.
• Refer to “Disassembly of DJ Cabinet Unit”.
Step 1 Remove 4 screws.
Step 2 Lift up Button Left P.C.B..
Step 3 Detach 22P FFC at connector (P1502) on Button Left
P.C.B..
Step 4 Remove Button Left P.C.B..
8.14. Disassembly of Multi Control
P.C.B.
• Refer to “Disassembly of Top Cabinet”.
• Refer to “Disassembly of Front Panel Unit”.
• Refer to “Disassembly of FL Display P.C.B.”.
• Refer to “Disassembly of Illumination Jog P.C.B.”.
• Refer to “Disassembly of BT&NFC P.C.B.”.
• Refer to “Disassembly of DJ Cabinet Unit”.
Step 1 Remove DJ Table.
Step 2 Remove 3 screws.
Step 3 Detach 22P FFC at connector (P1600) on Multi Control
P.C.B..
Step 4 Detach 5P FFC at connector (P1602) on Multi Control
P.C.B..
Step 5 Remove Multi Control P.C.B..
Summary of Contents for SA-MAX4000
Page 11: ...11 5 Location of Controls and Components 5 1 Remote Control Key Button Operation ...
Page 12: ...12 5 2 Main Unit Key Button Operation ...
Page 18: ...18 ...
Page 25: ...25 8 3 Main Components and P C B Locations ...
Page 38: ...38 ...
Page 48: ...48 ...
Page 50: ...50 ...
Page 74: ...74 ...
Page 80: ...80 ...
Page 97: ...97 MMH1504 ...


