10.36. Disassembly of Cam Gear
·
Follow (Step 1) to (Step 3) of Item 10.3.
·
Follow (Step 1) to (Step 3) of Item 10.4.
·
Follow (Step 1) to (Step 4) of Item 10.5.
·
Follow (Step 1) to (Step 4) of Item 10.7.
·
Follow (Step 1) to (Step 4) of Item 10.8.
·
Follow (Step 1) to (Step 3) of Item 10.30.
·
Follow (Step 1) to (Step 2) of Item 10.33.
·
Follow (Step 1) to (Step 5) of Item 10.35.
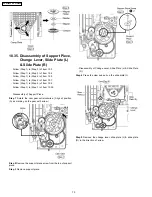
Step 1
Remove the cam gear from the mecha base in the
arrow of direction.
10.37. Assembly of Tray Base
Assembly
·
Reverse (Step 1) to (Step 4) of Item 10.8.
Step 1
Rotate the cam gear anti-clockwise. (Align at position
(B) as marking on gear with arrow.)
Step 2
Make sure drive gear (A) is in vertical position.
Step 3
Keep the open lock gear pressed in the position shown.
Step 4
Connect FFC cable at the connector (CN7003) on Tray
P.C.B.
Step 5
Align the tray base assembly to the tray guide (L) & tray
guide (R).
Step 6
Push the tray base assembly in the direction of arrow
shown.
71
SA-PT650P / SA-PT650PC
Summary of Contents for SA-PT650P
Page 12: ...12 SA PT650P SA PT650PC ...
Page 18: ...7 5 Using the Music Port 18 SA PT650P SA PT650PC ...
Page 54: ...10 2 Main Components and P C B Locations 54 SA PT650P SA PT650PC ...
Page 75: ...75 SA PT650P SA PT650PC ...
Page 90: ...SA PT650P SA PT650PC 90 ...
Page 98: ...SA PT650P SA PT650PC 98 ...
Page 100: ...100 SA PT650P SA PT650PC ...
Page 120: ...SA PT650P SA PT650PC 120 ...
Page 128: ...SA PT650P SA PT650PC 128 ...
Page 135: ...25 Exploded Views 135 SA PT650P SA PT650PC ...
Page 136: ...136 SA PT650P SA PT650PC ...
Page 137: ...25 1 Cabinet Parts Location SA PT650P SA PT650PC 137 ...
Page 138: ...SA PT650P SA PT650PC 138 ...


