7.5. USB Connection and Operation
The USB connectivity enables you to connect and play
tracks or files from USB mass storage class devices.
Typically, USB memory devices. (Bulk only transfer)
Preparation
Before connecting any USB mass storage device to the
unit, ensure that the data stored therein has been backed
up.
It is not recommended to use a USB extension cable. The
USB device is not recognised by this unit.
1
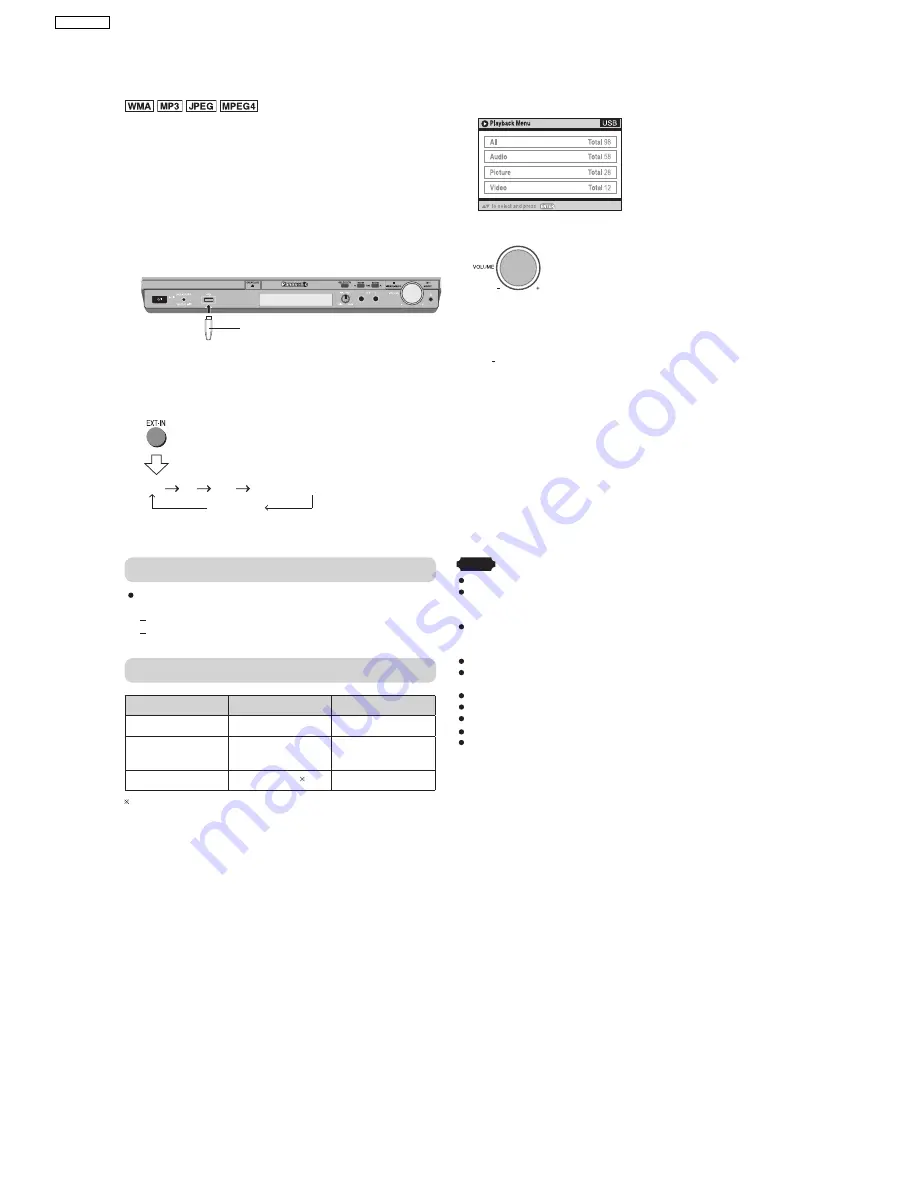
Connect the USB mass storage device (not included).
USB enabled device
(not included)
It is not recommended to use a
USB extension cable. The device
connected via the cable will not be
recognised by this unit.
2
To select "USB" as the source, press several times.
USB
AV
AUX
D-IN (Digital In)
MUSIC P.
3
Adjust the volume of the main unit.
4
Begin playback by selecting the track from the USB
mass storage device.
To return to the previous screen
Press [ RETURN]
For other operating functions, they are similar as those
described in "DISC OPERATIONS" ( Refer to the O/I book).
Compatible Devices
Devices w hich are defined
as USB m ass storage
class :
USB devices that support bulk only transfer.
USB devices that support USB 2.0 full speed.
Supported Formats
Fil e name
t
Fil e ex ension
Still pictures
JPG
.jpg
.jpeg
Music
MP3
WMA
.mp3
.wma
Video
MPEG4 .asf
For Panasonic D-Snap/DIGA
Note
CBI (Control/Bulk/Interrupt) is not supported.
Digital Cameras that use PTP protocol or which require
additional program installation when connected to a PC are not
supported.
[Only FAT 12/16/32 (File Allocation Table 12/16/32) file system is
supported].
Depending on the sector size, some files may not work.
It will not operate with Janus enabled MTP (Media Transfer
Protocol) devices.
A device using NTFS file system is not supported.
Maximum folder: 400 fo
file
file
files
lders
Maximum
: 4000
Maximum name: 44 characters
Maximum folder name: 44 characters
Only one memory card will be selected when connecting a multi-
port USB card reader. Typically the first
memory card inserted.
18
SA-PT850EE
Summary of Contents for SA-PT850EE
Page 3: ...3 SA PT850EE ...
Page 12: ...12 SA PT850EE ...
Page 23: ...8 1 3 Advanced Digital Sound 8 1 4 Easy to Use 8 1 5 HDMI Compatible Products 23 SA PT850EE ...
Page 39: ...10 2 Main Components and P C B Locations 39 SA PT850EE ...
Page 54: ...Step 3 Remove the middle chassis Step 4 Remove the traverse unit 54 SA PT850EE ...
Page 70: ...SA PT850EE 70 ...
Page 72: ...SA PT850EE 72 ...
Page 82: ...82 SA PT850EE ...
Page 114: ...25 Exploded Views 114 SA PT850EE ...
Page 115: ...25 1 Cabinet Parts Location SA PT850EE 115 ...
Page 116: ...SA PT850EE 116 ...
Page 117: ...25 2 Packaging SA PT850EE 117 ...


