12.1. Cassette Deck Section
•
•
•
•
Measurement Condition
−
−
−
−
Reverse-mode selector switch:
−
−
−
−
Tape edit: NORMAL
−
−
−
−
Make sure head, capstan and press roller are clean.
−
−
−
−
Judgeable room temperature 20 ± 5 °C (68 ± 9°F)
•
•
•
•
Measuring instrument
−
−
−
−
EVM (DC Electronic volmeter)
−
−
−
−
Digital frequency counter
•
•
•
•
Test Tape
−
−
−
−
Tape
speed
gain
adjustment
(3
kHz,
-10
dB);
QZZCWAT
12.1.1. Head Azimuth Adjustment (Deck
1/2)
Caution:
•
•
•
•
Please replace both azimuth adjustment screw and springs
simultaneously when readjusting the head azimuth. (shown
in Fig. 2) Even if you wish to readjust the head azimuth
without replacing the acrews and springs, a fine adjustment
to the azimuth screw and spring.
•
•
•
•
Please remove the screw-locking bond left on the head
base when replacing the azimuth screw.
•
•
•
•
If you wish to readjust the head azimuth, be sure to adjust
with adhering the cassette tape closely to the mechanism
by pushing the center of cassette tape with your finger.
(shown in Fig. 3)
1. Playback the azimuth adjustment portion (8 kHz, -20dB) of
the test tape (QZZCFM) in the forward play mode. Vary the
azimuth adjustment screw until the output of the R-CH (PB
OUT-R) are maximized.
2. Perform the same adjustment in the reverse play mode.
3. After the adjustment, apply screwlock to the azimuth
adjusting screw.
12.1.2. Tape Speed Adjustment (Deck 1/2)
1. Set the tape edit button to “NORMAL” position.
2. Insert the test tape (QZZCWAT) to DECK 2 and playback
(FWD side) the middle portion of it.
3. Adjust Motor VR (DECK 2) for the output value shown
below.
Adjustment target: 2940 ~ 3060 Hz (NORMAL speed)
4. After alignment, assure that the output frequency of the
DECK 1 FWD are within ±60 Hz of the value of the output
frequency of DECK 2 FWD.
Fig. 1
12.1.3. Bias Voltage Check
1. Set the unit “AUX” position.
2. Insert the Normal blank tape (QZZCRA) into DECK 2 and
the unit to “REC” mode (use
key).
3. Measure and make sure that the output is within the
standard value.
Bias voltage for Deck 2
14±4mV (Normal)
Fig. 2
Fig. 3
12 Adjustment Procedures
61
SA-VK460GC / SA-VK460GS / SA-VK460GCS / SA-VK460GCT
Summary of Contents for SA-VK460GS
Page 12: ...6 Accessories 12 SA VK460GC SA VK460GS SA VK460GCS SA VK460GCT ...
Page 14: ...7 2 Remote Control Operation Control 14 SA VK460GC SA VK460GS SA VK460GCS SA VK460GCT ...
Page 15: ...7 3 1 Disc Playability 7 3 Disc Information 15 SA VK460GC SA VK460GS SA VK460GCS SA VK460GCT ...
Page 17: ...7 4 DivX VOD Content 17 SA VK460GC SA VK460GS SA VK460GCS SA VK460GCT ...
Page 23: ...9 2 1 Service Mode Table 1 23 SA VK460GC SA VK460GS SA VK460GCS SA VK460GCT ...
Page 24: ...9 2 2 Service Mode Table 2 24 SA VK460GC SA VK460GS SA VK460GCS SA VK460GCT ...
Page 25: ...9 2 3 Service Mode Table 3 25 SA VK460GC SA VK460GS SA VK460GCS SA VK460GCT ...
Page 26: ...26 SA VK460GC SA VK460GS SA VK460GCS SA VK460GCT ...
Page 27: ...9 2 4 Service Mode Table 4 27 SA VK460GC SA VK460GS SA VK460GCS SA VK460GCT ...
Page 28: ...9 2 5 Service Mode Table 5 28 SA VK460GC SA VK460GS SA VK460GCS SA VK460GCT ...
Page 29: ...9 2 6 Special Mode Table 6 29 SA VK460GC SA VK460GS SA VK460GCS SA VK460GCT ...
Page 31: ...31 SA VK460GC SA VK460GS SA VK460GCS SA VK460GCT ...
Page 33: ...33 SA VK460GC SA VK460GS SA VK460GCS SA VK460GCT ...
Page 36: ...9 4 4 ECC Error Code Table 36 SA VK460GC SA VK460GS SA VK460GCS SA VK460GCT ...
Page 38: ...38 SA VK460GC SA VK460GS SA VK460GCS SA VK460GCT ...
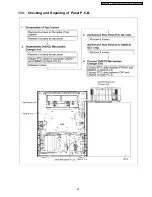
Page 59: ...11 3 Checking and Repairing of Panel P C B 59 SA VK460GC SA VK460GS SA VK460GCS SA VK460GCT ...
Page 78: ...78 SA VK460GC SA VK460GS SA VK460GCS SA VK460GCT ...
Page 96: ...SA VK460GC SA VK460GS SA VK460GCS SA VK460GCT 96 ...
Page 108: ...108 SA VK460GC SA VK460GS SA VK460GCS SA VK460GCT ...
Page 110: ...SA VK460GC SA VK460GS SA VK460GCS SA VK460GCT 110 ...
Page 112: ...22 3 Packaging SA VK460GC SA VK460GS SA VK460GCS SA VK460GCT 112 ...


