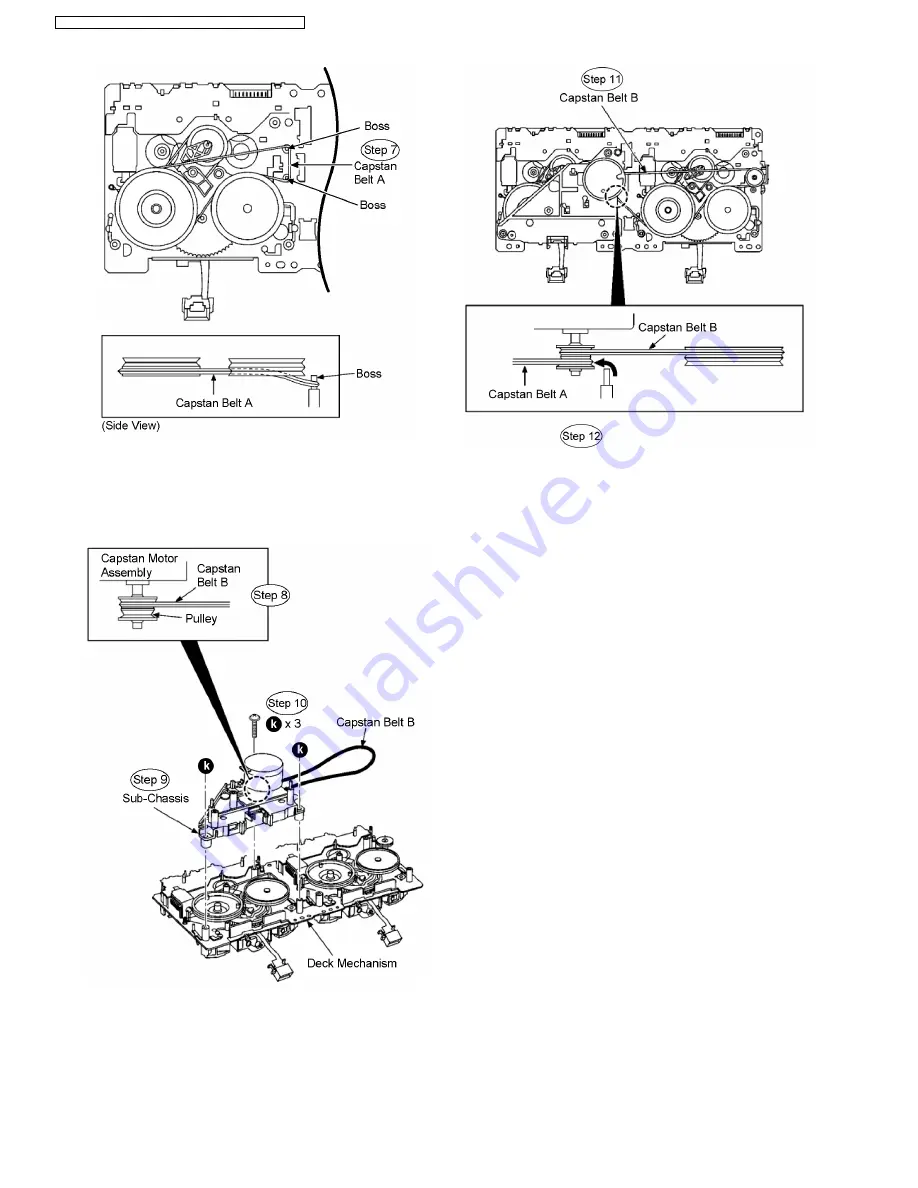
Step 8 Put the capstan belt B on the capstan motor assembly
pulley.
Step 9 Install the sub-chassis to the deck mechanism, and then
tighten screws.
Step 10 Install 3 screws.
Step 11 Put the capstan belt B as shown below.
Step 12 Put the capstan belt A on the capstan motor assembly
pulley.
10.27. Rectification for Tape Jam
Problem
•
•
•
•
Follow (Step 1) to (Step 5) of Item 10.3.
Note: If a cassette tape cannot be removed from the deck (the
tape is caught by the capstan or pinch roller during playback or
recording):
Step 1 Rotate the flywheel F assembly in the direction of the
arrow to remove it.
66
SA-VK960GC / SA-VK960GCS / SA-VK960GCT / SA-VK960GS
Summary of Contents for SA-VK960GC
Page 13: ...Fig 5 2 13 SA VK960GC SA VK960GCS SA VK960GCT SA VK960GS ...
Page 50: ...10 2 Main Components and P C B Locations 50 SA VK960GC SA VK960GCS SA VK960GCT SA VK960GS ...
Page 84: ...84 SA VK960GC SA VK960GCS SA VK960GCT SA VK960GS ...
Page 86: ...SA VK960GC SA VK960GCS SA VK960GCT SA VK960GS 86 ...
Page 96: ...96 SA VK960GC SA VK960GCS SA VK960GCT SA VK960GS ...
Page 116: ...SA VK960GC SA VK960GCS SA VK960GCT SA VK960GS 116 ...
Page 124: ...SA VK960GC SA VK960GCS SA VK960GCT SA VK960GS 124 ...
Page 128: ...22 Exploded Views 128 SA VK960GC SA VK960GCS SA VK960GCT SA VK960GS ...
Page 129: ...22 1 Cabinet Parts Location SA VK960GC SA VK960GCS SA VK960GCT SA VK960GS 129 ...
Page 130: ...SA VK960GC SA VK960GCS SA VK960GCT SA VK960GS 130 ...
Page 132: ...SA VK960GC SA VK960GCS SA VK960GCT SA VK960GS 132 ...
Page 133: ...22 3 Packaging SF VK960 SA VK960GC SA VK960GCS SA VK960GCT SA VK960GS 133 ...


