43
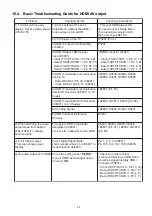
10.4. Basic Troubleshooting Guide for HDMI AV output
Problems
Checking Points
Checking components
1) Check setting of the set in
Setup Menu whether the HDMI
Video output is turned ON
* This year HDMI always ON.
No need to check Setup Menu.
If no resolution selection GUI,
then only check SETUP.
2) +5V Supply to the TV
IC3952 (Pin 4)
3) HDMI Connector Solderability
condition
P3901
4) HDMI Output TDMS signal
lines (IC3901)
- Clock (TXCP/TXCN => Pin 50, 49)
- Data (TXD0P/TXD0N => Pin 52, 51)
- Data (TXD1P/TXD1N => Pin 54, 53)
- Data (TXD2P/TXD2N => Pin 56, 55)
HDMI Connector (P3901)
- Clock (TXCP/TXCN => Pin 10, 12)
- Data (TXD0P/TXD0N => Pin 7, 9)
- Data (TXD1P/TXD1N => Pin 4, 6)
- Data (TXD2P/TXD2N => Pin 1, 3)
- Data, DDCDAT (Pin 46, IC8001)
- Clock, DDCCLK (Pin 47, IC8001)
5) HDMI Transmitter communication
lines to TV
6) HDMI Transmitter communication
from DVD Decorder (IC8001) +3.3V
Supply
7) HDMI Transmitter DVD Decorder
(IC8001) +1.8 V Supply
8) Hot-Plug Signal
9) HDMI Interface Reference
Resistor
1) Supply to HDMI transmitter
intergrated (IC8001)
2) Check for Capacitor short to GND
Check Digital Signal Data
communication lines from IC8001 to
Serial Flash IC (IC8651)
Check the setting under '
SETUP
'
menu if HDMI Audio Output option
is turned '
ON
'
- Clock (TXCP/TXCN => Pin 10, 12)
- Data (TXD0P/TXD0N => Pin 7, 9)
- Data (TXD1P/TXD1N => Pin 4, 6)
- Data (TXD2P/TXD2N => Pin 1, 3)
* Check for solder short/or
component missing on TDMS line
as well as signal intergrity HDMI
Connector (P3901)
LB3905, R3905, Q3902, R3904
LB3904, R3907, Q3903, R3906
LB3901 (Pin 57)
LB3902, LB3910, R3910 (Pin 59)
LB3906, R3902, R3903, Q3901
C8034, C8006, C8029, C8028,
LB3901 (Pin 57), LB3902, LB3910
(Pin 59)
Pin 1, 2, 5, 6 (IC8651)
Pin 105, 106, 107, 109 (IC8001)
R3901
1) TV does not have any
display. Set FL display shows
U702/U703
2) When switching the video
output mode from 480p to
720p /1080i, TV display
become blank
3) Error Video Output.
TV screen shows green
Display
4) No audio output from HDMI
Summary of Contents for SA-XH201
Page 15: ...15 4 1 Others Licences ...
Page 16: ...16 5 General Introduction 5 1 Power Saving Features ...
Page 17: ...17 5 2 Linked Operations with the TV VIERA Link HDAVI Control ...
Page 18: ...18 5 2 1 Easy Control With Viera Remote Control ...
Page 19: ...19 5 3 Disc Information 5 3 1 Media that can be played ...
Page 20: ...20 5 3 2 File Extension Type Support MP3 JPEG Xvid ...
Page 21: ...21 6 Location of Controls and Components 6 1 Remote Control Key Button Operations ...
Page 22: ...22 6 2 Main Unit Key Button Operations ...
Page 24: ...24 7 3 Connection with an ARC compatible TV ...
Page 47: ...47 12 3 Main Components and P C B Locations ...
Page 76: ...76 ...
Page 78: ...78 ...
Page 122: ...122 MMH1303 ...

