Getting started
Precautions
13
Preparation
Commercially available components (not supplied)
≥
Fall prevention cord ............................................................................................................................
k
2
≥
Screws to attach fall prevention cord to wall ......................................................................................
k
2
≥
To prevent damage or scratches, lay down a soft cloth and perform the assembly on it.
≥
Do not hold this unit in one hand to avoid injury by dropping this unit when carrying.
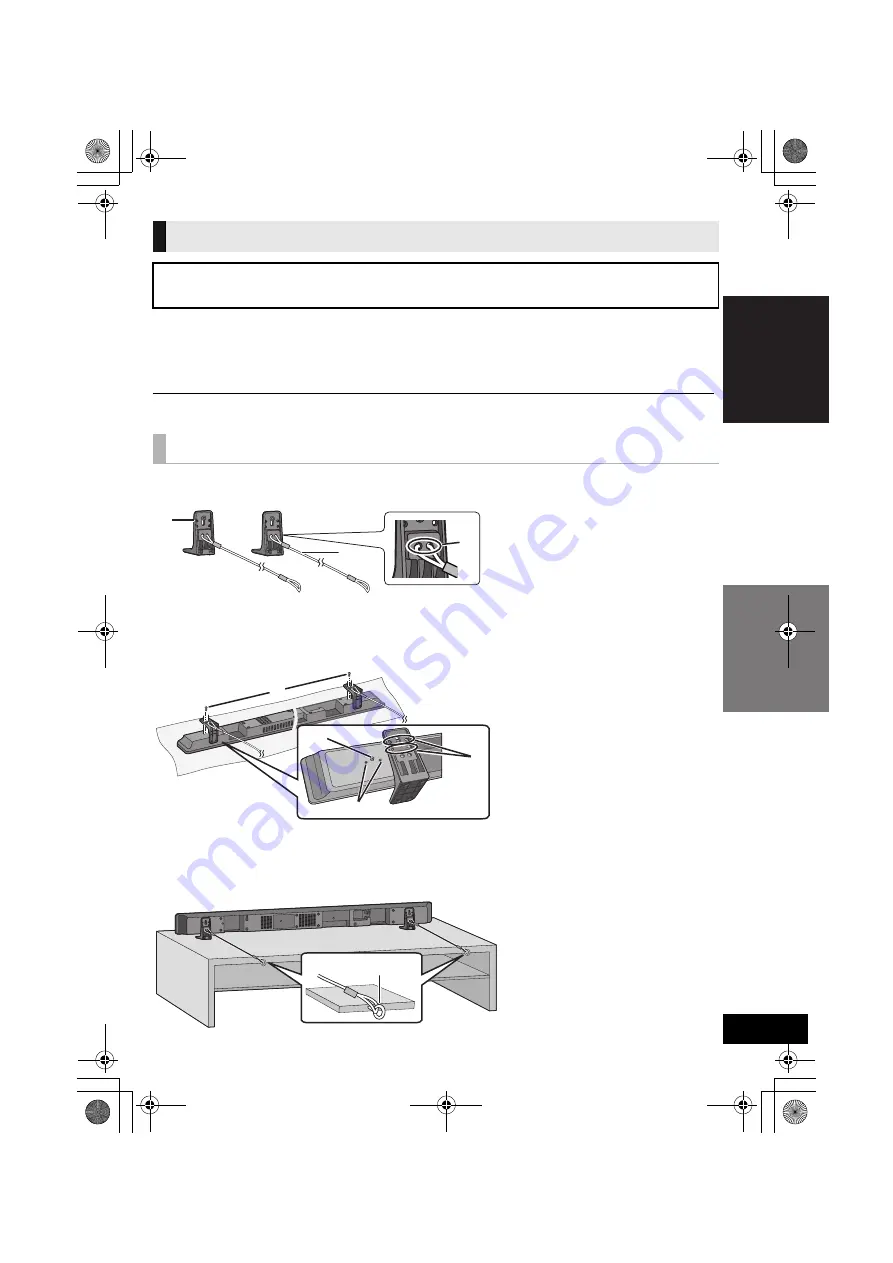
1
Attach a cord (not supplied) to the stand.
2
Place the stand by aligning the holes in the stand with the projecting parts
F
.
≥
Screw tightening torque: 80 N
0
cm (17.98 lbf-ft) to 120 N
0
cm (26.98 lbf-ft).
≥
Keep the screws out of reach of children to prevent swallowing.
3
Place the unit in the desired position and attach each cord onto the rack or
table.
≥
Make sure that the slack is minimal.
≥
Keep the screws out of reach of children to prevent swallowing.
When placing the unit in a rack or on a table
Follow the safety measure to prevent the unit from falling.
The installation should never be done by any other than a qualified installation specialist.
When the supplied leg stands are used
A
Stand (supplied)
B
Cord (not supplied)
C
Thread a cord through the
holes.
Refer to the Owner’s Manual
of the cord for details.
D
Screw with washer (supplied)
E
Screw hole
F
Projecting part
G
Height adjustment holes
≥
By changing the position that the
stand is attached to the projecting
parts, the height can be adjusted
by 10 mm (
13
/
32
q
).
H
Screw eye (not supplied)
≥
Depending on the placement of
the unit, the screwing position of
the screw eye may differ.
SC-HTB520PP_RQTX1278-Y.book Page 13 Friday, February 11, 2011 11:25 AM


