background image

17

RQT8043

RQTX0202

ESPAÑOL

ESPAÑOL

ESPAÑOL

ESPAÑOL

ESPAÑOL

Setting the clock

Setting the clock

This is a 24-hour clock.

1

 Press [ 

CLOCK / TIMER]  to  select  “CLOCK”.

Each time you press the button:

CLOCK

˚


PLAY

Original display

˚


REC

2

  (

Within 8 seconds or so

)


Press [

4

 / 

1

] or [

¡

 / 

¢

]  to set the 

time.

3

  Press  [CLOCK / TIMER]  to  fi nish setting the 

time.

Displaying the clock

Press [CLOCK


/


TIMER] once when the unit is on or in 

standby mode.
The time is displayed for a few seconds.

Note:

Reset the clock regularly to maintain accuracy.

Using the play or record timer

Using the play or record timer

You can set the timer to come on at a certain time to 
wake you up (play timer) or to record from the radio or 
the optional equipments (record timer).
Play timer and record timer cannot be used together.

Turn the unit on and set the clock.

Play 
timer

Prepare the music source you want to 
listen to; cassette, disc number (1 to 5), 
radio, USB, or other optional equipments, 
and set the volume.

Record 
timer

Check the cassette’s erasure prevention 
tabs (

\

 page 15), insert the cassette and 

tune to the radio station (

\

 page 16), 

USB, or select the music port or AUX 
source (

\

 page 20, 21, 22).

1

  Press [CLOCK/TIMER] repeatedly to select 

the timer function.

Each time you press the button:

CLOCK

˚

 PLAY

Original display

˚

 REC

˚

PLAY 

: to set the play timer

˚

REC 

: to set the record timer

(Proceed to the next step 

within 8 seconds

)

Using the timers

2

 Press [

4

 / 

1

] or [

¡

 / 

¢

] to set the 

starting time.

Play timer indicator

Start time

Record timer indicator

3

  Press  [CLOCK / TIMER]  to  confi rm.

4

  Repeat steps 2 to 3 to set the fi nishing 

time.

Finish time

To activate the timer

5

 Press [ 


˚

PLAY/REC] repeatedly to turn on 

your desired timer.

˚

 PLAY

No display (off)

˚

 REC

6

 Press [

y

] to turn off the unit.

The unit must be turned off for the timers to 
operate.

Change the 
settings

Repeat steps 1 to 4 and 6 (

\

 see left 

and above).

Change the 
source or 
volume

1) Press [ 

˚

PLAY/REC] to clear the 

timer indicator from the display.

2) Make changes to the source or 

volume.

3) Perform steps 5 to 6 (

\

 see 

above).

Check the 
settings

Press [CLOCK/TIMER] repeatedly to 
select 

˚

PLAY or 

˚

REC.

Cancel Press 

˚

PLAY/REC] to clear the 

timer indicators from the display.

If you use the unit after the timers are set

After using, check that the correct tape or disc are 
loaded before turning the unit off.

(continued on next page)

rqtx0202-B(en).indd   17

rqtx0202-B(en).indd   17

1/13/09   1:55:55 PM

1/13/09   1:55:55 PM

Summary of Contents for SC-AK280

Page 1: ...ormance and safety please read these instructions thoroughly before connecting operating or adjusting this product Please keep this manual for future reference 1 x AC mains lead K2CZ3YY00005 1 x Remote control N2QAYB000387 2 x Remote control batteries 1 x FM indoor antenna RSA0007 L1 1 x AM loop antenna N1DAAAA00001 1 x Antenna plug adaptor K1YZ02000013 Operations in these instructions are describ...

Page 2: ...2 RQT8043 RQTX0202 ESPAÑOL ESPAÑOL ESPAÑOL ESPAÑOL ESPAÑOL Inside of product Back of product ...

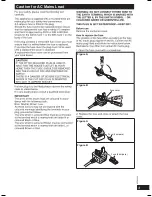
Page 3: ...3 RQT8043 RQTX0202 ESPAÑOL ESPAÑOL ESPAÑOL ESPAÑOL ESPAÑOL Caution for AC Mains Lead Figure A Figure B Fuse cover Figure A Fuse 5 ampere Figure B Fuse 5 ampere ...

Page 4: ... phoning our Customer Care Centre Monday Thursday 9 00am 5 30pm Friday 9 30am 5 30pm Excluding public holidays Or go on line through our Internet Accessory ordering application at www panasonic co uk Most major credit and debit cards accepted All enquiries transactions and distribution facilities are provided directly by Panasonic UK Ltd It couldn t be simpler Also available through our Internet i...

Page 5: ...This can cause electric shock or malfunction Do not let liquids get into the unit This can cause electric shock or malfunction If this occurs immediately disconnect the unit from the power supply and contact your dealer Do not spray insecticides onto or into the unit They contain flammable gases which can ignite if sprayed into the unit Service Service Do not attempt to repair this unit by yoursel...

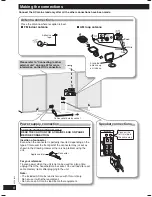
Page 6: ...he unit For your reference To save power when the unit is not to be used for a long time unplug it from the household mains socket You will need to reset some memory items after plugging in the unit Note The included AC mains lead is for use with this unit only Do not use it with other equipment Do not use an AC mains lead from other equipment FM indoor antenna Place the antenna where reception is...

Page 7: ...o left or right channel orientation is necessary You cannot take the front net off the speakers Use only the supplied speakers The combination of the main unit and speakers provide the best sound Using other speakers can damage the unit and sound quality will be negatively affected Note Keep your speakers at least 10mm away from the system for proper ventilation These speakers do not have magnetic...

Page 8: ...e in a cool dark place CAUTION Danger of explosion if battery is incorrectly replaced Replace only with the same or equivalent type recommended by the manufacturer Dispose of used batteries according to the manufacturer s instructions DEMO function 7 DEMO When the unit is first plugged in a demonstration of its functions may be shown on the display If the demo setting is off you can show a demonst...

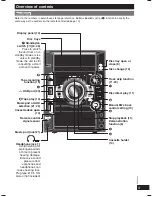
Page 9: ...it is still consuming a small amount of power 9 Tape recording function 15 2 USB port 20 8 Tape play 14 Music port or AUX selection 21 22 Cassette deck open 14 Remote control signal sensor Music port jack 21 Headphone jack Avoid listening for prolonged periods of time to prevent hearing damage Excessive sound pressure from earphones and headphones can cause hearing loss Plug type Ø 3 5 mm stereo n...

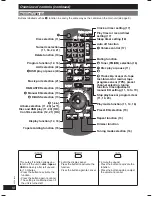
Page 10: ...umeric selection 11 16 20 21 Delete function 13 Program function 12 16 AUX selection 22 2 USB play or pause 20 Music port selection 21 RE MASTER selection 19 3 Manual EQ selection 19 4 D BASS selection 19 9 2 3 Album selection 11 20 5 Disc and USB play 11 20 OK Confirm selection 12 21 OK Display function 12 16 Tape recording function 15 Clock or timer setting 17 Play timer or record timer setting ...

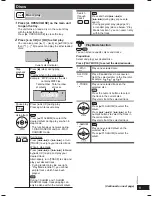
Page 11: ...ly turn TRACK to skip and play your desired track During random play see right Play Mode function you cannot skip to tracks which have been played During 1 ALBUM and 1 ALBUM RANDOM mode track skipping can only be done within the current album Search through tracks Press and hold 4 1 or during play or pause to search During program play page 12 or random play see below Play Mode function you can se...

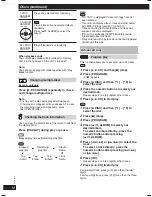
Page 12: ... is displayed if titles with tags have not been entered This unit can display album track and artist name with MP3 ID3 tags version 1 0 and 1 1 Titles containing text data that the unit does not support cannot be displayed ID3 is a tag embedded in MP3 track to provide information about the track Titles entered with 2 byte code cannot be displayed correctly on this unit Advanced play Advanced play ...

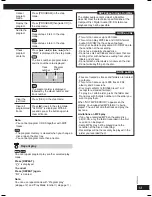
Page 13: ...ated as tracks and folders are treated as albums This unit can access up to 999 tracks 255 albums and 20 sessions Disc must conform to ISO9660 level 1 or 2 except for extended formats To play in a certain order prefix the folder and file names with 3 digits numbers in the order you want to play them When NOT MP3 ERROR1 appears on the display an unsupported MP3 format is being played The unit will ...

Page 14: ...r 1 TRACK mode Press 4 1 or to select the track The buttons described for Cassette tape Play and record are mainly using the main unit unless indicated otherwise Basic play Basic play Use normal position tapes High position and metal position tapes can be played but the unit will not be able to identify the characteristics of these tapes 1 Press 3 TAPE The unit turns on If a cassette was loaded pl...

Page 15: ...ou can also perform recording by pressing REC and TAPE consecutively on the remote control Your attention is drawn to the fact that recording pre recorded tapes or discs or other published or broadcast material may infringe copyright laws Note Changes to volume and sound quality do not affect recording Erasure prevention The illustration shows how to remove the tabs to prevent recording To record ...

Page 16: ... Station name PS Program Type PTY Frequency display Program type displays NEWS AFFAIRS INFO SPORT EDUCATE DRAMA CULTURE SCIENCE VARIED POP M ROCK M M O R M LIGHT M CLASSICS OTHER M WEATHER FINANCE CHILDREN SOCIAL A RELIGION PHONE IN TRAVEL LEISURE JAZZ COUNTRY NATIONAL OLDIES FOLK M DOCUMENT TEST ALARM M O R M Middle of the Road music Note RDS displays may not be available if reception is poor Mem...

Page 17: ...tune to the radio station page 16 USB or select the music port or AUX source page 20 21 22 1 Press CLOCK TIMER repeatedly to select the timer function Each time you press the button CLOCK PLAY Original display REC PLAY to set the play timer REC to set the record timer Proceed to the next step within 8 seconds Using the timers 2 Press 4 1 or to set the starting time Play timer indicator Start time ...

Page 18: ...s functioning the finish time setting will not be activated Using the sleep timer Using the sleep timer This function enables you to turn off the unit automatically after the set time Press SLEEP to select your desired time 30 MIN 60 MIN 90 MIN 120 MIN OFF Sleep timer indicator To cancel Press SLEEP to select OFF Changing the remaining time Press SLEEP to show the remaining time and press SLEEP ag...

Page 19: ...setting BASS MID TREBLE Setting Effect BASS For lower pitch sound MID For middle pitch sound TREBLE For higher pitch sound Using sound effects 2 Press 4 1 or to adjust the level OR By main unit only Setting the BASS Turn BASS CONTROL to either increase or decrease the pitch Note The level of the pitch is between 3 to 3 The changes you make are stored and automatically recalled the next time you se...

Page 20: ...osition Skip tracks Press 4 1 or or turn TRACK page 11 Basic play Skip album Press 5 ALBUM in the play mode Press 5 ALBUM once and then the numeric buttons in the stop mode Recording from a USB mass storage device 1 Press 4 1 or to select the desired track for recording 2 Press REC and TAPE consecutively main unit REC TAPE to start recording Note When you connect your digital audio player to the U...

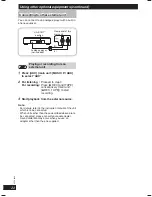
Page 21: ... on the remote control for at least 2 seconds To change the mode back to REMOTE 1 repeat both steps above by replacing 2 with 1 Connecting to a portable audio Connecting to a portable audio equipment equipment This feature enables you to enjoy music from a portable audio equipment Audio cord not included Portable audio equipment not included Playing or recording from a portable audio equipment Swi...

Page 22: ...nit Playing or recording from an external unit 1 Press AUX main unit MUSIC P AUX to select AUX 2 For listening Proceed to step 3 For recording Press REC and TAPE consecutively main unit REC TAPE to start recording 3 Start playback from the external source Note For details refer to the instruction manual of the unit which is to be connected When units other than those described above are to be conn...

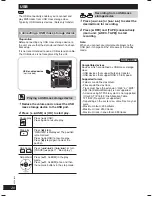
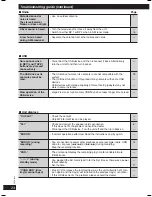
Page 23: ...f the speakers through excessive volume or power and using the unit in a hot environment A humming sound can be heard during play An AC mains lead or fluorescent light is near the unit Keep other appliances and cords away from the unit Discs Incorrect display or play will not start You have not inserted the disc correctly insert it correctly Disc may be dirty Wipe it clean Replace the disc if it i...

Page 24: ...ration of the USB device Large file size or high memory USB flash drive takes longer time to read Unit displays NO PLAY Check the content Only MP3 format files can be played F61 Check and correct the speaker cords connection If this does not fix the problem consult the dealer Disconnect the USB device Turn the unit off and then turn back on 6 ERROR Incorrect operation performed Read the instructio...

Page 25: ... included When moving the unit 1 Remove all discs 2 Press y I to turn the unit off 3 Disconnect the AC mains lead Memory reset Initialisation When the following situations occur refer to the instructions below to reset the memory There is no response when buttons are pressed You want to clear and reset the memory contents To reset memory 1 Disconnect the AC mains lead Wait at least 3 minutes befor...

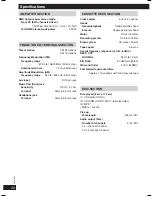
Page 26: ... 4 7 kΩ Terminal Stereo 3 5 mm jack Headphone jack Terminal Stereo 3 5 mm jack CASSETTE DECK SECTION Track system 4 track 2 channel Heads Record playback Solid permalloy head Erasure Double gap ferrite head Motor DC servo motor Recording system AC bias 100kHz Erase system AC erase 100kHz Tape speed 4 8cm s Overall frequency response 3 dB 6 dB at DECK OUT NORMAL 35 Hz to 14 kHz S N Ratio 50 dB A we...

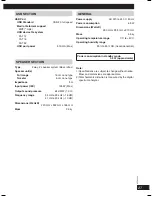
Page 27: ...utput sound pressure 84 dB W 1 0 m Frequency range 34 Hz to 22 kHz 16 dB 41 Hz to 20 kHz 10 dB Dimensions WxHxD 220 mm x 332 mm x 186 mm Mass 2 6 kg GENERAL Power supply AC 220 to 240 V 50 Hz Power consumption 65 W Dimensions WxHxD 250 mm x 333 mm x 310 mm Mass 4 5 kg Operating temperature range 0 C to 40 C Operating humidity range 35 to 80 RH no condensation Power consumption in standby mode 0 4 ...

Page 28: ... Corporation Web Site http panasonic net Pursuant to at the directive 2004 108 EC article 9 2 Panasonic Testing Centre Panasonic Marketing Europe GmbH Winsbergring 15 22525 Hamburg Germany En RQTX0202 B L0109KE0 ...

Reviews: