background image

6

RQ

T

978

9

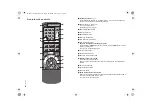
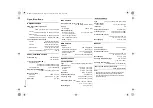
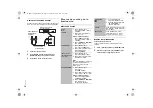
Overview of controls

A

Standby/on switch 

[

`

], [

1

]

Press to switch the unit from on to standby mode or vice versa. In standby mode, 
the unit is still consuming a small amount of power.

B

Numeric buttons [1 to 9, 0,  10]
To select a 2-digit number
Example: 16: [ 10]

=

[1]

=

[6]

C

Delete a programmed track

D

Select audio source

E

Basic playback control

F

Select the sound effects

G

Auto preset the radio station

H

View content information

Decrease the brightness of the display panel

Press and hold [– DIMMER] on the remote control or press [DIMMER] on the main 
unit to use this function.
To cancel, do the above step again.

I

Set the clock and timer

J

Set the program function

K

Adjust the volume of the system

L

Mute the sound of the system

Press the button again to cancel.
“MUTE” is also canceled when you adjust the volume or when you switch off the 
system.

M

Set the play menu item

N

Set the radio menu item

O

Select the option

P

Automatically switch off the system

When you are in disc or USB source, the auto off function switches off the system if 
you do not use the system for 30 minutes.
To cancel, press the button again.

RADIO

EXT-IN

SOUND

PRESET EQ

D.BASS

DISPLAY

DIMMER

SLEEP

PLAY

AUTO OFF

A

B

C

D

E

G

F

H

J

I

K

L

N

M

O

P

SC-AKX75P_RQT9789-P.book  Page 6  Tuesday, March 12, 2013  11:25 AM

Summary of Contents for SC-AKX75

Page 1: ... these instructions carefully Please keep this manual for future reference If you have any questions contact 1 800 211 PANA 7262 Register online at www panasonic com register U S customers only P RQT9789 P La referencia rápida en español se puede encontrar en la página 15 SC AKX75P_RQT9789 P book Page 1 Tuesday March 12 2013 11 25 AM ...

Page 2: ...ervice personnel Servicing is required when the apparatus has been damaged in any way such as power supply cord or plug is damaged liquid has been spilled or objects have fallen into the apparatus the apparatus has been exposed to rain or moisture does not operate normally or has been dropped 1 Read these instructions 2 Keep these instructions 3 Heed all warnings 4 Follow all instructions 5 Do not...

Page 3: ...to direct sunlight for a long period of time with doors and windows closed Do not break open or short circuit the battery Do not charge the alkaline or manganese battery Do not use the battery if the cover has peeled off Remove the battery if you do not use the remote control for a long period of time Keep in a cool dark area Table of contents IMPORTANT SAFETY INSTRUCTIONS 2 Safety precautions 3 S...

Page 4: ... and used in accordance with the instructions may cause harmful interference to radio communications However there is no guarantee that interference will not occur in a particular installation If this equipment does cause harmful interference to radio or television reception which can be determined by turning the equipment off and on the user is encouraged to try to correct the interference by one...

Page 5: ...e AC power supply cord Do not use an AC power supply cord from other equipment Conserving power The system consumes approximately 0 2 W when it is in standby mode Disconnect the power supply if you do not use the system Some settings will be lost after you disconnect the system You have to set them again Preparing the remote control Use alkaline or manganese battery Install the battery so that the...

Page 6: ... main unit to use this function To cancel do the above step again I Set the clock and timer J Set the program function K Adjust the volume of the system L Mute the sound of the system Press the button again to cancel MUTE is also canceled when you adjust the volume or when you switch off the system M Set the play menu item N Set the radio menu item O Select the option P Automatically switch off th...

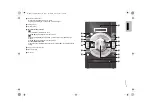
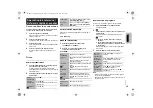
Page 7: ... track and then turn CONTROL to browse Press 4 9 to start playback from the selection Set the illumination effect Press and hold ILLUMINATION and then turn CONTROL to select the desired setting U Open or close the disc tray V Music port jack W Disc tray MUSIC PORT OPEN CLOSE RADIO EXT IN CD TUNEMODE ALBUM TRACK ILLUMINATION CONTROL VOLUME SUPERWOOFER D BASS MANUALEQ PRESET EQ USB DIMMER DISPLAY A ...

Page 8: ...condition of the recording MP3 files are defined as tracks and folders are defined as albums This system can access up to CD DA 99 tracks MP3 999 tracks 255 albums and 20 sessions Disc must conform to ISO9660 level 1 or 2 except for extended formats Recordings will not necessarily be played in the order you recorded them Note about using a DualDisc The digital audio content side of a DualDisc does...

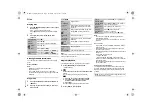
Page 9: ...tations can be preset Automatic presetting 1 Press OK to select LOWEST or CURRENT frequency 2 Press AUTO PRESET to start presetting To cancel press 8 Manual presetting 1 Press 3 or 5 to tune in to the station 2 Press PROGRAM 3 Press the numeric buttons to select a preset number Do steps 1 through 3 again to preset more stations The new station replaces any station that occupies the same preset num...

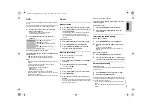
Page 10: ...To cancel press PLAY again The system must be switched off for the timer to operate To check the settings Press CLOCK TIMER to select PLAY Note The timer starts at a low volume and increases gradually to the preset level The timer comes on at the set time every day if the timer is on If you switch off the system and switch on again while a timer is in operation the timer will not stop at the end t...

Page 11: ...lect BASS MID or TREBLE 2 Press Y U to adjust the level 4 to 4 Using the main unit 1 Press MANUAL EQ to select BASS MID or TREBLE 2 Press 2 3 or 5 6 to adjust the level SURROUND 1 Press SOUND to select SURROUND 2 Press Y U to select ON SURROUND or OFF SURROUND INPUT LEVEL For music port source 1 Press SOUND to select INPUT LEVEL 2 Press Y U to select NORMAL or HIGH Note Select NORMAL if the sound ...

Page 12: ...e best reception A low hum is heard during AM broadcasts Move the antenna away from other cables and cords USB The USB device or the contents in it cannot be read The format of the USB device or the contents in it is are not compatible with the system USB devices with storage capacity of more than 32 GB cannot work in some conditions Slow operation of the USB device Large content size or large mem...

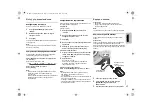
Page 13: ... 4 seconds Memory reset initialization Reset the memory when the following situations occur There is no response when buttons are pressed You want to clear and reset the memory contents 1 Disconnect the AC power supply cord 2 While you press and hold 1 on the main unit connect the AC power supply cord again Continue to press and hold the button approximately 10 seconds until is shown 3 Release 1 A...

Page 14: ...upport MP3 mp3 USB device file system FAT12 FAT16 FAT32 USB port power 500 mA max Bit rate 16 kbps to 320 kbps playback Speaker section Speakers SB AKX75 Type 3 way 3 speaker system bass reflex Speaker unit s Super Woofer 20 cm 7 cone type Woofer 8 cm 3 cone type Tweeter 6 cm 2 cone type Impedance High 3 Ω Low 3 Ω Output sound pressure 86 dB W 1 m Frequency range 42 Hz to 28 kHz 16 dB 46 Hz to 23 ...

Page 15: ...ones numéricos para seleccionar la pista deseada 3 Pulse OK Realice estos pasos nuevamente para programar otras pistas 3 Pulse 4 9 para iniciar la reproducción Nota Usted no puede utilizar la reproducción de programa con la función PLAYMODE La memoria del programa se borra cuando se abre la bandeja de disco Detener reproducción Pulse 8 Pausar la reproducción Pulse 4 9 Pulse nuevamente para continu...

Page 16: ...más estaciones La estación más reciente reemplazará cualquier estación que ocupe el mismo número preconfigurado Selección de una emisora preconfigurada Pulse los botones numéricos 2 o 6 para seleccionar la estación preconfigurada Cómo mejorar la calidad del sonido Cuando se haya seleccionado FM 1 Pulse RADIO MENU para seleccionar FM MODE 2 Pulse Y U para seleccionar MONO y después pulse OK Para ca...

Page 17: ...sea escuchar disco radio USB puerto de música o AUX y configure el volumen 2 Pulse PLAY Se visualiza PLAY Para cancelar pulse PLAY nuevamente El sistema debe estar apagado para que el temporizador funcione Para revisar las configuraciones Pulse CLOCK TIMER para seleccionar PLAY Nota El temporizador iniciará con un volumen bajo y aumentará gradualmente hasta el nivel preconfigurado Si el temporizad...

Page 18: ...a unidad principal 1 Pulse MANUAL EQ para seleccionar BASS MID o TREBLE 2 Pulse 2 3 o 5 6 para ajustar el nivel SURROUND 1 Pulse SOUND para seleccionar SURROUND 2 Pulse Y U para seleccionar ON SURROUND o OFF SURROUND INPUT LEVEL Para fuentepuerto de música 1 Pulse SOUND para seleccionar INPUT LEVEL 2 Pulse Y U para seleccionar NORMAL o HIGH Nota Seleccione NORMAL normal si el sonido está distorsio...

Page 19: ...ling misapplication alteration faulty installation set up adjustments misadjustment of consumer controls improper maintenance power line surge lightning damage modification introduction of sand humidity or liquids commercial use such as hotel office restaurant or other business or rental use of the product or service by anyone other than a Factory Service Center or other Authorized Servicer or dam...

Page 20: ...a Division of Panasonic Corporation of North America One Panasonic Way Secaucus New Jersey 07094 http www panasonic com Panasonic Corporation 2013 Printed in Malaysia Sp RQT9789 P L0313HH0 En SC AKX75P_RQT9789 P book Page 1 Tuesday March 12 2013 11 25 AM ...

Reviews: