background image

Reference

Advanced 

operations 

43

VQT3Z99

Reference

Troubleshooting guide

Before requesting service, please perform the 
following checks.
If the problem remains unresolved, consult 
your dealer for instructions.

The following do not indicate a problem with 
this unit:

– Regular disc rotating sounds.
– Image disturbance during search.
– Image disturbance when replacing 3D discs.

Unit doesn’t respond to remote 
control or front panel buttons.

Press and hold [

Í

/I] on the main unit for 3 seconds.

– If still unable to turn the unit off, disconnect the 

AC mains lead, wait 1 minute, then reconnect 
the AC mains lead.

Cannot eject disc.

The unit may have a problem.

1

While the unit is off, press and hold [OK], the 
yellow button and the blue button on the remote 
control at the same time for more than 5 seconds.

j

“00 RET” is displayed on the unit’s display.

2

Repeatedly press [

1

] (right) on the remote 

control or [

Í

/I] on the unit until “06 FTO” is 

displayed on the unit’s display.

3

Press [OK] on the remote control or 
[

<

OPEN/CLOSE] on the unit.

To return to the factory preset.

¾

Select “Yes” in “Default Settings” in the Setup 
menu. (

>

41)

To return all settings to the factory preset.

¾

Reset the unit as follows:

1

While the unit is off, press and hold [OK], the 
yellow button and the blue button on the remote 
control at the same time for more than 5 seconds.

j

“00 RET” is displayed on the unit’s display.

2

Repeatedly press [

1

] (right) on the remote 

control or [

Í

/I] on the unit until “08 FIN” is 

displayed on the unit’s display.

3

Press and hold [OK] on the remote control or 
[

<

OPEN/CLOSE] on the unit for at least 

3 seconds.

This unit is turned off when the input for the 
TV is switched.

¾

This is a normal phenomenon when using 
VIERA Link (HDAVI Control 4 or later). For 
details please read the operating instructions 
for the TV.

The remote control doesn’t work properly.

¾

Change the batteries in the remote control. 
(

>

10)

¾

The remote control and main unit are using 
different codes. If “SET 

” is displayed on the 

unit’s display when a button is pressed on the 
remote control, change the code on the 
remote control. (

>

40, 47)

The TV tuner mode is not displayed when the 
TV is switched on.

¾

This phenomenon may occur, depending on the 
TV setting, when “Quick Start” is set to “On”.

¾

Depending on the TV, this phenomenon may 
be prevented by reconnecting the HDMI cable 
to a different HDMI input terminal or by 
changing the HDMI auto connection setting.

You have forgotten your ratings password.
You want to cancel the ratings level.

¾

The ratings level returns to the factory preset.

1

While the unit is on, press and hold [OK], the 
yellow button and the blue button on the remote 
control at the same time for more than 5 seconds.

j

“00 RET” is displayed on the unit’s display.

2

Repeatedly press [

1

] (right) on the remote 

control or [

Í

/I] on the unit until “03 VL” is 

displayed on the unit’s display.

3

Press [OK] on the remote control or 
[

<

OPEN/CLOSE] on the unit.

This unit does not recognize the USB 
connection correctly.

¾

Disconnect and reconnect the USB cable. If it 
still does not recognize the connection, turn 
this unit off and on again.

¾

USB devices may not be recognized by this 
unit when connected using the following :

j

a USB hub

j

a USB extension cable other than the 

supplied with the Wireless LAN Adaptor 
DY-WL5 (optional)

¾

If you connect USB HDD to this unit, use the 
USB cable that is supplied with the HDD.

Do you have the latest firmware installed?

Firmware updates may be released to correct 
operating irregularities that are discovered with 
certain movies. (

>

20)

General operation

SC-BTT282&182EB-VQTVQT3Z99_mst.book  43 ページ  2012年2月8日 水曜日 午前11時8分

Summary of Contents for SC-BTT282

Page 1: ...C BTT182 Unless otherwise indicated illustrations in these operating instructions are of SC BTT282 Thank you for purchasing this product For optimum performance and safety please read these instructions carefully Please keep this manual for future reference Model number suffix EB denotes UK model ...

Page 2: ... this unit in a bookcase built in cabinet or in another confined space Ensure this unit is well ventilated Do not obstruct this unit s ventilation openings with newspapers tablecloths curtains and similar items Do not expose this unit to direct sunlight high temperatures high humidity and excessive vibration Speaker Use only supplied speakers The main unit and supplied speakers are to be used only...

Page 3: ...ed markings identifying the terminals in your plug proceed as follows The wire which is coloured Blue must be connected to the terminal which is marked with the letter N or coloured Black or Blue The wire which is coloured Brown must be connected to the terminal which is marked with the letter L or coloured Brown or Red WARNING DO NOT CONNECT EITHER WIRE TO THE EARTH TERMINAL WHICH IS MARKED WITH ...

Page 4: ...lid in the European Union If you wish to discard these items please contact your local authorities or dealer and ask for the correct method of disposal Note for the battery symbol bottom two symbol examples This symbol might be used in combination with a chemical symbol In this case it complies with the requirement set by the Directive for the chemical involved Information for Users on Collection ...

Page 5: ...on option 42 Reference Troubleshooting guide 43 Messages 46 Specifications 48 Supplemental information 49 Please note that the actual controls and components menu items etc may look somewhat different from those shown in the illustrations in these Operating Instructions Precautions of Wireless LAN connection The following limits are in place regarding the usage of this unit or Wireless LAN adaptor...

Page 6: ...eck the package contents and supplied accessories before using this unit Parts number Package contents System BTT282 BTT182 Speaker cables j REEX1267A WHITE k 2 Cushion foot RFA3313 j SUBWOOFER SUBWOOFER FRONT FRONT Main unit Speaker cables Main unit Cushion foot ...

Page 7: ...rear side of the card Do not use the following discs Discs with exposed adhesive from removed stickers or labels rented discs etc Discs that are badly warped or cracked Irregularly shaped discs such as heart shapes To dispose or transfer this unit The unit may keep the user settings information in the unit If you discard this unit either by disposal or transfer then follow the procedure to return ...

Page 8: ...o Video DVD R Video AVCHD DivX MKV JPEG MPO FLAC MP3 WAV DVD R DL DVD RW Video AVCHD R RW R DL Music CD Music CD DA CD R CD RW DivX MKV JPEG MPO FLAC MP3 Music CD DA WAV SD Memory Card from 8 MB to 2 GB SDHC Memory Card from 4 GB to 32 GB SDXC Memory Card 48 GB 64 GB Compatible with both mini and micro types AVCHD AVCHD 3D MP4 MPEG2 JPEG MPO USB devices up to 2 TB DivX MKV MP4 MPEG JPEG MPO FLAC M...

Page 9: ...ed but must be used with an adaptor card These are usually supplied with such cards or otherwise customer provided To protect the card s contents move the record prevention tab on the SD card to LOCK This unit is compatible with SD Memory Cards that meet SD Card Specifications FAT12 and FAT16 formats as well as SDHC Memory Cards in FAT32 format and SDXC Memory Cards in exFAT If the SD card is used...

Page 10: ...select the time in minutes Timer selection is up to 120 minutes Select OFF when cancelling the setting To confirm the remaining time Press and hold the button again 13 TV operation buttons Í TV Turn the television on and off AV INPUT Switch the input select i j VOL Adjust the volume 14 Adjust the volume of the main unit 15 Select audio 24 16 Mute the sound MUTE flashes on the unit s display while ...

Page 11: ...e Approx 20e up and down 30e left and right 10 Display 11 BTT282 Dock for iPod iPhone 26 1 AC IN terminal 18 2 Speaker terminals 14 3 Cooling fan 4 LAN port 18 5 USB port 18 31 6 HDMI AV OUT ARC terminal 15 17 7 BTT282 HDMI1 IN CABLE SAT terminal 17 8 BTT282 HDMI2 IN terminal 17 9 DIGITAL AUDIO IN terminal 15 16 17 10 FM radio antenna terminal 16 11 AUX terminal 15 16 12 BTT282 VIDEO OUT terminal ...

Page 12: ... ventilation Placing speakers too close to floors walls and corners can result in excessive bass Cover walls and windows with thick curtains For optional wall mount refer to page 42 STEP 2 Preparing the speakers Connect the speaker cables Insert the wire fully taking care not to insert beyond the wire insulation Front speaker 60 e g BTT282 BTT182 Connecting the speaker cables Push r White s Blue l...

Page 13: ...ker Place the speakers facing the inclined surface C toward outside To attach speaker stand again 1 Secure the cable with the speaker D and put the speaker cable through the speaker stand 2 Put the speaker and the stand together and then attach the bracket A To prevent damage or scratches lay down a soft cloth and perform assembly on it BTT282 Assembling the front speakers D Slide the speaker cabl...

Page 14: ...uctions Do not connect the AC mains lead until all other connections are complete Connect the speaker cables to the terminals of the same colour Place the speaker that is connected with the speaker terminal R on the observers right and connect with the speaker terminal L on the observers left Speaker connection ...

Page 15: ... the VCR Due to copy guard protection the picture may not display properly 1 It is also possible to use an audio cable instead of the optical digital audio cable In this case connect the AUX terminal on the main unit with the audio output terminal on the TV 2 If the HDMI terminal on the TV is labelled HDMI ARC the connection of the optical digital audio cable is not required Connection to a TV Bes...

Page 16: ...udio BTT282 Standard picture and audio FM antenna connection OPTICAL OUT L VIDEO IN R AUDIO IN Optical digital audio cable not supplied Video cable not supplied L VIDEO IN R AUDIO IN L R AUDIO OUT Audio cable not supplied Video cable not supplied 75 Affix this end of the antenna to a wall or pillar where the reception is best FM indoor antenna supplied Antenna plug adaptor supplied ...

Page 17: ...ed to the HDMI AV OUT terminal the sound will not be output from this system Even while the unit is in the standby mode you can change the input signal HDMI1 IN CABLE SAT or HDMI2 IN by pressing EXT IN on the remote control When the connecting devices do not have an HDMI terminal Other device connection AV IN ARC AV OUT AV OUT e g Set Top Box etc Video game etc HDMI cable not supplied HDMI cable n...

Page 18: ...nformation on your wireless router refer to http panasonic jp support global cs This site is in English only The unit is not compatible with public wireless LAN services Hotspot etc provided in airports stations cafes etc See page 5 for the precautions of wireless LAN connection Use category 5 or above straight LAN cables STP when connecting to peripheral devices Inserting any cable other than a L...

Page 19: ...w the on screen instructions and apply the settings WPS PUSH button If your wireless router supports WPS PUSH button you can easily perform the settings by pressing WPS button on it WPS Wi Fi Protected SetupTM is a standard that facilitates settings relating to the connection and security of wireless LAN devices 1 Press WPS button or corresponding button of the wireless router until the lamp start...

Page 20: ...e you will need to change the remote control code to prevent this occurrence 40 Remote Control Occasionally Panasonic may release updated firmware for this unit that may add or improve the way a feature operates These updates are available free of charge This unit is capable of checking the firmware automatically when connected to the Internet via a broadband connection When a new firmware version...

Page 21: ...the Communication Camera BTT182 Use the front USB port when you connect a iPod iPhone USB memory or a USB HDD The USB port on the rear panel is only for the following devices Wireless LAN Adaptor Communication Camera Enjoying TV with unit s speakers 1 Connect the TV and the main unit 15s16 2 Press EXT IN several times to select the appropriate external input mode 22 Reduce the volume on the TV to ...

Page 22: ...ave on electricity the unit is turned off automatically if there is no button operation for about 30 minutes when not playing back such as when paused displaying the menu displaying still pictures etc 2 Press OK or 3 4 2 1 to select the item AUX AUX terminal ARC HDMI AV OUT ARC terminal DIGITAL IN DIGITAL AUDIO IN terminal BTT282 HDMI IN1 HDMI IN2 HDMI1 IN CABLE SAT and or HDMI2 IN terminal 17 Net...

Page 23: ...ETURN Using registered smartphones When the unit is turned on using the registered smartphone the user who registered the smartphone will automatically be selected Perform the Remote Device Settings 39 To use smartphones as a remote control installation of dedicated software is required For more details refer to the following website http panasonic jp support global cs This site is in English only...

Page 24: ... MP3 The speed is fixed to a single step Slow motion While paused press SEARCH6 or SEARCH5 BD Video and AVCHD SEARCH5 only The speed increases up to 5 steps Press 1PLAY to revert to normal playback speed While playing or paused press or 9 Skip to the title chapter or track While paused press 2 2 or 1 1 Press and hold to change in succession forward or backward Press 1PLAY to revert to normal playb...

Page 25: ...ons and the operating method may vary with each disc please refer to the instructions on the disc and or visit their website BD Live Internet Access may need to be changed for certain discs 39 Play a slideshow of photos and make various settings during the playback 1 Insert the media 2 Select Photos 3 Select an item and press the green button The following items can be set Still pictures displayed...

Page 26: ...ging the battery iPod iPhone will not be recharged after the battery charge completion BTT282 iPod iPhone will start recharging regardless of whether this unit is on or off IPOD CHARGING will be shown on the main unit s display during iPod iPhone charging in main unit standby mode BTT182 iPod iPhone will start recharging when this unit is on Preparation Turn the main unit off or reduce the volume ...

Page 27: ...r music playback only e g music playback screen If album artwork is not contained in the data will appear on TV Depending on the software version of your iPod iPhone the album artwork may not appear properly Some operations may not work while reading the album artwork 1 Press iPod to select IPOD 2 Press STATUS several times to select the menus 3 Press 3 4 to select an item and press OK The setting...

Page 28: ...ou can perform various playback operations and settings See the operating instructions of the TV for more details The buttons that you can use for this unit vary depending on the TV For details refer to the operating instructions of the TV The operation of this unit may be interrupted when you press certain buttons on the TV remote control This unit supports HDAVI Control 5 function HDAVI Control ...

Page 29: ...ut from the TV and the audio is output from the speakers of this unit BTT282 When HDMI Standby Pass Through is set to Yes 36 this unit will not turn on BTT282 Connecting the HDMI cable The setting for audio output is not necessary when the unit is connected to the STB with an HDMI cable Connecting the optical digital audio cable When this unit and the STB are connected by an optical digital audio ...

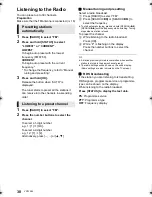
Page 30: ...setting Select a radio broadcast 1 Press RADIO to select FM 2 Press SEARCH6 or SEARCH5 to select the frequency To start automatic tuning press and hold SEARCH6 SEARCH5 until the frequency starts scrolling Tuning stops when a station is found To preset the channel 3 While listening to the radio broadcast Press OK 4 While P is flashing on the display Press the number buttons to select the channel A ...

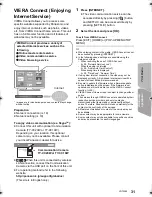
Page 31: ...accessed by pressing INTERNET In the following cases settings are possible using the Setup menu items When restricting the use of VIERA Connect 39 Network Service Lock When the audio is distorted 39 Audio Auto Gain Control When wrong time is displayed 39 Time Zone Summer Time If using slow Internet connection the video may not be displayed correctly A high speed Internet service with a speed of at...

Page 32: ...pplications DMC compatible software should be installed Preparation Perform steps 1 and 2 left 3 Add the contents and folder to the libraries of the Windows Media Player or the smartphone etc Playlist of Windows Media Player can play back only the contents that are stored in the libraries 4 Perform the Remote Device Settings 39 You can register up to 16 devices 1 Press HOME 2 Select Network 3 Sele...

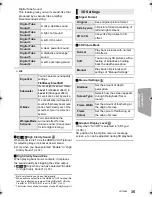
Page 33: ...elect Off to cancel Random Select whether or not to play random Start Slideshow Start the slideshow Status Show the status messages Rotate RIGHT Rotate LEFT Rotate the still picture Wallpaper Set the still picture to the wallpaper of HOME menu 22 Icon Registration Set the still picture as your user icon 23 Video The recording method of original video appears Secondary Video Playback Information Wi...

Page 34: ...od of conversion for progressive output to suit the type of material being played If the video is disrupted when Auto is selected select either Video or Film depending on the material to be played back 24p Movies and other material recorded on DVD Video at 24p are output at 24p Only when you have selected On in 24p Output 36 and play discs recorded at a rate of 60 fields per second This may not wo...

Page 35: ... A tight hi fi sound Digital Tube Sound 3 A soft rich sound Digital Tube Sound 4 A clear powerful sound Digital Tube Sound 5 A distinctive mid range sound Digital Tube Sound 6 A soft enveloping sound Equalizer You can select sound quality settings Flat Heavy Clear Soft Subwoofer You can adjust the amount of bass Level 1 Weakest effect to Level 4 Strongest effect Levels can be set by source H Bass ...

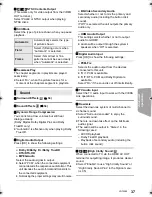
Page 36: ...0p compatible 24p Output When this unit is connected to a TV supporting 1080 24p output using an HDMI cable movies and other material recorded at 24p are output at 24p When playing DVD Video set to On and then set 24p in Picture Settings 34 to On When BD Video images other than 24p are played images are output at 60p 24p A progressive image recorded at a rate of 24 frames per second motion picture...

Page 37: ...d If Off is selected the unit outputs the primary audio only HDMI Audio Output This setting selects whether or not to output audio from HDMI Audio will be output through the system s speakers when Off is selected Digital Audio Input Press OK to show the following settings PCM Fix Selects the audio output from the devices connected to this unit On PCM is available Off DTS PCM and Dolby Digital are ...

Page 38: ... Choose the language for the disc menus Enter a code 49 when you select Other Subtitle Text Select a suitable item according to the language used for DivX or MKV subtitles text This item is displayed only after playing back a file On Screen Language Choose the language for menus and on screen messages Easy Network Setting 19 Network Settings Perform network related settings individually Press OK t...

Page 39: ...er to the following Website http panasonic jp support global cs This site is in English only Remote Device Settings 32 Press OK to show the following settings Remote Device Operation Enable to operate by DMC If On is selected Quick Start is fixed to On Device Name Entry Set the name of this unit to be displayed on the connected equipment Registration Type Remote Device List Registering deregisteri...

Page 40: ...ttings Press OK to show the following settings Front Panel Display Changes the brightness of the unit s display If Automatic is selected the display is set to bright and only dimmed during playback Edit User Information Change the user information registered in the HOME menu Quick Start Speed of startup from standby mode is increased When set to On the internal control unit will be powered and the...

Page 41: ...g refer to Sound Settings on the Option menu 34 1 Press SURROUND 2 While the mode is displayed Press 3 4 to select the desired setting 34 Adjusting speaker level during play 1 Press CH SELECT to activate the speaker setting mode 2 Press CH SELECT several times to select the speaker Press 2 1 to adjust the balance of the front speakers 3 Press 3 increase or 4 decrease to adjust the speaker level fo...

Page 42: ...above the speaker and 10 mm on each side to allow enough space for fitting the speaker BTT282 Front speaker Attach to a wall without the stand 13 A 37 mm B 45 mm BTT182 Front speaker C 40 mm D 24 mm Preventing from falling BTT282 Front speaker Preventing from dropping Front speaker 1 Thread a string to the speaker Use a string of less than 2 0 mm which is capable of supporting over 10 kg e g BTT28...

Page 43: ...ormal phenomenon when using VIERA Link HDAVI Control 4 or later For details please read the operating instructions for the TV The remote control doesn t work properly Change the batteries in the remote control 10 The remote control and main unit are using different codes If SET is displayed on the unit s display when a button is pressed on the remote control change the code on the remote control 4...

Page 44: ...splayed on the unit s display 3 Press and hold OK on the remote control or OPEN CLOSE on the unit for at least 3 seconds The system switches from PAL to NTSC or vice versa The system used on the disc doesn t match your television jPAL discs cannot be correctly viewed on an NTSC television j BTT282 This unit can convert NTSC signals to PAL60 for viewing on a PAL television 37 NTSC Contents Output W...

Page 45: ...cannot be played The disc is dirty 7 Still pictures JPEG do not play back normally The images that were edited on the PC such as Progressive JPEG etc may not be played back I can t play back BD Live The SD card is write protected 9 Confirm that this unit is connected to the broadband Internet 18 Confirm the BD Live Internet Access settings 39 Confirm an SD card is inserted into the SD card slot 21...

Page 46: ... insert the card No disc inserted The disc may be upside down This operation is not available Some operations are unsupported by the unit For example jBD Video During playback reverse slow motion or reverse frame by frame is not possible IP address is not set The IP Address in IP Address DNS Settings is Set the IP Address Subnet Mask and Gateway Address Select the automatic address acquisition if ...

Page 47: ...the unit H or F stands for a number Check and correct the speaker cable connections There is something unusual Check the unit using the troubleshooting guide If the service number remains displayed do the following If the service number remains displayed despite doing the above request service from the dealer Inform the dealer of the service number when requesting service IPOD OVER CURRENT ERROR T...

Page 48: ...ital DTS FM TUNER SECTION Frequency range 87 50 MHz to 108 00 MHz 50 kHz step Antenna terminals 75 unbalanced SPEAKER SECTION Woofer CONE TYPE cm Full range CONE TYPE cm BTT282 Front j 6 5 Subwoofer 16 j BTT182 Front j 6 5 Subwoofer 16 j Dimensions W mm kH mm kD mm Mass Approx kg BTT282 Front 109 k341 k110 0 79 Subwoofer 145 k289 5 k258 3 0 BTT182 Front 80 k139 k71 0 37 Subwoofer 145 k289 5 k258 3...

Page 49: ...ITA ESP NLD SVE NOR DAN POR RUS English French German Italian Spanish Dutch Swedish Norwegian Danish Portuguese Russian ARA HIN PER IND MRI BUL RUM GRE TUR JPN CHI KOR MAL VIE THA POL CES SLK HUN FIN Japanese Chinese Korean Malay Vietnamese Thai Polish Czech Slovak Hungarian Finnish Arabic Hindi Persian Indonesian Maori Bulgarian Romanian Greek Turkish Others Abkhazian 6566 Afar 6565 Afrikaans 657...

Page 50: ...eo that was encoded by a consumer engaged in a personal and non commercial activity and or was obtained from a video provider licensed to provide AVC VC 1 Video No license is granted or shall be implied for any other use Additional information may be obtained from MPEG LA LLC See http www mpegla com HDAVI Control is a trademark of Panasonic Corporation VIERA Connect is a trademark of Panasonic Cor...

Page 51: ...such technology outside of this product is prohibited without a license from Microsoft or an authorized Microsoft subsidiary 2 MS PlayReady Final Product Labeling This product contains technology subject to certain intellectual property rights of Microsoft Use or distribution of this technology outside of this product is prohibited without the appropriate license s from Microsoft 3 MS PlayReady En...

Page 52: ...ase visit our website www panasonic co uk Direct Sales at Panasonic UK Order accessory and consumable items for your product with ease and confidence by phoning our Customer Communications Centre Monday Thursday 9 00 a m 5 30 p m Friday 9 30 a m 5 30 p m Excluding public holidays Or go on line through our Internet Accessory ordering application at www pas europe com Most major credit and debit car...

Reviews: