background image

n

AMPLIFIER SECTION

FTC OUTPUT POWER both channel driven simultaneously

10% total harmonic distortion (THD)

1 kHz

1.8 W per channel

RMS OUTPUT POWER both channel driven simultaneously

10% total harmonic distortion (THD)

1 kHz

2 W per channel

Output impedance

HEADPHONE

16

W

to 32

W

MUSIC PORT

14 k

W

Phone Jack

Terminal

3.5 mm stereo

Music Port Jack

Terminal

3.5 mm stereo

n

TUNER SECTION

Frequency range

FM

87.9 MHz to 107.9 MHz (200 kHz)

87.5 MHz to 108.0 MHz (100 kHz)

AM

520 kHz to 1710 kHz (10 kHz)

n

CD SECTION

Disc played [8cm (3”) or 12cm (5”)]

(1) CD-Audio (CD-DA)

(2) CD-R/RW (CD-DA, MP3)

(3) MP3

©

2007 Matsushita Electric Industrial Co. Ltd.. All

rights

reserved.

Unauthorized

copying

and

distribution is a violation of law.

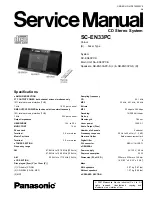
SC-EN33PC

Colour
(S)... Silver Type

System
SC-EN33PC-S
Main Unit: SA-EN33PC-S
Speakers: SB-EN33APC-S (L) & SB-EN33PC-S (R)

Sampling frequency

CD

44.1 kHz

MP3

32 kHz, 44.1 kHz, 48 kHz

Bit rate

MP3

32 kbps to 384 kbps

Decoding

16/20/24 bit linear

Pick up

Wavelength

785 nm

Laser power

CLASS 1

Audio Output (Disc)

Number of channels

2 channel

Frequency response

20 Hz to 20 kHz (+1, -2 dB)

Wow and flutter

Below measurement limit

Digital filter

8

D/A converter

MASH (1 bit DAC)

n

GENERAL

Power supply

AC 120 V, 60 Hz

Power consumption

30 W

Dimension (W x H X D)

220mm x 236mm x 146 mm

(8 21/32” x 9 9/32” x 5 3/4”)

Mass

With speakers

3.57 kg (7.87 lbs)

Without speakers

1.27 kg (2.80 lbs)

n

SPEAKER SECTION

CD Stereo System

Specifications

ORDER NO. MD0703020CE

A6

Summary of Contents for SC-EN33PC

Page 1: ... Co Ltd All rights reserved Unauthorized copying and distribution is a violation of law SC EN33PC Colour S Silver Type System SC EN33PC S Main Unit SA EN33PC S Speakers SB EN33APC S L SB EN33PC S R Sampling frequency CD 44 1 kHz MP3 32 kHz 44 1 kHz 48 kHz Bit rate MP3 32 kbps to 384 kbps Decoding 16 20 24 bit linear Pick up Wavelength 785 nm Laser power CLASS 1 Audio Output Disc Number of channels...

Page 2: ...rvo P C B 23 9 11 Disassembly of Motor Unit Motor P C B 23 9 12 Disassembly of CD Block CD Lid 24 9 13 Disassembly of Speakers 25 10 Service Fixture and Tools 29 Power consumption in standby mode 2 0 W appx Notes Specifications are subject to change without notice Mass and dimensions are approximate 11 Service Positions 29 11 1 Check and Repair of CD Servo P C B 30 11 2 Check and repair of Main P ...

Page 3: ...IC801 MN101EF16ZXW Servo Processor Digital Signal Processor Digital filter and D A Converter 56 20 Exploded Views 57 20 1 Cabinet Parts Location 57 20 2 Packaging 59 21 Replacement Parts List 61 3 SC EN33PC ...

Page 4: ...esistance value between the jumpered AC plug and each exposed metallic cabinet part on the equipment such as screwheads connectors control shafts etc When the exposed metallic part has a return path to the chassis the reading should be between 1MW and 5 2MW When the exposed metal does not have a return path to the chassis the reading must be 1 1 2 Leakage Current Hot Check See Figure 1 1 Plug the ...

Page 5: ... indicated rated impedance of the amplifier are used If this occurs follow the procedure outlines below 1 Turn off the power 2 Determine the cause of the problem and correct it 3 Turn on the power once again after one minute Note When the protection circuitry functions the unit will not operate unless the power is first turned off and then on again 1 5 Safety Parts Information Safety Parts List Th...

Page 6: ...ssembly 3 Use only a grounded tip soldering iron to solder or unsolder ES devices 4 Use only an anti static solder remover device Some solder removal devices not classified as anti static ESD protected can generate electrical charge to damage ES devices 5 Do not use freon propelled chemicals These can generate electrical charges sufficient to damage ES devices 6 Do not remove a replacement ES devi...

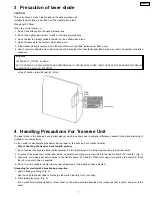
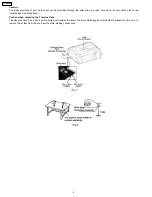
Page 7: ...Traverse Unit The laser diode in the traverse deck optical pickup may break down due to potential difference caused by the static electricity of clothes or our human body So be careful of electrostatic breakdown during repair of the traverse deck optical pickup Way of handling the traverse deck optical pickup 1 Do not subject the traverse deck optical pickup to static electricity as it is extremel...

Page 8: ...not to let your clothes touch the traverse deck optical pickup Caution when replacing the Traverse Deck The traverse deck has a short point shorted with solder to protect the laser diode against electrostatics breakdown Be sure to remove the solder from the short point before making connections 8 SC EN33PC ...

Page 9: ...work using Lead Free Solder PbF The lead free solder has to be used when repairing the equipment for which the lead free solder is used Definition The letter of PbF is printed on the PCB using the lead free solder To put lead free solder it should be well molten and mixed with the original lead free solder Remove the remaining lead free solder on the PCB cleanly for soldering of the new IC Since t...

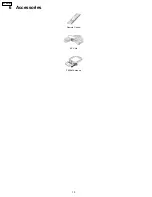
Page 10: ...6 Accessories Remote Control AC Cord FM AM Antenna 10 SC EN33PC ...

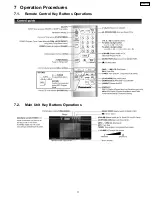
Page 11: ...7 Operation Procedures 7 1 Remote Control Key Buttons Operations 7 2 Main Unit Key Buttons Operations 11 SC EN33PC ...

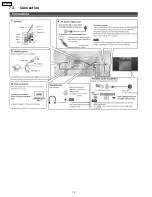
Page 12: ...7 3 Connection 12 SC EN33PC ...

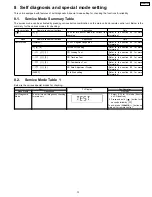
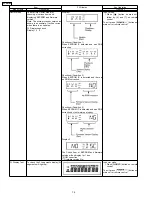
Page 13: ...e section 8 2 for more information 7 8 9 Forced VOL setting Refer to the section 8 2 for more information 1 1 CD Loading Test Refer to the section 8 2 for more information 1 2 CD Traverse Test Refer to the section 8 2 for more information 1 3 CD Combination Test Refer to the section 8 2 for more information 1 4 CD Auto Adjustment Display Refer to the section 8 2 for more information SLEEP Cold Sta...

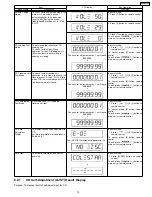
Page 14: ...tion 2 When EEPROM IC is detected and there is no ROM correction Checksum Condition 3 When EEPROM IC is detected and has ROM correction but not working properly Display 2 The Check Sum of EEPROM and firmware version will be display for 1 sec ROM correction Firmware version No In any mode 1 Press button on main unit follow by 4 and 7 on remote control To exit press button on main unit or remote con...

Page 15: ... TOC It fails when TOC is not completed by IOS or the traverse is out of focus The counter will increment by 1 until reach 9999999 fl In doctor mode 1 Press 1 2 button on remote control To cancel press 0 button remote control To exit press button on main unit or remote control CD Combination Test Mode A combination of CD loading traverse unit test The counter will increment by 1 until reach 999999...

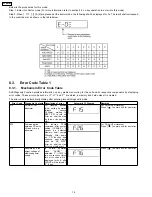
Page 16: ...tents Description of error Automatic FL Display Remarks F15 CD REST SW abnormal CD traverse position initial setting operation failsafe counter 1000ms waiting for REST SW to turn on Error no shall be clear by force or during cold start For CD unit For traverse Press on main unit for next error F26 Communication between CD servo LSI and micro p abnormal CD function DTMS command after system setting...

Page 17: ...edures are described only when required 3 Select items from the following index when checks or replacement are required 4 Refer to the Parts No on the page of Parts Location and Replacement Parts List Section 21 if necessary Warning This product uses a laser diode Refer to caution statement Precaution of Laser Diode Disassembly of Rear Cabinet Disassembly of Panel P C B LED P C B Disassembly of Ma...

Page 18: ...art is the procedure for disassembling the casing and inside parts for internal inspection when carrying out the servicing To assemble the unit reverse the steps shown in the chart as below 9 2 1 For Main unit 9 2 2 For Speaker unit 18 SC EN33PC ...

Page 19: ...9 3 Main Components P C B Locations 9 3 1 Main Parts Locations 9 3 2 Speaker Unit Parts Location For SB EN33A only 19 SC EN33PC ...

Page 20: ... P C B and remove the rear cabinet as arrow shown Step 2 Detach cable P801 on Main P C B 9 4 Disassembly of Rear Cabinet 9 5 Disassembly of Panel P C B LED P C B Follow the Step 1 Step 3 of Item 9 4 Disassembly of Rear Cabinet 9 6 Disassembly of Main P C B Sensor P C B Tuner P C B Follow the Step 1 Step 3 of Item 9 4 Disassembly of Rear Cabinet 20 SC EN33PC ...

Page 21: ...B and Tuner P C B 9 7 Disassembly of Switch P C B and Traverse Unit Follow the Step 1 Step 3 of Item 9 4 Disassembly of Rear Cabinet Follow the Step 1 Step 3 of Item 9 6 Disassembly of Main P C B Sensor P C B Tuner P C B 9 8 Disassembly of Power Switch P C B Tact Switch P C B Follow the Step 1 Step 3 of Item 9 4 Disassembly of Rear Cabinet Follow the Step 1 Step 2 of Item 9 5 Disassembly of Panel ...

Page 22: ... Ensure front ornament fully insert to front cabinet Step 3 Widening the catch push the fixed pin in a fi b Step 4 Lift up the traverse unit to remove it 9 9 Replacement of Traverse Cover Follow the Step 1 Step 3 of Item 9 4 Disassembly of Rear Cabinet Follow the Step 1 Step 2 of Item 9 6 Disassembly of Main P C B Sensor P C B Tuner P C B Follow the Step 1 of Item 9 8 Disassembly of Switch P C B T...

Page 23: ...s for traverse unit 9 10 Disassembly of CD Servo P C B Follow the Step 1 Step 3 of Item 9 4 Disassembly of Rear Cabinet Follow the Step 1 Step 2 of Item 9 6 Disassembly of Main P C B Sensor P C B Tuner P C B Follow the Step 1 of Item 9 8 Disassembly of Switch P C B Traverse Unit Follow the Step 1 Step 4 of Item 9 9 Replacement of Traverse Cover 9 11 Disassembly of Motor Unit Motor P C B Follow the...

Page 24: ...ove 2 screws at motor unit Step 7 Remove 1 screw and unsolder 3 points at gear base 9 12 Disassembly of CD Block CD Lid Follow the Step 1 Step 3 of Item 9 4 Disassembly of Rear Cabinet Follow the Step 1 Step 2 of Item 9 6 Disassembly of Main P C B Sensor P C B Tuner P C B Follow the Step 1 of Item 9 8 Disassembly of Switch P C B Traverse Unit Follow the Step 1 of Item 9 11 Disassembly of Motor Uni...

Page 25: ...Remove 2 screws Step 1 Remove 6 screws Step 3 Remove 4 screws remove sw lever left and roller guide R Step 4 Remove cd lid 9 13 Disassembly of Speakers 9 13 1 Disassembly of the speaker SB EN33 R 25 SC EN33PC ...

Page 26: ...Step 2 Remove the back cabinet ass y Step 3 Unsolder the lead wires silver and gold Step 4 Remove 4 screws Disassembly of net frame ass y Step 5 Remove 4 screws 26 SC EN33PC ...

Page 27: ...6 screws Step 2 Remove the back cabinet ass y Step 3 Unsolder the lead wires Step 4 Remove 4 screws Disassembly of net frame ass y Step 5 Remove 4 screws 9 13 2 Disassembly of the rear cabinet SB EN33A L 27 SC EN33PC ...

Page 28: ...nsformer P C B Step 1 Remove 1 screw on back cabinet assy Step 2 Remove 3 screws to remove the port unit Step 3 Remove 4 screws on Transformer P C B unit Step 4 Unsolder wire and remove Transformer P C B 28 SC EN33PC ...

Page 29: ...5 14 Pins 11 Service Positions General proceduree Connect the DC in cord cable from SB EN33A to main set connect AC power supply cord to speaker to on the set Load in cd and switch off the set Proceed to checking Note For description of the disassembly procedures see the Section 9 29 SC EN33PC ...

Page 30: ...11 1 Check and Repair of CD Servo P C B 30 SC EN33PC ...

Page 31: ...11 2 Check and repair of Main P C B Sensor P C B Tuner P C B Motor P C B Panel P C B LED P C B Power Switch P C B Tact Switch P C B Switch P C B 31 SC EN33PC ...

Page 32: ...form described herein shall be regarded as reference information when probing defect point because it may differ from an actual measuring value due to difference of Measuring instrument and its measuring condition and product itself 12 1 Main P C B 32 SC EN33PC ...

Page 33: ...12 2 CD Servo P C B 12 3 Motor P C B 12 4 Panel P C B 12 5 Tuner P C B 33 SC EN33PC ...

Page 34: ...12 6 Waveform Chart 34 SC EN33PC ...

Page 35: ...13 Wiring Connection Diagram 35 SC EN33PC ...

Page 36: ...36 SC EN33PC ...

Page 37: ...14 Block Diagram 14 1 CD Servo SC EN33PC 37 ...

Page 38: ...14 2 Tuner SC EN33PC 38 ...

Page 39: ...14 3 Main 1 2 Transformer Sensor SC EN33PC 39 ...

Page 40: ...14 4 Main 2 2 Panel LED Power Switch Tact Switch Switch Motor SC EN33PC 40 ...

Page 41: ...t for safety Furthermore special parts which have purposes of fire retardant resistors high quality sound capacitors low noise resistors etc are used When replacing any of components be sure to use only manufacturer s specified parts shown in the parts list Capacitor values are in microfarad µF unless specified otherwise F Farad pF Pico Farad Resistance values are in ohm W unless specified otherwi...

Page 42: ...42 SC EN33PC ...

Page 43: ...16 Schematic Diagram All schematic diagrams may be modified at any time with the development of the new technology SC EN33PC 43 ...

Page 44: ...16 1 A CD Servo Circuit SC EN33PC 44 ...

Page 45: ...16 2 B Tuner Circuit SC EN33PC 45 ...

Page 46: ...16 3 C Main Circuit SC EN33PC 46 ...

Page 47: ...SC EN33PC 47 ...

Page 48: ...SC EN33PC 48 ...

Page 49: ...16 4 D Panel Circuit E LED Circuit F Power Switch Circuit G Tact Switch Circuit H Switch Circuit SC EN33PC 49 ...

Page 50: ...16 5 I Motor Circuit J Sensor Circuit K Transformer Circuit SC EN33PC 50 ...

Page 51: ...17 Printed Circuit Board Note Circuit board diagrams may be modified at any time with the development of new technology SC EN33PC 51 ...

Page 52: ...17 1 A CD Servo P C B B Tuner P C B SC EN33PC 52 ...

Page 53: ...17 2 C Main P C B SC EN33PC 53 ...

Page 54: ...17 3 D Panel P C B E LED P C B F Power Switch P C B G Tact Switch P C B H Switch P C B I Motor P C B J Sensor P C B K Transformer P C B SC EN33PC 54 ...

Page 55: ...0BA8R700009 B0CDAB000019 B0CDAD000010 Anode Anode Cathode B0AACK000004 B0EAMM000038 A Ca Anode Cathode B1ACND000003 E C B B1ABDF000026 B1ABGD000022 B1ADCF000001 B1ADCF000063 B1GBCFGJ0016 UNR511100L UNR521300L UNR521400L B1BAAJ000003 E C B B C E B1BCCG000002 1 28 15 14 7 21 22 8 BA5948FPE2 C0GAE0000007 1 9 C1BB00000732 32P C1BB00001120 36P No 1 Ca Cathode Anode A MAZ80560ML C0AAAA000036 1 6 12 7 B ...

Page 56: ...ute on 46 CD_BOTTOM_SW I CD bottom switch 47 CD_TOP_SW I CD top switch Pin No Mark I O Function 48 N C No connection 49 N C No connection 50 PLL_DO O PLL Data Output 51 PLL_DI O PLL Data Input 52 N C No connection 53 N C No connection 54 N C No connection 55 PLL_CLK O PLL clock 56 PLL_CE O PLL chip select 57 E CS No Connection 58 E_DATA No Connection 59 E_CLK No Connection 60 MBP1 O Micro P Beat P...

Page 57: ...20 Exploded Views 20 1 Cabinet Parts Location SC EN33PC 57 ...

Page 58: ...SC EN33PC 58 ...

Page 59: ...20 2 Packaging SC EN33PC 59 ...

Page 60: ...SC EN33PC 60 ...

Page 61: ... 304 RME0109 1 FLOATING SPRING M 305 RMG0730 G FLOATING RUBBER M 306 XTN2 6GFJ SCREW M PRINTED CIRCUIT BOARD REPV0111A CD SERVO P C B M RTL REPV0116F TUNER P C B M RTL REPV0116F MAIN P C B M RTL REPV0116F PANEL P C B M RTL REPV0116F LED P C B M RTL REPV0116F POWER SWITCH P C B M RTL REPV0116F TACT SWITCH P C B M RTL 21 Replacement Parts List Important safety notice Components identified by mark ha...

Page 62: ...0AACK000004 DIODE M D802 B0AACK000004 DIODE M Ref No Part No Part Name Description Remarks D803 B0ACCE000003 DIODE M D901 B0EAMM000038 DIODE M D902 B0EAMM000038 DIODE M D903 B0EAMM000038 DIODE M D904 B0EAMM000038 DIODE M D1001 B0BA7R900004 DIODE M D1005 LNG4A4CN4E DIODE M D1007 B0BA6R100003 DIODE M D7650 MAZ80560ML DIODE M SWITCHES S351 K0L1BA000078 SW CD TOP M S352 K0L1BA000078 SW CD BOTTOM M S80...

Page 63: ...0V CHIP JUMPER M W742 ERJ3GEY0R00V CHIP JUMPER M W743 ERJ6GEY0R00V CHIP JUMPER M W747 ERJ3GEY0R00V CHIP JUMPER M W750 ERJ3GEY0R00V CHIP JUMPER M W753 ERJ6GEY0R00V CHIP JUMPER M W755 ERJ3GEY0R00V CHIP JUMPER M W757 ERJ3GEY0R00V CHIP JUMPER M W758 ERJ3GEY0R00V CHIP JUMPER M W759 ERJ3GEY0R00V CHIP JUMPER M W762 ERJ3GEY0R00V CHIP JUMPER M W764 ERJ6GEY0R00V CHIP JUMPER M W766 ERJ3GEY0R00V CHIP JUMPER M...

Page 64: ...GB473JA008 47K 1 16W M R215 D0GB562JA008 5 6K 1 16W M Ref No Part No Part Name Description Remarks R216 D0GB473JA008 47K 1 16W M R217 D0GB562JA008 5 6K 1 16W M R301 D0GB223JA008 22K 1 16W M R302 D0GB223JA008 22K 1 16W M R303 D0GB223JA008 22K 1 16W M R304 D0GB223JA008 22K 1 16W M R305 D0GB103JA008 10K 1 16W M R306 D0GB102JA008 1K 1 16W M R307 D0GB102JA008 1K 1 16W M R308 D0GB102JA008 1K 1 16W M R30...

Page 65: ...3 ERJ3GEYJ332V 3 3K 1 16W M R7325 ERJ3GEYJ331V 330 1 16W M R7327 D0GB102JA008 1K 1 16W M R7328 D0GB103JA008 10K 1 16W M R7329 D0GB102JA008 1K 1 16W M R7330 ERJ3GEYJ562V 5 6K 1 16W M R7331 D0GB223JA008 22K 1 16W M Ref No Part No Part Name Description Remarks R7332 D0GB102JA008 1K 1 16W M R7335 ERJ3GEYJ101V 100 1 16W M R7336 ERJ3GEYJ100V 10 1 16W M R7339 D0GB102JA008 1K 1 16W M R7349 ERJ3GEYJ183V 18...

Page 66: ...02A219 1000P 50V M C804 F1H1H102A219 1000P 50V M C806 F1H1H102A219 1000P 50V M Ref No Part No Part Name Description Remarks C807 ECJ1VC1H560J 56P 50V M C808 ECJ1VC1H560J 56P 50V M C809 F1H1H102A219 1000P 50V M C810 ECJ1VC1H390J 39P 50V M C811 ECJ1VC1H560J 56P 50V M C812 ECJ1VC1H180J 18P 50V M C813 ECJ1VC1H180J 18P 50V M C814 F2A1H2R2A145 2 2 50V M C815 F2A1H1R0A145 1 50V M C816 F1H1H102A219 1000P ...

Page 67: ...ECJ1VB1C563K 0 056 16V M C7339 ECJ1VB1C183K 0 018 16V M C7352 ECJ1VB1C183K 0 018 16V M C7601 ECEA0JKA330I 33 6 3V M C7613 ECJ1VB1C104K 0 1 16V M C7614 F2A0J101A198 100 6 3V M C7626 ECJ1VB1C104K 0 1 16V M C7670 ECJ1VB1C104K 0 1 16V M 67 SC EN33PC PRT0703 ...

Reviews: