background image

3

RQ

T0

B

01

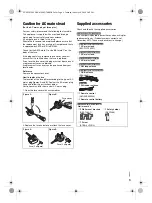
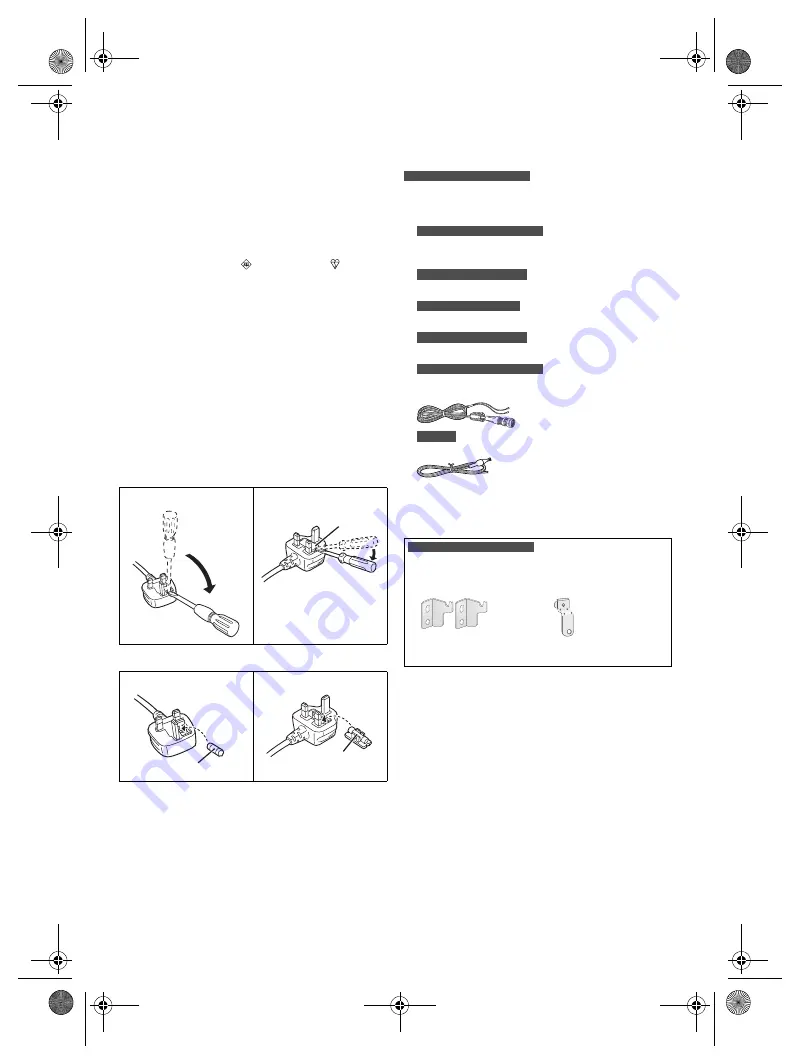
Caution for AC mains lead

(For the AC mains plug of three pins)

For your safety, please read the following text carefully.

This appliance is supplied with a moulded three pin 
mains plug for your safety and convenience.
A 5-ampere fuse is fitted in this plug.
Should the fuse need to be replaced please ensure that 
the replacement fuse has a rating of 5-ampere and that it 
is approved by ASTA or BSI to BS1362.

Check for the ASTA mark 

 or the BSI mark   on the 

body of the fuse.

If the plug contains a removable fuse cover you must 
ensure that it is refitted when the fuse is replaced.
If you lose the fuse cover the plug must not be used until 
a replacement cover is obtained.
A replacement fuse cover can be purchased from your 
local dealer.

Before use

Remove the connector cover.

How to replace the fuse

The location of the fuse differ according to the type of AC 
mains plug (figures A and B). Confirm the AC mains plug 
fitted and follow the instructions below.
Illustrations may differ from actual AC mains plug.

1. Open the fuse cover with a screwdriver.

2. Replace the fuse and close or attach the fuse cover.

Supplied accessories

Check and identify the supplied accessories.

 For the United Kingdom and Ireland 

Use numbers indicated in parentheses when asking for 
replacement parts. (Product numbers correct as of 
December 2015. These may be subject to change.)


For the United Kingdom and Ireland 

1 AC mains lead

(K2CT2YY00097)


For Australia and New Zealand 

1 AC mains lead


For Asia and the Middle East 

3 AC mains leads


For Australia and New Zealand 

1 AM loop antenna


For the United Kingdom and Ireland 

1 DAB antenna

(RFA3669)

 For others 

1 FM indoor antenna

1 Remote control

(N2QAYB000944)

1 Remote control battery

Figure A

Figure B

Figure A

Figure B

Fuse cover

Fuse (5 ampere)

Fuse (5 ampere)

 For the United Kingdom and Ireland 

Wall mount kit

2 Wall mount brackets

(RSC1262-1)

1 Screw

(XTB3+8JFJK-J)

1 Safety holder

(RSC1266)

SC-HC297.295 EB.GN.GS RQT0B01-B En.fm  Page 3  Tuesday, January 19, 2016  2:49 PM

Summary of Contents for SC-HC297

Page 1: ...this product For optimum performance and safety please read these instructions carefully Please keep this manual for future reference The installation instructions are on page 17 Please read these in...

Page 2: ...confined space Ensure this unit is well ventilated Do not obstruct this unit s ventilation openings with newspapers tablecloths curtains and similar items Do not place sources of naked flames such as...

Page 3: ...B Confirm the AC mains plug fitted and follow the instructions below Illustrations may differ from actual AC mains plug 1 Open the fuse cover with a screwdriver 2 Replace the fuse and close or attach...

Page 4: ...y mode Disconnect the power supply if you do not use the system Some settings will be lost after you disconnect the system You have to set them again Note These speakers do not have magnetic shielding...

Page 5: ...elect or confirm the option G Open or close the sliding door H Decrease the brightness of the display panel To cancel press the button again I Adjust the volume level J Mute the sound To cancel press...

Page 6: ...mplete The MAC address e g 6C 5A B5 B3 1D 0F may be shown before SC HC297 or SC HC295 is shown The name of the connected device is shown for a few seconds Note You can pair up to 8 devices with this s...

Page 7: ...Media playback The following marks indicate the availability of the feature Basic playback CD USB BLUETOOTH Note Depending on the Bluetooth device some operations may not work Viewing available inform...

Page 8: ...on Some CD R RW cannot be played because of the condition of the recording Note on USB device This system does not guarantee connection with all USB devices This system supports USB 2 0 full speed Th...

Page 9: ...s the same preset number Selecting a preset station 1 Press PLAY MENU repeatedly to select TUNEMODE 2 Press R T to select PRESET and then press OK 3 Press 2 3 or 5 6 to select the preset station Impro...

Page 10: ...or when you have selected a secondary service Selecting a preset station 1 Press PLAY MENU repeatedly to select TUNEMODE 2 Press R T to select PRESET and then press OK 3 Press 2 3 or 5 6 to select the...

Page 11: ...for Bluetooth source You can set the timer to come on at a certain time to wake you up Preparation Set the clock 1 Press SETUP repeatedly to select TIMER ADJ 2 Press R T to set the start time and then...

Page 12: ...f the equaliser if any of the portable audio equipment to prevent sound distortion Decrease the volume of the system and the portable audio equipment before you connect or disconnect the portable audi...

Page 13: ...rtable device such as Android smartphone connected to the USB port Note Use a cable compatible with the device Use the charger supplied with the device if power is not supplied to the device Do not us...

Page 14: ...lay time Transfer the data to another USB device or backup the data and reformat the USB device Bluetooth Pairing cannot be done Check the Bluetooth device condition The device is out of the 10 m comm...

Page 15: ...uning SOUND 1 NOT SET SOUND 2 NOT SET SOUND 3 NOT SET You have not saved the sound effects into the sound setting number USB OVER CURRENT ERROR The USB device is using too much power Disconnect the US...

Page 16: ...d USB 2 0 full speed Media file format support MP3 mp3 USB device file system FAT12 FAT16 FAT32 Bluetooth section Version Bluetooth Ver 2 1 EDR Class Class 2 Supported profiles A2DP AVRCP Operating fr...

Page 17: ...he supplied screw 5 Attach a cord to the unit to prevent the unit from falling Bend the cord twice from the tip each at 45 and 5 mm apart for it to go through the holes 6 Connect the antenna s and the...

Page 18: ...Ireland Customer Communications Centre For customers within the UK 0344 844 3899 For customers within Ireland 01 289 8333 Monday Friday 9 00am 5 00pm Excluding public holidays For further support on y...

Page 19: ...The warranty covers normal domestic use only and does not cover damage malfunction or failure resulting from use of incorrect voltages incorrect installation accident misuse neglect build up of dirt...

Page 20: ...n health and the environment For more information about collection and recycling please contact your local municipality Penalties may be applicable for incorrect disposal of this waste in accordance w...

Reviews: