background image

38

RQT7061

SE

TTI

NGS

Changing the unit’s settings

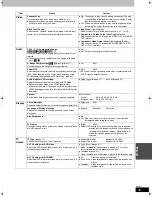
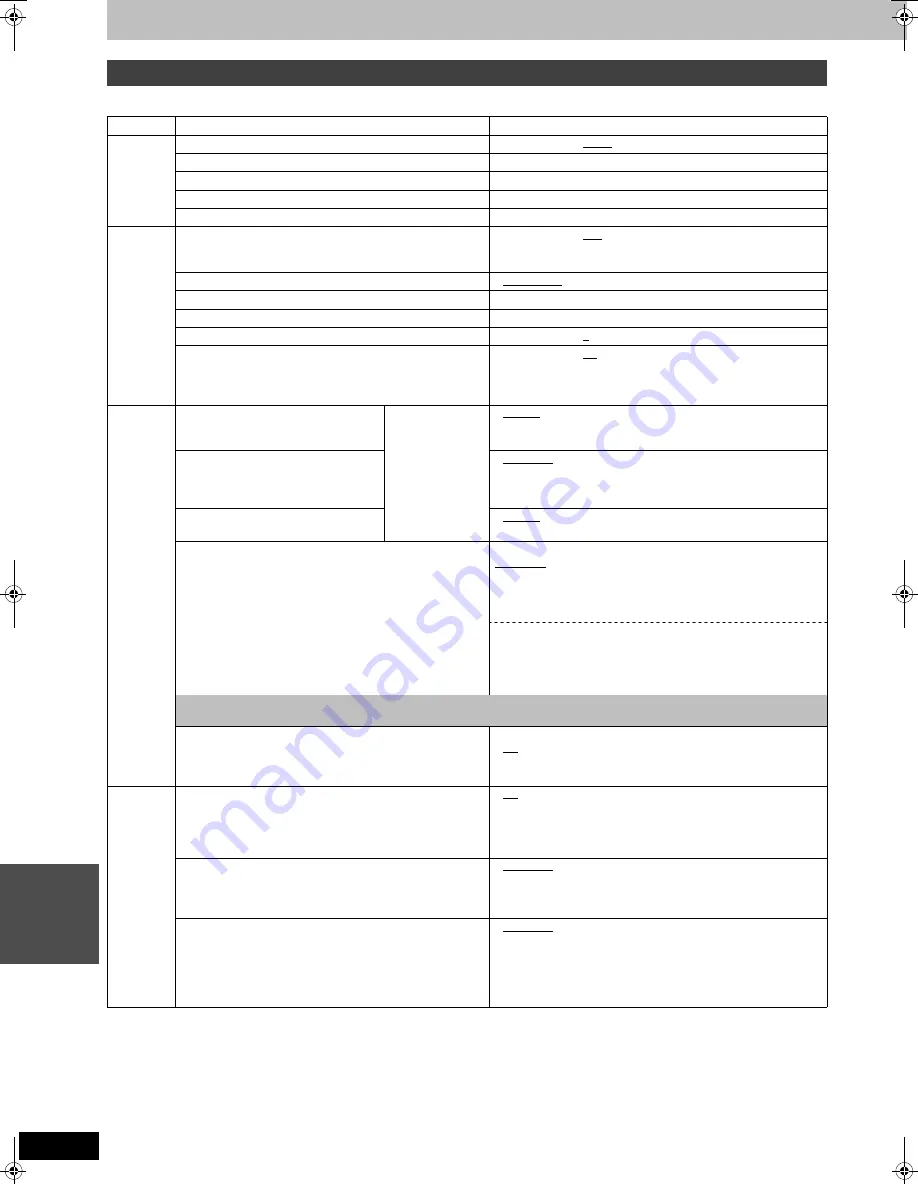
This chart shows the initial settings for this unit. See pages 40–43 for details on menu operation.

Underlined items are the factory presets.

Continued on next page.

Summary of settings

Tabs

Menus

Options

Channel

Antenna System

 (

page 40)

TV

CATV

Auto Channel Setting

 (

page 40)

Preset Channel Caption

 (

page 41)

Manual Channel Caption

 (

page 41)

VCR Plus

r

 CH Setting

 (

page 10)

Set Up

Off Timer

Select how long the unit remains on when it is not being 
used.

2 hr

6 hr

Off

Remote Control Code

 (

page 42)

 Set Code 1

Set Code 2

Set Code 3

Auto Clock Setting

 (

page 43)

Manual Clock Setting

 (

page 43)

Time Zone Adjust

 (

page 43)

≥j

1

0

≥i

1

Re-initialize Setting

This returns all values in the SETUP menus, except for the 
clock, channel settings, ratings level, and display language, 
to the default settings.

Yes

No

Disc

(Playing a 
DVD disc)

Audio

Choose the audio language. 

Some discs start 
in a certain 
language despite 
any changes you 
make here.

English

French

Spanish

Original: The original language of each disc will be selected.

Other 

¢¢¢¢

: Input a code (

page 50).

Subtitle

Choose the subtitle language.

Automatic: If the language selected for “Audio” is not available, 

subtitles of that language will automatically appear if 
available on that disc.

English

French

Spanish

Other 

¢¢¢¢

Menus

Choose the language for disc menus.

English

French

Spanish

Other 

¢¢¢¢

Ratings

Set a ratings level to limit DVD-Video play. The password 
screen is shown when you select levels 0 to 7.

To enter a password

1 Input a 4-digit password with the numbered buttons.

If you enter a wrong number, press [CANCEL] to erase it.

Do not forget your password.

2 Press [ENTER]. 

The lock symbol appears closed to show the rating is 

locked.

3 Press [ENTER] to confirm the 4 digits.

Setting ratings (When level 8 is selected)

8 No Limit: All DVD-Video can be played.
1 to 7:

Prohibits play of DVD-Video with corresponding 
ratings recorded on them.

0 Lock All: Prohibits play of all DVD-Video.

Changing ratings (When level 0–7 is selected)

Unlock Recorder

Change Password

Change Level

Temporary Unlock

If you insert a DVD-Video that exceeds the ratings limit you set, a message appears on the television.
Follow the on-screen instructions.

DVD-Video mode

Select how to play pictures contained on some DVD-Audio.
The setting returns to “Off” when you change the disc or turn 
the unit off.

On: You can play DVD-Video content on DVD-Audio.

Off: DVD-Audio are played as DVD-Audio.

Video

3-D Y/C Separation

On: Reduces noise for recording by separating the luminance 

(Y) and color (C) signals received from the television 
station.

Off: Reduces the ghosting that occurs when recording fast 

moving images.

Hybrid VBR Resolution

Automatic: Video compression is automated providing efficient 

recording.

Fixed:

Video compression is fixed when recording providing 
smooth video play.

Still Mode

Select the type of picture shown when you pause play.

Automatic

Field:

Less blurred field stills are shown. Select if jittering 
occurs when “Automatic” is selected.

Frame: Sharper frame stills are shown. Select if small text or 

fine patterns cannot be seen clearly when “Automatic” is 
selected.

7061en.book  38 ページ  2003年7月1日 火曜日 午前11時44分

Summary of Contents for SC-HT1000

Page 1: ...se read these instructions carefully Before connecting operating or adjusting this product please read these instructions completely Please keep this manual for future reference Region number supporte...

Page 2: ...nada To order accessories call the dealer from whom you have made your purchase 1 Remote control EUR7624KP0 2 Batteries for remote control 2 AC power supply cords RJA0065 1D 1 Video cable RJL1P016B15A...

Page 3: ...creen menus 22 Common procedures 22 Disc menu 22 Audio menu 22 Play menu 23 Video menu 23 On screen displays 24 Changing the information displayed 24 Display examples 24 Using the FUNCTIONS window 25...

Page 4: ...nergy and if not installed and used in accordance with the instructions may cause harmful interference to radio communications However there is no guarantee that interference will not occur in a parti...

Page 5: ...nd You can enjoy recorded and broadcast television programming in surround sound with Dolby Pro Logic II You can also enjoy satellite television and CATV digital multi channel audio by connecting with...

Page 6: ...i rear surround button MULTI REAR SHIFT 37 C Shift button SHIFT To use the functions labeled in orange press the button while pressing SHIFT D Equalizer sound field control button EQ SFC 36 Position m...

Page 7: ...MODE UP VOLUME OPEN CLOSE TUNING TIME SLIP PULL OPEN CHANNEL PHONES 8 b c a X 1 S Q R Y Z 4 _ L REC DVD AVCD CH ST MEMO DTS SFC PL GRP TITLE PL CHAP PGTRACK MIX2CH RAM XP SP LP EP M V REAR CF DVD PLA...

Page 8: ...rrespective of the video signal input Play may be impossible in some cases due the condition of the recording A DVD R recorded on this unit may not be recordable on other Panasonic DVD recorders Prote...

Page 9: ...ing Add or delete channels if necessary channels are not set or unnecessary channels are set While this unit is receiving the antenna signal but not during recording 1 Press the numbered buttons to se...

Page 10: ...OLUME SKIP STOP PAUSE PLAY x1 3 SLOW SEARCH CANCEL 1 2 3 4 5 6 7 8 9 0 100 HOME THEATER TV STATUS MULTI REAR MARKER S POSITION F Rec C FOCUS REC MODE CHSELECT RETURN P MEMORY EQ SFC ERASE ADD DLT PROG...

Page 11: ...trol code 1 Switch HOME THEATER TV to TV 2 While pressing POWER enter the two digit code with the numbered buttons e g 01 press 0 1 Code No and Manufacturer Test by turning on the television and chang...

Page 12: ...cord CPRM page 51 protected material onto DVD R or 2 8 GB DVD RAM discs For your reference You can record up to 99 programs on one disc Depending on the content being recorded the recording times may...

Page 13: ...t mode to TV 3 Press W X CH to change channels You can also select the channel with the numbered buttons This is a simple way of specifying a time to stop recording when you are in a hurry or before y...

Page 14: ...ge TURN RECORDER OFF FOR TIMER RECORDING is shown on the television 6 Press POWER The F lights on the unit s display to indicate timer recording standby has been activated CH VOLUME SKIP STOP PAUSE PL...

Page 15: ...BC 3 26 TUE 01 MODE CHECK OFF ON No CHANNEL DATE 1 58 SP TIMER New Timer Program TIMER RECORDING Remaining RecordingTime 3 26TUE12 55 PM SP Enable 3 00 PM 2 30 PM 64 ABC 3 26 TUE 02 Displayed if the r...

Page 16: ...next time the timer starts recording This program is currently recording F The disc was full or the maximum number of programs or scenes was reached so the program failed to record The material was co...

Page 17: ...thin 5 seconds Playing from the beginning of the program while you are recording Chasing Play CH VOLUME SKIP STOP PAUSE PLAY x1 3 SLOW SEARCH CANCEL 1 2 3 4 5 6 7 8 9 0 100 HOME THEATER TV STATUS MULT...

Page 18: ...CTNAVIGATOR MENU PLAY LIST MIX 2CH FRAME REC TEST CM SKIP SETUP MUTING AUDIO SW LEVEL FM AM TV VIDEO INPUTSELECT OPEN CLOSE DISPLAY DVD VCR Plus POWER POWER PRO LOGIC TIME SLIP SHIFT SHIFT SHIFT 1 2 9...

Page 19: ...ess 3 4 2 1 to select an item and ENTER to confirm Or press the numbered buttons e g 5 0 5 15 1 5 Press TOP MENU to show the top menu Press MENU to show a menu Press RETURN to show a menu VCD Note Dis...

Page 20: ...from approximately a minute later Convenient when you want to skip commercials etc During play Press CM SKIP Note If the start of the next program is within one minute of the point you skipped from p...

Page 21: ...no T Track no in the group TOTAL Selected track no Total track no in all groups Using the tree screen to find a group Note Discs must conform to ISO9660 level 1 or 2 except for extended formats This u...

Page 22: ...ital 2 0 ch Menu Item Setting Disc menu Item Content Sound track Soundtrack language DVD A DVD V See A below Audio attribute RAM DVD R DVD A DVD V See B below Karaoke vocals on and off Karaoke DVD V o...

Page 23: ...arkers on DVD RAM and DVD R are ordered by time so marker numbers can change when you add and delete them Video menu Disc Video Audio Play Repeat play Marker OFF 1s10 e g DVD RAM 1 2 1s10 Item Content...

Page 24: ...recording or play status input channel and caption if entered page 41 REC Recording PAUSE Recording paused PLAY Playing Playing paused 6 Rewinding 5 Fast forwarding E Reverse slow motion D Slow motio...

Page 25: ...is nothing recorded on the disc CH VOLUME SKIP STOP PAUSE PLAY x1 3 SLOW SEARCH CANCEL 1 2 3 4 5 6 7 8 9 0 100 HOME THEATER TV STATUS MULTI REAR MARKER S POSITION F Rec C FOCUS REC MODE CHSELECT RETU...

Page 26: ...e a character 1 Press 3 4 2 1 to select the character you want to erase in the title field 2 Press You can also erase characters by selecting ERASE and pressing ENTER Note The full title is shown in t...

Page 27: ...actual number of play lists that can be recorded may be less than that specified in this manual 1 While stopped Press PLAY LIST 2 Press 3 4 to select the play list and press ENTER You can also select...

Page 28: ...set up process Press RETURN CH VOLUME SKIP STOP PAUSE PLAY x1 3 SLOW SEARCH CANCEL 1 2 3 4 5 6 7 8 9 0 100 HOME THEATER TV STATUS MULTI REAR MARKER S POSITION F Rec C FOCUS REC MODE CHSELECT RETURN P...

Page 29: ...nd press ENTER The re edited scene replaces the old one 6 Press 3 4 2 1 to select the scene and press ENTER 7 Press 2 to select Yes and press ENTER The selected scene is erased from the play list To e...

Page 30: ...NCEL 1 2 3 4 5 6 7 8 9 0 100 HOME THEATER TV STATUS MULTI REAR MARKER S POSITION F Rec C FOCUS REC MODE CHSELECT RETURN P MEMORY EQ SFC ERASE ADD DLT PROG CHECK L1 OPT FUNCTIONS TOP MENU ENTER DIRECTN...

Page 31: ...nto two 5 Press ENTER at the point you want to divide the program To confirm the division point Press 3 4 to select Preview and press ENTER Play will begin from a point 10 seconds prior to and after t...

Page 32: ...RN CH VOLUME SKIP STOP PAUSE PLAY x1 3 SLOW SEARCH CANCEL 1 2 3 4 5 6 7 8 9 0 100 HOME THEATER TV STATUS MULTI REAR MARKER S POSITION F Rec C FOCUS REC MODE CHSELECT RETURN P MEMORY EQ SFC ERASE ADD D...

Page 33: ...on the disc including computer data DVD R DVD R recorded on this unit only You can play DVD R on compatible DVD players by finalizing them on this unit effectively making them into DVD Video that comp...

Page 34: ...bands Main unit only 1 Tune to FM 87 9 MHz or FM 87 5 MHz left 2 Press and hold MEMORY Release the button when AUTO is displayed The tuner presets all the stations it can receive into the channels in...

Page 35: ...1 L3 S VIDEO LOOP ANT GND VIDEO S VIDEO OUT 1 1 2 FM outdoor antenna Using a television antenna Disconnect the FM indoor antenna The antenna should be installed by a competent technician Rework your o...

Page 36: ...Dolby PLII OFF Note This does not work when playing multi channel Dolby Digital Press EQ SFC to select a setting Each time you press the button FLAT Canceled no effect is added factory preset HEAVY Ad...

Page 37: ...SUB W 3 SUB W 4 factory preset Adjust the level of the speakers so they are the same apparent level as the front speakers where you would normally be sitting and listening L R below Balance Preparatio...

Page 38: ...ct levels 0 to 7 To enter a password 1 Input a 4 digit password with the numbered buttons If you enter a wrong number press CANCEL to erase it Do not forget your password 2 Press ENTER The lock symbol...

Page 39: ...udio type when recording with XP mode Sound recordings made using LPCM require more information than usual Consequently the picture quality of LPCM recordings may be less than that of normal XP mode r...

Page 40: ...el Setting and press ENTER If you have not yet set clock the Auto Channel Clock Setting screen appears 5 Press ENTER to start Auto Channel Setting This takes a few minutes When finished press ENTER To...

Page 41: ...nually To delete the channel number press CANCEL Repeat steps 3 and 4 as necessary 5 Press ENTER You can set channel captions manually 2 Press 3 4 to select Manual Channel Caption and press ENTER 3 Pr...

Page 42: ...to select Speaker and press ENTER 3 Press 3 4 to select the delay time box and press ENTER 4 Press 3 4 to adjust the delay time and press ENTER Values If distance a or b is greater than or equal to d...

Page 43: ...he time zone j1 or i1 if it was not set correctly with auto clock setting You cannot change this setting if you set the clock manually 2 Press 3 4 to select Time Zone Adjust and press ENTER 3 Press 3...

Page 44: ...unless the channel is first selected on the cable TV box or satellite receiver A One cable TV box satellite receiver Note When a home satellite system Dishnetwork DSS is connected auto tuning and aut...

Page 45: ...um allowable compression recommended for night viewing Recording audio from discs or television broadcasts to a tape deck 1 Discs Press DVD to select DVD CD as the source Television broadcasts Press W...

Page 46: ...terminals Multiple antenna terminals Other antenna connections to the unit 300 75 transformer not included from the antenna Flat Twin lead 300 cable To this unit s RF IN terminal from the antenna Fla...

Page 47: ...or including the number 1 Cover page This is non recordable disc The unit cannot record on the disc you inserted Insert a DVD RAM or unfinalized DVD R You inserted an unformatted DVD RAM Format the di...

Page 48: ...nsor on the main unit Remove obstacles from between the remote control and main unit 42 2 Cannot operate the television Change manufacturer code Some televisions cannot be operated even if you change...

Page 49: ...erasing previously recorded programming 33 53 A part or whole of a recorded program has been lost If there is a power failure or the plug is disconnected from the household AC outlet while recording o...

Page 50: ...rding Select Main or SAP from Select MTS in the Audio menu before recording 39 Beginning of audio is cut off when receiving audio from a digital broadcast using the optical connection When using the L...

Page 51: ...I or P pictures B Bidirectionally predictive coded picture This picture is calculated by comparing past and future I and P pictures so it has the lowest volume of information Linear PCM pulse code mod...

Page 52: ...s SB PF1000 Type 2 way 2 speaker system Bass ref Woofer 6 5 cm 21 2q CONE type Tweeter 6 cm 23 8q RING SHAPED DOME type Impedance Input power IEC 6 60 W Max Output sound pressure level 82 dB W 1 0 m F...

Page 53: ...ble to record or play discs Use the DVD RAM PD lens cleaner LF K123LCA1 about once every year depending on frequency of use and the operating environment Read the lens cleaner s instructions carefully...

Page 54: ...WARRANTOR IS NOT LIABLE FOR INCIDENTAL OR CONSEQUENTIAL DAMAGES RESULTING FROM THE USE OF THIS PRODUCT OR ARISING OUT OF ANY BREACH OF THIS WARRANTY As examples this excludes damages for lost time tra...

Page 55: ...OR FITNESS FOR A PARTICULAR PURPOSE IN NO EVENT WILL PANASONIC CANADA INC BE LIABLE FOR ANY SPECIAL INDIRECT OR CONSEQUENTIAL DAMAGES In certain instances some jurisdictions do not allow the exclusion...

Page 56: ...operation 11 Time Slip 17 20 Timer recording 14 16 Transfer 23 TV Type 11 VCR Plusr Guide channel setting 10 Recording 14 Virtual Rear Surround 37 Manufactured under license from Dolby Laboratories Do...

Reviews: