background image

9

RQT6847

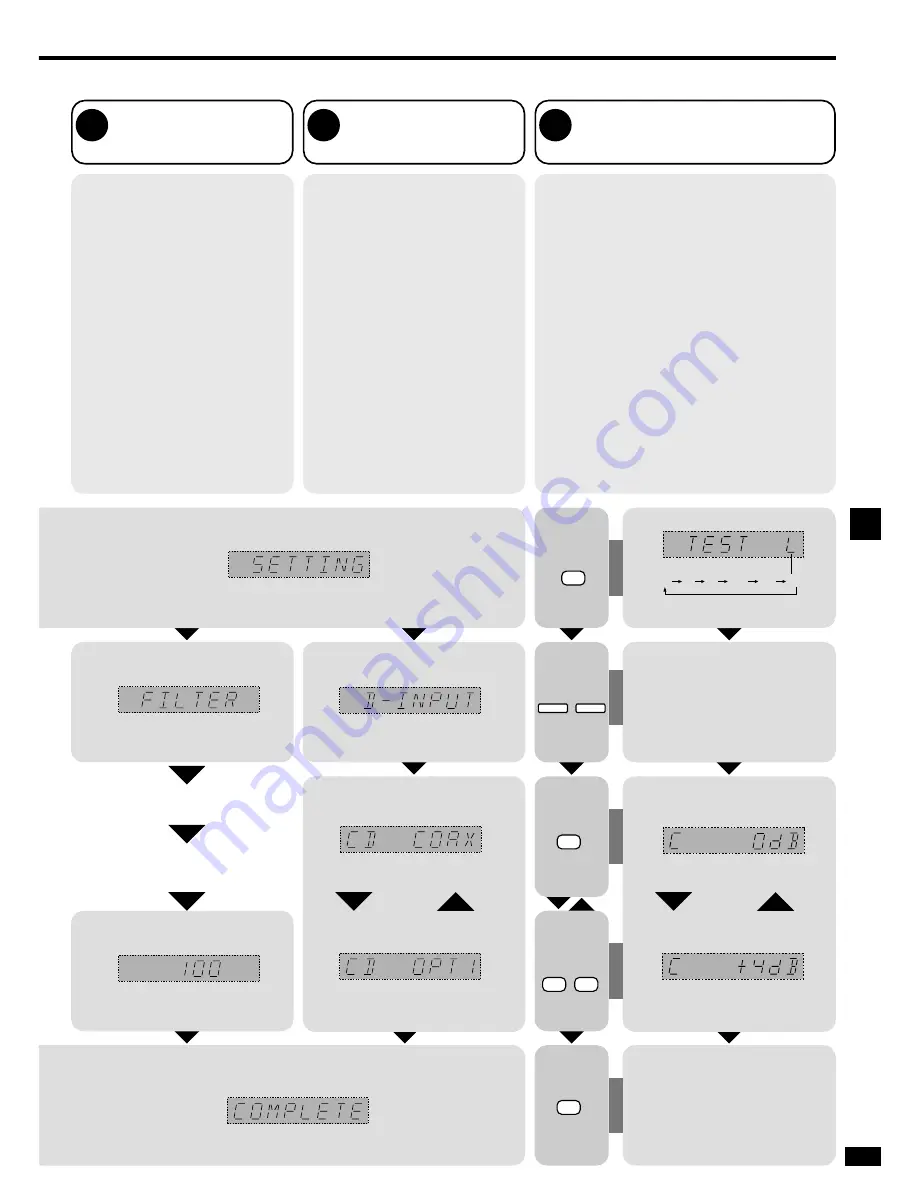
Change the cut-off for bass
output from the front speakers

If you set the front speakers to “SMALL”,
the filter is set to 100 Hz. Raise the cut-off
if the bass from the front speakers is
unsatisfactory so the bass is output
through the subwoofer.
You can raise the cut-off from 100 Hz to
either 150 Hz or 200 Hz.

Adjusting speaker output
level

Adjust the level of the other speakers based on the
output of the front speakers. (Adjust the volume of the
front speakers with [VOLUME].)

C (center), SR (surround right), and SL (surround left)
can be adjusted between –10 dB and +10 dB, with 0
being the level of the front speakers.
Adjust center and surround output to the same apparent
level of the front speakers. 

For SW (subwoofer), you can select “---” so there is no
output, “MIN” for minimum output, a level between 1 and
19, or “MAX” for maximum output. 
Adjust subwoofer output so it is balanced with the front
speakers. Subwoofer output is easily influenced by the
source. You can also change its level while playing
something for better effect (

\

page 13).

Preparation: Turn SPEAKERS on.

3

5

Change the setting.

Select.

Output the signal.

Adjust the main volume.

Adjust the level.

Stop the test signal.

Repeat.

FILTER

Two seconds each.

Select the speaker
channel.

Change these settings to suit the
connections you have made to the three
digital input terminals, COAX, OPT 1 and
OPT 2, so that the correct source is
selected when you turn [INPUT
SELECTOR].
The factory settings are:

CD:

COAX

DVD:

OPT 2

TV:

OPT 1

4

D-INPUT 

Digital input

Select.

Change the setting.

Repeat.

TEST

L

C

R

SR

SL

SW

Speakers set as “NONE” or “NO”
are skipped.

TEST

VOLUME

+

Select the input. 

+

LEVEL

Repeat these steps for each speaker
channel.

Repeat these steps for each input.

Change the settings to suit your speakers and units to the environment in which you are using them. Before making any changes,read the
descriptions of the settings, note the factory settings and ranges, and refer to the equipment’s instructions.

Step 3

Summary of Contents for SC-HT405D-S Operating

Page 1: ...R TAPE CD DVD AUDIO 3 2 1 DISC DECK 1 2 SOUNDMODE SFC TV VIDEO VOLUME MUTING TEST TOP MENU ENTER MENU DISPLAY SUBWOOFER EFFECT LEVEL 6 10 ENTER 5 4 9 0 8 7 DIRECTTUNING DISC ENTER CH DIRECTNAVIGATOR PLAY LIST Table of contents IMPORTANT SAFETY INSTRUCTIONS 2 Supplied accessories 3 The remote control 3 Maintenance 17 Product Service 17 Specifications 17 Troubleshooting guide 18 Warranty U S A 19 Cu...

Page 2: ...1 Ventilation Situate the unit so that it receives proper ventilation Do not install in a confined space such as a bookcase or cabinet Allow at least 10 cm 4 inches clearance from the rear of the unit To prevent the risk of electric shock or fire due to overheating ensure curtains and other materials do not obstruct the unit s ventilation 2 Foreign material Ensure objects and liquids do not get in...

Page 3: ...ration details Only for U S A To order accessories contact 1 800 332 5368 or web site http www panasonic com Keep the transmission window and the unit s sensor free from dust Operation can be affected by strong light sources such as direct sunlight and the glass doors on cabinets Remote control signal sensor Transmission window Use 7 meters 23 feet POWER SFC MODE 8 INPUT SELECTOR VOLUME DOWN UP SP...

Page 4: ...s A C The front center and surround speakers should be placed at approximately the same distance from the seating area The angles in the diagram are approximate Connecting speakers Other connections are possible depending on your speaker system See your speaker system s operating instructions for details SPEAKERS HAUT PARLEURS SURROUND FRONT CENTER 6 8Ω 6 8Ω 6 8Ω EACH SPEAKER CHAQUE EACH SPEAKER C...

Page 5: ...e TV Note that some experimentation can yield the smoothest low frequency performance Placement near a corner can increase the apparent output level but can result in unnatural bass Cable Speaker terminals Note Do not short circuit Speaker cable Twist the wire Speaker cable D SPEAKERS HAUT PARLEURS SURROUND FRONT CENTER 6 8Ω 6 8Ω 6 8Ω EACH SPEAKER CHAQUE EACH SPEAKER CHAQUE R L R L SPEAKERS HAUT P...

Page 6: ...URROUND SUBWOOFER L R TV IN VCR1 VCR1 DVD DVD 6CH SPEAKERS HAUT PARLEURS AC IN AC OUTLET SUBWOOFER IN IN IN IN IN FRONT OUT OUT DVD IN COAXIAL SURROUND FRONT CENTER 6 8Ω 6 8Ω 6 8Ω EACH SPEAKER CHAQUE EACH SPEAKER CHAQUE R L R L TV L R CENTER SURROUND SUBWOOFER L R DVD DVD 6CH IN IN FRONT DVD player VIDEO OUT AUDIO OUT SURROUND L R AUDIO OUT CENTER SUBWOOFER AUDIO OUT FRONT L R Connect to FRONT L R...

Page 7: ... equipment rated up to a maximum of 80 W can be connected here If equipment exceeding this rating is connected the outlet may be rendered inoperable Consult your dealer to replace the fuse Connect this cord after all other cables and cords are connected AC power supply cord included L R L R LOOP ANT HOLDER FM ANT AM ANT GND LOOP EXT 75Ω DIGITAL IN TAPE S VIDEO TV OPTICAL1 TV REC OUT PLAY IN OPTICA...

Page 8: ... LIST TEST VOLUME LEVEL POWER SFC MODE 8 INPUT SELECTOR VOLU SPEAKERS PHONES DSP SOUNDMODE DOLBY PROLOGIC2 HELP RESET BAND FM MODE MEMORY PRESET 2 TUNING 1 DVD 6CH L R BASS TREBLE BALANCE DIGITAL INPUT INPUT SELECTOR SPEAKERS Display SFC MODE POWER 8 SFC MODE SFC MODE Press at the same time Select Select the speaker Change the setting Exit the setting mode Press at the same time Repeat SIZE Enter ...

Page 9: ... with the front speakers Subwoofer output is easily influenced by the source You can also change its level while playing something for better effect page 13 Preparation Turn SPEAKERS on 3 5 Change the setting Select Output the signal Adjust the main volume Adjust the level Stop the test signal Repeat FILTER Two seconds each Select the speaker channel Change these settings to suit the connections y...

Page 10: ...t source even if the unit is turned off Notes on using the Digital Signal Processor The digital signal processor in this unit can decode the following signals Dolby Digital DTS PCM It cannot decode Other digital signals such as MPEG PCM with sampling frequencies of 88 2 kHz 96 kHz 176 4 kHz or 192 kHz Dolby Digital RF signals from a laser disc player Use this mode to play digital or analog stereo ...

Page 11: ...acing You can adjust the sound field by adjusting the level of the speakers and the delay time of the surround speakers These adjustments can be made for each SFC mode To adjust the speaker level 1 1 Press LEVEL to select the speaker channel Each time you press the button C SR SL SW Speakers set as NONE or NO are skipped 2 2 Press or to adjust the level C SR and SL 10 dB to 10 dB SW off MIN 1 19 M...

Page 12: ...all amount of power SPEAKERS Turning the speakers off automatically engages the STEREO mode when listening through headphones for example HELP RESET Press if an error message appears A message offering a possible solution scrolls across the display To reinitiate the unit s settings press and hold until RESET appears PHONES Headphone jack Plug type 6 3 mm 1 4 stereo Avoid listening for prolonged pe...

Page 13: ...ur depending on the equalizer s settings To adjust the tone The STEREO DSP mode must be on and input must be either analog or PCM signals You cannot adjust the tone while the DSP is defeated or if DVD 6CH INPUT is selected When using the subwoofer You cannot adjust subwoofer level while the DSP is defeated or if DVD 6CH INPUT is selected Sound can be distorted if you raise the volume while subwoof...

Page 14: ...ROUND or SFC SFC For selecting SFC modes TEST To start the speaker test signal DIRECT TUNING DISC ENTER To enable selection of radio stations by frequency CH 2 1 For selecting preset radio channels VOLUME To adjust the volume 10 ENTER To enter two digit channels EFFECT Use when adjusting Dolby Pro Logic 2 or SFC effects LEVEL Use when adjusting speaker level First select EFFECT or LEVEL then press...

Page 15: ...t a time 1 1 Tune to the station 2 2 Press MEMORY 3 3 Press TUNING 2 or 1 to select a channel 4 4 Press MEMORY Manual tuning Direct tuning You can tune radio stations manually by selecting the station s frequency 1 1 Turn INPUT SELECTOR to select TUNER 2 2 Press BAND FM MODE to select FM or AM 3 3 Press TUNING 2 or 1 to select the frequency Tuning intervals FM 0 2 MHz AM 10 kHz 1 1 Press TUNER BAN...

Page 16: ...recording with a VCR connected VCR 1 you can record any source except TAPE or VCR 1 1 1 Turn INPUT SELECTOR to select the source to be recorded 2 2 Begin recording Follow your recording unit s operating instructions 3 3 Start the source to be recorded Follow your equipment s operating instructions You cannot record a source connected through a digital terminal When recording CD DVD or TV ensure th...

Page 17: ...ect to change without notice Mass and dimensions are approximate 2 Total harmonic distortion is measured by the digital spectrum analyzer Specifications IHF 78 To clean this unit wipe with a soft dry cloth Never use alcohol paint thinner or benzine to clean this unit Before using chemically treated cloth read the instructions that came with the cloth carefully If the surfaces are dirty Maintenance...

Page 18: ...rs are correct Check the DSP sound mode Cancel DSP DEFEAT Sound is not heard from the center surround or subwoofer speakers 8 10 13 Cancel DSP DEFEAT Turn DVD 6CH INPUT off DSP sound modes cannot be selected 13 13 DSP sound modes Pages Radio Pages Common problems Ensure the power cord is connected No power Switch off the unit determine and correct the cause then switch the unit on Causes include S...

Page 19: ...DER LIMITED WARRANTY COVERAGE THE WARRANTOR IS NOT LIABLE FOR INCIDENTAL OR CONSEQUENTIAL DAMAGES RESULTING FROM THE USE OF THIS PRODUCT OR ARISING OUT OF ANY BREACH OF THIS WARRANTY As examples this excludes damages for lost time travel to and from the servicer loss of media or images data or other memory content The items listed are not exclusive but are for illustration only ALL EXPRESS AND IMP...

Page 20: ...ing adapts To establish a safe level Start your volume control at a low setting Slowly increase the sound until you can hear it comfortably and clearly and without distortion Once you have established a comfortable sound level Set the dial and leave it there Taking a minute to do this now will help to prevent hearing damage or loss in the future After all we want you listening for a lifetime EST 1...

Reviews: