background image

RQ

T

8

6

0

6

32

Usin

g oth

e

r us

eful 

funct

ions

Using other useful functions

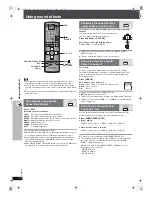
To cancel the timer

While the time is shown, press [—SLEEP] to select “OFF”.

To confirm the remaining time

Press and hold [—SLEEP] again.

To change the setting

Repeat the procedure from the beginning.

Press [MUTING].

“MUTING” flashes on the unit’s display.

To cancel

Press [MUTING] again or reduce the volume to minimum “VOL 0”, and 
then raise it to the required level.

Muting is canceled when you switch the unit to standby.

[Note]

To prevent hearing damage, avoid listening for prolonged periods of time.

The Music Port allows you to connect and enjoy music from an external 
device (e.g. MP3 player) through your home theater system.

Preparation

To avoid distorted sound, make sure that any equalizer function of your 
external device is turned off.

Setting the sleep timer

1

Press and hold [—SLEEP].

2

While the time is shown

Press [—SLEEP] to select the time (in minutes).

SLEEP 30

_----)

SLEEP 60

_----)

SLEEP 90

^""""" 

OFF

(_ 

SLEEP120

(__}

Muting the sound

VOLUME

EXT-IN

MUTING

SLEEP

ONE TOUCH PLAY

MONO

SLP

ST

MODE

AC

PRG

RDS

DTS

PL

A

PS

TY

H.BASS

SRD

PGM

HDCD

E.

1

CD

VD

W

D

MONO SLP ST

MODE

AC

PRG

RDS

DTS

PL

A

PS

PTY

CD

DVD

D

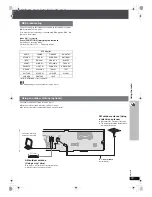
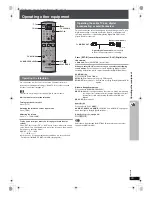
Using headphones

1

Reduce the volume and connect the headphones (not 
included).

Headphone plug type:

3.5 mm stereo mini plug

2

Adjust headphone volume with [VOLUME].

Audio is automatically switched to 2-channel stereo.

Using the Music Port

1

Reduce the volume and connect the external device 
(not included).

Plug type:

3.5 mm stereo mini plug

2

Press [EXT-IN] to select “MUSIC P.”.

MUSIC P.

 ----------------------. 

TV 

---------------------------. 

AUX

^""" 

D-IN (Digital In) (

page 33) 

(----_}

3

Adjust the external device volume to a normal listening 
level, and then adjust the volume of the main unit with 
[VOLUME].

You can enjoy surround sound when you turn on Sound Field 
Control (MOVIE, SPORT or MUSIC) (

page 30).

M

ain unit only

VOLUME

VOLUME

VOLUME

External device

Reduce the volume before connecting.

MONO

ST

DE

AC

RG

S

H.B

SR

H

W

8606En_p28-44.fm  Page 32  Thursday, March 9, 2006  9:26 AM

Summary of Contents for SC-HT855

Page 1: ...ing this product please read the instructions completely Please keep this manual for future reference 2 ALL 3 5 2 High quality picture HDMI capability Advanced progressive scan and more page 8 Compati...

Page 2: ...VASES SHALL BE PLACED ON THE APPARATUS CAUTION DO NOT INSTALL OR PLACE THIS UNIT IN A BOOKCASE BUILT IN CABINET OR IN ANOTHER CONFINED SPACE ENSURE THE UNIT IS WELL VENTILATED TO PREVENT RISK OF ELEC...

Page 3: ...g the player settings 24 Changing the delay time of the speakers 27 Using the radio 28 Presetting stations automatically 28 Selecting the preset channels 28 Manual tuning 28 RDS broadcasting 29 Using...

Page 4: ...tand to the base while gently pulling on the end of the speaker cable 2 Secure the stand to the base 3 Attach the speaker to the stand 1 Pull out the end of the speaker cable and position it between t...

Page 5: ...ng to a concrete wall or a surface that may not have strong enough support Improper attachment may result in damage to the wall or speakers Speaker Stand Screw Tighten securely Ensure the speaker cabl...

Page 6: ...Ensure the stands meet these conditions before purchasing them Note the diameter and length of the screws and the distance between screws as shown in the diagram The stands must be able to support ov...

Page 7: ...cause vibration Leave about 30 cm from the television Caution Do not stand on the base Be cautious when children are near Do not touch the netted area of the speakers Notes on speaker use You can dam...

Page 8: ...G15 1 5 m RP CDHG30 3 0 m RP CDHG50 5 0 m etc Non HDMI compliant cables cannot be utilized Television with an HDMI terminal STEP3 Speaker connections 4 4 2 2 6 6 5 3 5 3 1 1 SURROUND Rch Rch SURROUND...

Page 9: ...der connection Basic audio connection Basic video connection Other video connections for improved picture quality R L IN IN AUDIO AUDIO TV TV VIDEO OUT RF IN AUDIO OUT L R VIDEO IN AUDIO IN VIDEO OUT...

Page 10: ...base Place the antenna where reception is best Keep loose antenna cable away from other wires and cables Click AM loop antenna FM indoor antenna FM indoor antenna Affix this end of the antenna where r...

Page 11: ...s remote control can perform some basic television operations page 33 To change these settings later Select QUICK SETUP in the Others tab page 26 STEP7 Performing QUICK SETUP ENTER RETURN SETUP DVD ON...

Page 12: ...ELECTOR 28 DVD CD FM AM TV AUX D IN Digital In MUSIC P Return to DVD CD OPEN CLOSE Open Close the disc tray 14 TUNE MODE FM MODE Stop playing 14 Select the tuning mode 28 Adjust the FM reception condi...

Page 13: ...lens is generally not necessary although this depends on the operating environment DVD Video DVD V DVD Audio DVD A DVD V DVD V Some DVD Audio discs contain DVD Video content To play DVD Video content...

Page 14: ...D ENHANCER VOLUME Press to skip Press and hold to search during play start slow motion play during pause Motion picture part Press 1 Play to start normal play 6 Adjust the volume 5 Start play The tray...

Page 15: ...TOP PAUSE TOP MENU DIRECT NAVIGATOR MENU PLAY LIST ENTER CANCEL FL DISPLAY ONETOUCH PLAY Numbered buttons On screen item select Enter number DVD VR DVD A DVD V VCD CD e g To select 12 S10 1 2 VCD with...

Page 16: ...gram and Random play Press PLAY MODE while stopped All group program and random playback screens appear sequentially All group DVD A __ Program Random off Normal play __ __ To exit the all group progr...

Page 17: ...DivX Playing items in order Playback Menu 1 Press TOP MENU To exit the screen press TOP MENU 2 Press 3 4 to select All Audio Picture or Video and press ENTER Playing from the selected item Navigation...

Page 18: ...occer Baseball Neanderthal Cartoons Trilobites e g CD text 2 Prev 3Return Next 1 New Playlist Item Long Name Display Te PAGE 1 3 Menu1 Menu2 Menu3 Play list1 Play list2 Play list3 Menu Takes you to th...

Page 19: ...sampling rates DVD RAM DVD R RW 11 02 12 22 05 24 44 1 and 48 kHz CD R RW 8 11 02 12 16 22 05 24 32 44 1 and 48 kHz JPEG Extension JPG jpg JPEG or jpeg JPEG files taken on a digital camera that confo...

Page 20: ...fps frame per second is also displayed Audio DVD A DVD V DivX with multiple soundtracks To select audio soundtrack DVD VR VCD DivX To select L R or LR DVD V Karaoke disc To select On or Off for vocals...

Page 21: ...sc tab page 24 When you find a title program to play Press 1 PLAY This may not work depending on the disc and the play position DVD VR This does not work when playing a playlist page 18 Picture Mode N...

Page 22: ...X contents is automatically distinguished and output If the picture is distorted select I Interlace or P Progressive depending on which constructing method was used when the contents were recorded to...

Page 23: ...This may not work depending on the discs recording 16 9 Standard 16 9 4 3 Standard 4 3 European Vista 1 66 1 American Vista 1 85 1 Cinemascope1 2 35 1 Cinemascope2 2 55 1 e g Manual Zoom To zoom in an...

Page 24: ...enables successive settings of the items in the shaded area Audio Choose the audio language English French German Italian Spanish Polish Swedish Dutch Original 1 Other 2 Subtitle Choose the subtitle l...

Page 25: ...SCART AV and Component terminal Video YPbPr S Video YPbPr RGB No Output Still Mode Specify the type of picture shown when paused Automatic Field 4 The picture is not blurred but picture quality is low...

Page 26: ...On When audio output is from the HDMI AV OUT terminal Depending on the capabilities of the connected equipment audio output may differ from the audio settings of the main unit Off When audio output i...

Page 27: ...zian 6566 Afar 6565 Afrikaans 6570 Albanian 8381 Ameharic 6577 Arabic 6582 Armenian 7289 Assamese 6583 Aymara 6589 Azerbaijani 6590 Bashkir 6665 Basque 6985 Bengali Bangla 6678 Bhutani 6890 Bihari 667...

Page 28: ...press the button MANUAL PRESET 3 Press X TUNING W to tune to the lowest frequency FM 87 50 AM 522 4 Press and hold MEMORY Release the button when FM AUTO or AM AUTO is displayed The tuner presets all...

Page 29: ...n use Do not use the outdoor antenna during an electrical storm RDS broadcasting PTY displays NEWS VARIED FINANCE COUNTRY AFFAIRS POP M CHILDREN NATIONAL INFO ROCK M SOCIAL A OLDIES SPORT M O R M RELI...

Page 30: ...Field Control MOVIE SPORT or MUSIC is turned on This also works when Dolby Pro Logic II is turned on Except DivX Dolby Pro Logic II is an advanced decoder that derives 5 channel surround Left and Rig...

Page 31: ...djustable when PLII is lit S appears on the display when MOVIE SPORT or MUSIC is selected with Sound Field Control page 30 In this case you can adjust both surround speaker levels at the same time usi...

Page 32: ...SLEEP to select the time in minutes SLEEP 30_ SLEEP 60_ SLEEP 90 OFF _ SLEEP120 __ Muting the sound VOLUME EXT IN MUTING SLEEP ONETOUCH PLAY MONO SLP ST MODE AC PRG RDS DTS PL A PS TY H BASS SRD PGM H...

Page 33: ...l In as the source Main unit Press SELECTOR several times When you select D IN as the source you can select the following sound effects These functions only work with Dolby Digital or PCM excluding Au...

Page 34: ...efer to the operating instructions of your television When audio is output from the home theater speakers The television speakers are automatically muted You can control the volume setting using the v...

Page 35: ...n Demand VOD content is encrypted for copyright protection In order to play DivX VOD content on this unit you first need to register the unit Follow the online instructions for purchasing DivX VOD con...

Page 36: ...eturn to the default values The HDAVI Control function does not respond Depending on the condition of the home theater system or the connected equipment it may be necessary to repeat the same operatio...

Page 37: ...he unit Move it away from the unit Change Source Select in Picture Menu DivX Picture may not be seen when more than 4 devices are connected with HDMI cables Reduce the number of connected devices When...

Page 38: ...gnals which may not be reproduced authentically U701 The connected equipment is not HDMI compatible U70 stands for a number The actual number following U70 will depend on the state of the main unit Th...

Page 39: ...ransmits uncompressed digital video and audio signals on a single cable This unit supports high definition video output 720p 1080i from the HDMI AV OUT terminal To enjoy high definition video a high d...

Page 40: ...files Certified to the DivX Home Theater Profile GMC Global Motion Compensation is not supported 2 The total combined maximum number of recognizable audio picture and video contents and groups 4000 a...

Page 41: ...sound pressure 84 dB W 1 0 m Cross over frequency 5 kHz Frequency range 105 Hz 25 kHz j16 dB 125 Hz 22 kHz j10 dB Dimensions WtHtD 270 mmk92 mmk95 4 mm Mass 1 25 kg Subwoofer SB W540 Type 1 way 1 spea...

Page 42: ...Compatible Digital and Pacific Microsonics are either registered trademarks or trademarks of Pacific Microsonics Inc in the United States and or other countries HDCD system manufactured under license...

Page 43: ...RQT8606 43 MEMO HT855En book Page 43 Tuesday March 7 2006 2 33 PM...

Page 44: ...RS TEILYLLE VAROITUS TULIPALO S HK ISKUVAARAN TAI TUOTETTA KOHTAAVAN MUUN VAHINGON V HENT MISEKSI EI LAITETTA SAA ALTISTAA SATEELLE KOSTEUDELLE VESIPISAROILLE TAI ROISKEELLE EIK NESTETT SIS LT VI ESIN...

Reviews: