background image


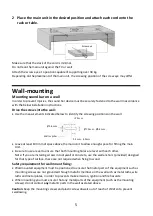
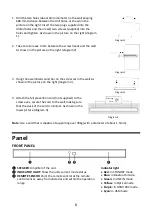
2  Place the main unit in the desired position and attach each cord onto the 

rack or table.  


Make sure that the slack of the cord is minimal.  
Do not lean the main unit against the TV or wall.  


Attach the screw eye at a position capable of supporting over 30 kg.  
Depending on the placement of the main unit, the screwing position of the screw eye may differ.  


Wall-mounting  

Mounting sound bar on a wall  

In order to prevent injuries, the sound bar device must be securely fastened to the wall in accordance 
with the below installation instructions.  


Drive the screws into the wall:  


Use the measurements indicated below to identify the screwing positions on the wall.  


Leave at least 100 mm of space above the main unit to allow enough space for fitting the main 
Unit.  


Be sure to use a level to ensure that both mounting holes are level with each other. 
Note: If you are installing screws into drywall or concrete, use the wall anchors (provided) designed 
for that type of surface, these are not required when fixing to wood.  


Safety requirement for wall mount fixing:  


Wall-mounted equipment must be positioned to ensure that metal parts of the equipment such as 
mounting screws are not grounded through metallic members in the wall such as metal laths, wire 
laths and metal plates, in order to prevent smoke emission, ignition and fire hazards. 


When mounting you must ensure that any metal parts of the equipment (such as the mounting 
screws) do not contact 

any 

metallic parts in the wall as stated above. 


Caution

: Keep the mounting screws and plastic screw dowels out of reach of children to prevent 

swallowing.  

Screw eye 

>25 mm 

Ø7.0 mm - Ø9.4 mm 

3.5 mm - 4.0 mm 

Wall or pillar 

Ø3.6 mm 

Summary of Contents for SC-HTB100

Page 1: ...cluded Installation Instructions Installation work should be completed by a qualified installation specialist 4 to 6 Before commencing work carefully read these installation instructions and the operating instructions to ensure that installation is performed correctly Please keep these instructions You may need them when maintaining or moving this system Ver 1 0 3 REGISTER NOW UPDATES TIPS NEWS OF...

Page 2: ...s on this unit Use the recommended accessories Do not remove covers Do not repair this unit by yourself Refer servicing to qualified service personnel AC mains lead To reduce the risk of fire electric shock or product damage Ensure that the power supply voltage corresponds to the voltage printed on this unit Insert the mains plug fully into the socket outlet Do not pull bend or place heavy items o...

Page 3: ... system might get warm after prolonged usage This is normal Do not be alarmed AC mains lead The mains plug is the disconnecting device Install this unit so that the mains plug can be unplugged from the socket outlet immediately Battery Danger of explosion if battery is incorrectly replaced Replace only with the type recommended by the manufacturer When disposing of the batteries please contact you...

Page 4: ...t in a rack on a table or on the wall In order to prevent injuries the sound bar device must be securely fasten to the wall in accordance with the below installation instructions Additionally required accessories Commercially available Fall prevention cord x2 Screw eyes to attach the fall prevention cord x2 Note Use commercially available screws that are capable of supporting over 30 kg Use a cord...

Page 5: ...ce for fitting the main Unit Be sure to use a level to ensure that both mounting holes are level with each other Note If you are installing screws into drywall or concrete use the wall anchors provided designed for that type of surface these are not required when fixing to wood Safety requirement for wall mount fixing Wall mounted equipment must be positioned to ensure that metal parts of the equi...

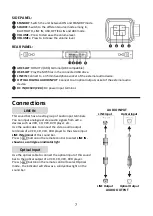
Page 6: ...n the picture on the right diagram 3 Diagram 3 4 Attach the fall prevention cord not supplied to the screw eyes secure the cord to the wall making sure that the slack of the cord is minimal As shown in the lower picture diagram 4 Diagram 4 Note Use a cord that is capable of supporting over 30kg with a diameter of about 1 5mm Panel FRONT PANEL SPEAKER Amplifier of the unit INDICATOR LIGHT Show the ...

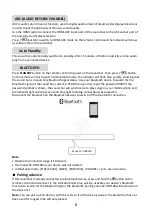
Page 7: ... terminal Connections This sound bar has an extra group of audio input terminals You can input analogue stereo audio signals from extra devices such as VCD CD VCR DVD player etc Use the audio cable to connect the stereo audio output terminals of a VCD CD VCR DVD player to the stereo input LINE IN terminal of this sound bar Press button on the remote control to select LINE IN shown as a solid green...

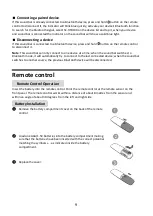
Page 8: ...al of the sound bar select SC HTB100 on your list input the password 0000 if the password prompt is shown the sound bar will synchronize to play songs on your mobile phone and the indicator light will show as a solid blue light meaning connection was successful Disconnect the Bluetooth on the Bluetooth devices to switch off the Bluetooth connection Note Bluetooth connection range is 10 meters The ...

Page 9: ...e when the sound bar switches to Bluetooth mode it will automatically try to connect to the last connected device when the sound bar switches to another source the previous Bluetooth device will be disconnected Remote control Insert the battery into the remote control Point the remote control at the remote sensor on the front panel The remote control works within a distance of about 8 metres from ...

Page 10: ...2 7 6 1 3 4 5 8 9 11 10 ...

Page 11: ...exFAT ...

Page 12: ......

Page 13: ... caution This system cannot transmit data to a Bluetooth device Range of use Use this device at a maximum range of 10 m The range can decrease depending on the environment obstacles or interference Interference from other devices This system may not function properly and troubles such as noise and sound jumps may arise due to radio wave interference if this unit is located too close to other Bluet...

Page 14: ... Centre Winsbergring 15 22525 Hamburg Vokietija Bevielio ryšio tinklas Dažnių diapazonas Maksimali siuntimo galia dBm e i r p Bluetooth 2402 2480 M Hz 7 5 dBm 5 62 mW Eesti keel Vastavusdeklaratsioon DoC Käesolevaga kinnitab Panasonic Corporation et see toode vastab direktiivi 2014 53 EL olulistele nõuetele ja teistele asjakohastele sätetele Kliendid saavad koopia meie RE toodetele kehtiva origina...

Page 15: ...Specifications are subject to change without notice Mute function from Remote Control might not work with all TVs ...

Reviews: