background image

13 


Troubleshooting 


Before resorting to maintenance service, please kindly check the following chart.  


Symptom 

Cause(s) 

Remedy 

No Power 


The AC power cord of the adaptor is not 
connected to the main unit or it's not 
connected to the power supply. 


Please check that the AC power cord of the 
adaptor is connected securely. 

Sound 

There is no 
sound or the 
sound is 
distorted. 


The audio cables aren't connected 
securely. 


The volume is set to the minimum level. 


The sound is switched off. 


Is the unit placed in an extremely hot 
place. 


Make sure that the received audio signal 
is compatible with the unit.  


Connect the audio cables securely. 


Turn up the volume. 


Press [MUTE] on the remote control to 
switch on the sound. 


Press [PLAY/PAUSE], 


Move the unit to a cooler place and try to 
switch it on again. 


Check if the audio signal is OK. 

The remote 
control does 
not function. 


There is no battery in the remote 
control. 


The battery is out of charge. 


The remote control isn't pointed to the 
remote sensor. 


The remote control is out of its 
operating area. 


The unit is shut down. 


Install one AAA/1.5V battery in it. 


Replace the battery with new one. 


Make sure that the remote control is 
pointed to the remote control sensor. 


Make sure the remote control is within the 
operating area. 


Switch off the unit and disconnect it from 
the AC outlet. Then power on the unit again. 

No sound 
from 
subwoofer 


The AC power cord of the subwoofer is 
not connected to the AC Inlet of the 
subwoofer or to the power supply. 


Please check that the AC power cord of the 
subwoofer is connected securely. 


Accidently pressed PAIR button on the 
backside of subwoofer. 


Please turn the power "off" and "on" on the 
main unit to let the subwoofer auto pairing 
process restart automatically. 


The main unit is not connected with the 
subwoofer. 


If the sound bar and subwoofer cannot be 
connected automatically, please repair it as 
follow: 

1.  Press PAIR button on the subwoofer to 

reset and the red indicator on the 
subwoofer will start to flash quickly 
(twice per second). 

2.  In LINE mode, press the STANDBY button 

on the sound bar for 5 seconds to reset. 
After the sound bar is in standby, press 
the STANDBY button to power on, the 
sound bar will automatically pair and 
connect the subwoofer.


Summary of Contents for SC-HTB150

Page 1: ...uded Installation Instructions Installation work should be completed by a qualified installation specialist 4 to 6 Before commencing work carefully read these installation instructions and the operating instructions to ensure that installation is performed correctly Please keep these instructions You may need them when maintaining or moving this system Ver 1 0 0 REGISTER NOW UPDATES TIPS NEWS OFFE...

Page 2: ...such as vases on this unit Use the recommended accessories Do not remove covers Do not repair this unit by yourself Refer servicing to qualified service personnel AC mains lead To reduce the risk of fire electric shock or product damage Ensure that the power supply voltage corresponds to the voltage printed on this unit Insert the mains plug fully into the socket outlet Do not pull bend or place h...

Page 3: ... system might get warm after prolonged usage This is normal Do not be alarmed AC mains lead The mains plug is the disconnecting device Install this unit so that the mains plug can be unplugged from the socket outlet immediately Battery Danger of explosion if battery is incorrectly replaced Replace only with the type recommended by the manufacturer When disposing of the batteries please contact you...

Page 4: ...lacing the main unit in a rack on a table or on the wall In order to prevent injuries the sound bar device must be securely fasten to the wall in accordance with the below installation instructions Additionally required accessories Commercially available Fall prevention cord x2 Screw eyes to attach the fall prevention cord x2 Note Use commercially available screws that are capable of supporting ov...

Page 5: ...ce for fiting the main Unit Be sure to use a level to ensure that both mounting holes are level with each other Note If you are installing screws into drywall or concrete use the wall anchors provided designed for that type of surface these are not required when fixing to wood Safety requirement for wall mount fixing Wall mounted equipment must be positioned to ensure that metal parts of the equip...

Page 6: ...As shown in the picture on the right diagram3 Diagram 3 4 Attach the fall prevention cord not supplied to the screw eyes secure the cord to the wall making sure that the slack of the cord is minimal As shown in the lower picture diagram4 Diagram 4 Note Use a cord that is capable of suppor ng over 30kg with a diameter of about 1 5mm Panel FRONT PANEL SPEAKER Amplifier of the unit INDICATOR LIGHT Sh...

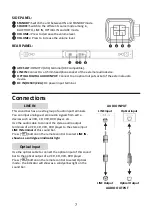
Page 7: ...und bar has an extra group of audio input terminals You can input analogue stereo audio signals from extra devices such as VCD CD VCR DVD player etc Use the audio cable to connect the stereo audio output terminals of a VCD CD VCR DVD player to the stereo input LINE IN terminal of this sound bar Press button on the remote control to select LINE IN shown as a solid green indicator light Use the opti...

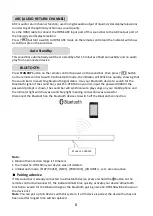
Page 8: ...al of the sound bar select SC HTB150 on your list input the password 0000 if the password prompt is shown the sound bar will synchronize to play songs on your mobile phone and the indicator light will show as a solid blue light meaning connection was successful Disconnect the Bluetooth on the Bluetooth devices to switch off the Bluetooth connection Note Bluetooth connection range is 10 meters The ...

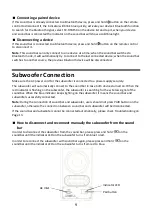
Page 9: ...woofer is connected to a power supply securely The subwoofer will automatically connect to the sound bar in case both devices turned on When the red indicator is flashing on the subwoofer the subwoofer is searching for the wireless signal of the soundbar When the blue indicator keeps lighting on the subwoofer it means the sound bar and subwoofer successfully connected Note During the connection of...

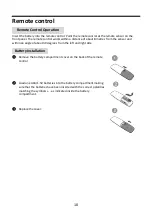
Page 10: ... and within an angle of about 30 degrees from the left and right side Remove the battery compartment cover on the back of the remote control Load one AAA 1 5V batteries into the battery compartment making sure that the batteries have been inserted with the correct polarities matching the symbols as indicated inside the battery compartment Replace the cover Battery Installation Remote Control Opera...

Page 11: ...nditions High or low extreme temperatures during use storage or transportation Replacement of a battery with an incorrect type Disposal of a battery into fire or a hot oven or mechanically crushing or cutting of a battery that can result in an explosion Extremely high temperature and or extremely low air pressure that can result in an explosion or the leakage of flammable liquid or gas 1 STANDBY 2...

Page 12: ...N OPTICAL and HDMI ARC mode Press repeatedly to switch between Eql Eq2 and Eq3 equalizer modes Eql mode indicator blinks white for 3 seconds stands for MUSIC Eq2 mode indicator blinks green for 3 seconds stands for MOVIE Eq3 mode indicator blinks red for 3 seconds stands for NEWS Press to enter the LINE IN mode Press to temporarily pause a playback Press it again to resume the playback Press to sk...

Page 13: ...f its operating area The unit is shut down Install one AAA 1 5V battery in it Replace the battery with new one Make sure that the remote control is pointed to the remote control sensor Make sure the remote control is within the operating area Switch off the unit and disconnect it from the AC outlet Then power on the unit again No sound from subwoofer The AC power cord of the subwoofer is not conne...

Page 14: ...vidual 818mm x 353mm x 214mm Net Weight Soundbar 1 5kg Subwoofer 1 7kg Working Environment Temperature 10 35 C Relative Humidity 5 90 Power Output RMS 30 THD Total RMS Stereo Mode 100W Soundbar 45W 22 5W X 2 Subwoofer 55W Frequency response 3dB 20Hz 20kHz Bluetooth version V4 2 Bluetooth frequency band 2402 2480MHz Bluetooth maximum power 7 5dBm 5 62mW Terminal HDMI Output ARC Audio Format LPCM Ve...

Page 15: ...ystem cannot transmit data to a Bluetooth device Range of use Use this device at a maximum range of 10 m The range can decrease depending on the environment obstacles or interference Interference from other devices This system may not function properly and troubles such as noise and sound jumps may arise due to radio wave interference if this unit is located too close to other Bluetooth devices or...

Page 16: ... Centre Winsbergring 15 22525 Hamburg Vokietija Bevielio ryšio tinklas Dažnių diapazonas Maksimali siuntimo galia dBm e i r p Bluetooth 2402 2480 MHz 7 5 dBm 5 62 mW Eesti keel Vastavusdeklaratsioon DoC Käesolevaga kinnitab Panasonic Marketing Europe GmbH et see toode vastab direktiivi 2014 53 EL olulistele nõuetele ja teistele asjakohastele sätetele Kliendid saavad koopia meie RE toodetele kehtiv...

Page 17: ...ermék kielégíti az 2014 53 EU Irányelv létfontosságú kóvetelményeit és más vonatkozó rendelkezéseit A vásárlók letölthetik az RE termékek eredeti DoC másolatát a DoC szerverünkről http www ptc panasonic eu A hivatalos képviselő elérhetősége Panasonic Marketing Európe GmbH Panasonic Testing Centre Winsbergring 15 22525 Hamburg Németország Wireless típus Frekvenciasáv Maximális teljesítmény dBm e i ...

Reviews: