background image

5

RQT8043

RQTX0043

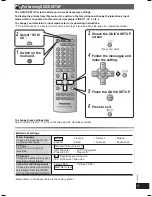
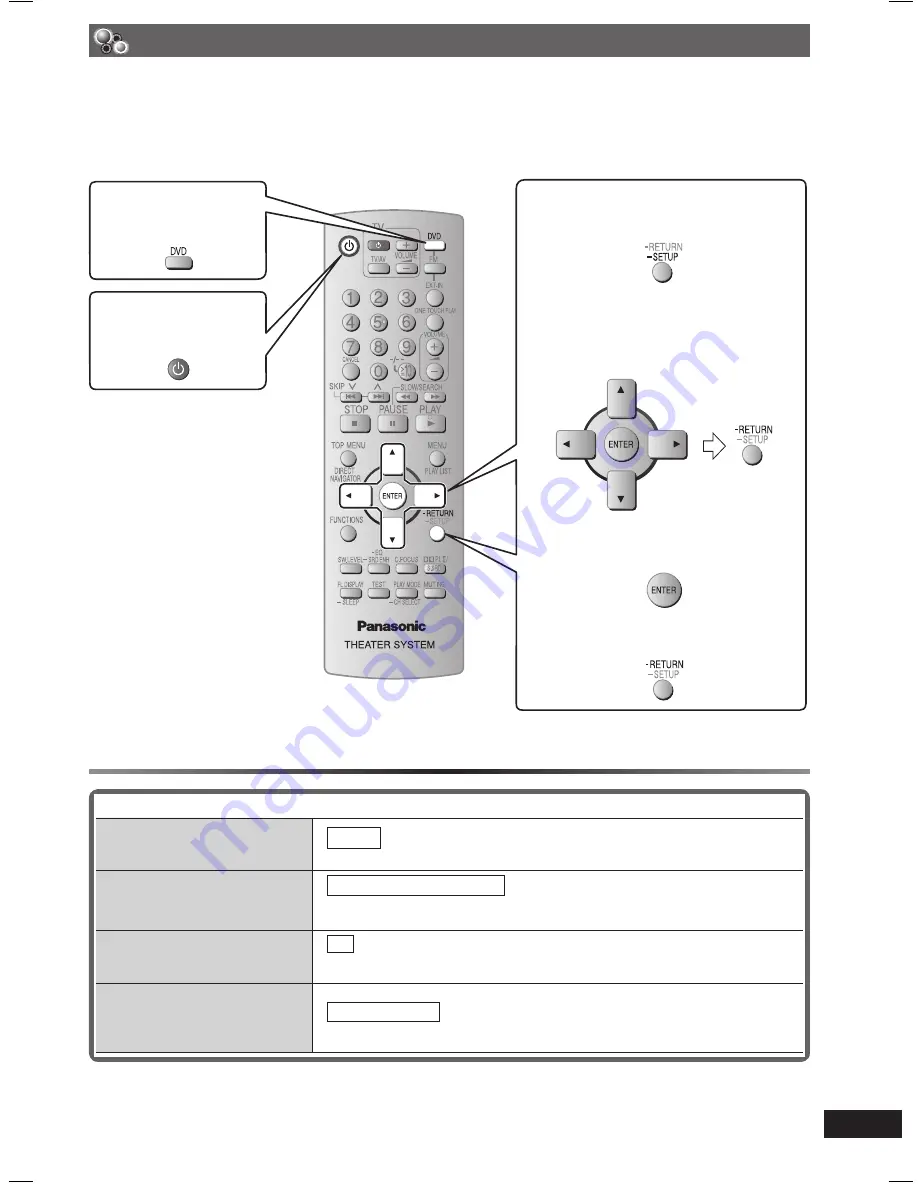
The QUICK SETUP screen assists you to make necessary settings.

To display the picture from this main unit, switch on the television and change the television’s input 
mode which is connected to this main unit (example: VIDEO 1, AV 1, etc.).

To change your television’s input mode, refer to its operating instructions.

• This remote control is able to perform some basic television operations (

\

 page 40, Operations Guide).

To change these settings later

Select “QUICK SETUP” in “Others” tab (

\

 page 29, Operations Guide).

 Performing QUICK SETUP

Switch on the 
main unit.

7

 Details of settings

Menu language

Choose the language for the 
on-screen messages.

•  English  

• Français 

• Deutsch 

• Italiano

• Español 

• Polski 

• Svenska 

• Nederlands

TV Type

Select to suit the type of 
television.

•  Standard (Direct View TV)
• CRT Projector 

• LCD TV/Projector

• Projection TV 

• Plasma TV

TV Aspect

Choose the setting to suit your 
television and preference.

•  4:3 : Regular aspect television
• 16:9: Widescreen television

Video Out (AV/Component)

Choose the video signal format 
to be output from the SCART 
(AV) and Component terminal.

• Video/YPbPr 

• S-Video/YPbPr

•  RGB/No Output

• Boxed items in the above table are the factory preset.

Select “DVD/
CD”.

Shows the QUICK SETUP 
screen

(Press and hold)

Follow the messages and 
make the setting.

Finish the QUICK SETUP.

Press to exit.

RQTX0043-3B_new.indd   5

RQTX0043-3B_new.indd   5

4/2/07   1:49:58 PM

4/2/07   1:49:58 PM

Summary of Contents for SC-PT550

Page 1: ...SC PT850 Setup Guide Setup Guide Preparing the remote control Placement of speakers Performing QUICK SETUP Speaker assembly Speaker installation options Simple setup Operating other equipment Once all the connections are completed kindly read the Operations Guide for playback operations ...

Page 2: ... WOOFER SUB SUB WOOFER 6 6 WOOFER SUB SUB WOOFER 1 1 1 1 Lch Lch Lch FRONT FRONT FRONT 5 5 CENTER CENTER 5 5 CENTER CENTER Lch FRONT 2 2 2 2 Rch Rch Rch FRONT FRONT FRONT Rch FRONT Preparing the remote control Do not use rechargeable type batteries R6 LR6 AA 1 Insert so the poles and match those in the remote control Do not mix old and new batteries use different types of batteries at the same tim...

Page 3: ...OOFER 2 FRONT L R Main unit Do not use a front speaker as a surround speaker or vice versa Verify the type of speaker with the label on the rear of the front speaker Setup example Place the front center and surround speakers at approximately the same distance from the seating position The angles in the diagram are approximate ...

Page 4: ...or a sturdy shelf so that it will not cause vibration Leave a space of 30 cm from the television Note You can damage your speakers and shorten their useful life if you play sound at high levels over extended periods Reduce the volume in the following cases to avoid damage When playing distorted sound When the speakers are reverberating due to a record player noise from FM broadcasts or continuous ...

Page 5: ...n unit 7 Details of settings Menu language Choose the language for the on screen messages English Français Deutsch Italiano Español Polski Svenska Nederlands TV Type Select to suit the type of television Standard Direct View TV CRT Projector LCD TV Projector Projection TV Plasma TV TV Aspect Choose the setting to suit your television and preference 4 3 Regular aspect television 16 9 Widescreen tel...

Page 6: ...atch the walls or pillars to which they are going to be fastened Consult a qualified housing contractor concerning the appropriate procedure when attaching to a concrete wall or a surface that may not have strong enough support Improper attachment may result in damage to the wall or speakers 2 1 3Tighten securely 4 5Slide into the groove 2 1 Position the cable between the ridges 5Press into the gr...

Page 7: ...screws and the distance between screws as shown in the diagram The stands must be able to support over 10 k The stands must be stable even if the speakers are in a high position Example Center speaker Metal screw holes For attaching to speaker stands Speaker stand not included 5 mm pitch 0 8 mm Plate thickness plus 7 mm to 10 mm 60 mm 7 Reattach the speaker cable 1 Insert the cable from the bottom...

Page 8: ...elevision select the appropriate audio out example Monitor on the television Sound from the television Press EXT IN page 40 Operations Guide to select the AV audio input on the remote control Optical digital audio cable not included Do not bend sharply when connecting You can change the video signal output from the SCART AV terminal from RGB to either S Video or Video to suit the type of televisio...

Page 9: ...t included Audio cable not included Rear panel of this main unit Do not use the SCART cable when the HDMI cable is being used for connection When the HDMI cable is connected there will be no video output from the SCART and COMPONENT VIDEO OUT terminals of the main unit Do not connect any kind of audio video distribution devices between this unit and the television such as an amplifier etc Set Vide...

Page 10: ...of power even when it is standby mode approx 0 8 W To save power when the unit is not to be used for a long time unplug it from the household mains socket You will need to reset some memory items after plugging in the unit To household mains socket Connect to the speakers Attach the speaker cable stickers to make connection easier 6 SUBWOOFER 2 FRONT R 1 FRONT L 3 SURROUND L 4 SURROUND R 5 CENTER ...

Page 11: ...liant cables cannot be utilised 7Television with SCART terminal Television not included SCART cable not included Using the SCART AV terminal You can change the video signal output from the SCART AV terminal from RGB to either S Video or Video to suit the type of television you are using Select S Video YPbPr or Video YPbPr from QUICK SETUP page 5 Set Video Mode to Off page 29 HDMI tab Operations Gu...

Page 12: ...Matsushita Electric Industrial Co Ltd Web Site http panasonic net RQTX0043 3B L0107LE3047 En ...

Reviews: