background image

Confidential 

Until:  

9 Jan  2017

2

TQ

BJ

09

73

Your system and the illustrations can look differently.
This manual is applicable to the following system.

THE FOLLOWING APPLIES ONLY IN THE U.S.A. AND 
CANADA

THE FOLLOWING APPLIES ONLY IN CANADA

Table of contents

IMPORTANT SAFETY INSTRUCTIONS . . . . . . . . . . . . .  2
Safety precautions . . . . . . . . . . . . . . . . . . . . . . . . . . . . .  3
References . . . . . . . . . . . . . . . . . . . . . . . . . . . . . . . . . . .  4
Supplied accessories . . . . . . . . . . . . . . . . . . . . . . . . . . .  4
Maintenance . . . . . . . . . . . . . . . . . . . . . . . . . . . . . . . . . .  4
Placement of speakers . . . . . . . . . . . . . . . . . . . . . . . . . .  5
Making the connections . . . . . . . . . . . . . . . . . . . . . . . . .  5
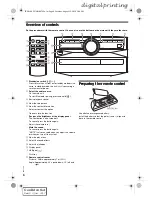
Overview of controls . . . . . . . . . . . . . . . . . . . . . . . . . . . .  6
Preparing the remote control . . . . . . . . . . . . . . . . . . . . .  6
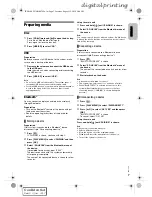
Preparing media . . . . . . . . . . . . . . . . . . . . . . . . . . . . . . .  7
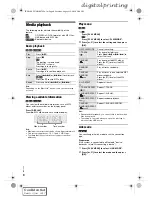
Media playback  . . . . . . . . . . . . . . . . . . . . . . . . . . . . . . .  8
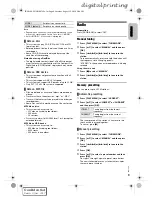
Radio. . . . . . . . . . . . . . . . . . . . . . . . . . . . . . . . . . . . . . . .  9
Clock and timers. . . . . . . . . . . . . . . . . . . . . . . . . . . . . .  10
Sound effects . . . . . . . . . . . . . . . . . . . . . . . . . . . . . . . .  11
Jukebox  . . . . . . . . . . . . . . . . . . . . . . . . . . . . . . . . . . . .  11
External equipment. . . . . . . . . . . . . . . . . . . . . . . . . . . .  12
Others . . . . . . . . . . . . . . . . . . . . . . . . . . . . . . . . . . . . . .  12
Troubleshooting . . . . . . . . . . . . . . . . . . . . . . . . . . . . . .  13
Specifications . . . . . . . . . . . . . . . . . . . . . . . . . . . . . . . .  15
Limited Warranty (ONLY FOR CANADA)  . . . . . . . . . . .  16

IMPORTANT SAFETY 
INSTRUCTIONS

Read these operating instructions carefully before using 
the unit. Follow the safety instructions on the unit and the 
applicable safety instructions listed below. Keep these 
operating instructions handy for future reference.

1. Read these instructions.

2. Keep these instructions.

3. Heed all warnings.

4. Follow all instructions.

5. Do not use this apparatus near water.

6. Clean only with dry cloth.

7. Do not block any ventilation openings. Install in 

accordance with the manufacturer’s instructions.

8. Do not install near any heat sources such as 

radiators, heat registers, stoves, or other apparatus 
(including amplifiers) that produce heat.

9. Do not defeat the safety purpose of the polarized or 

grounding-type plug. A polarized plug has two blades 
with one wider than the other. A grounding-type plug 
has two blades and a third grounding prong. The 
wide blade or the third prong are provided for your 
safety. If the provided plug does not fit into your 
outlet, consult an electrician for replacement of the 
obsolete outlet.

10. Protect the power cord from being walked on or 

pinched particularly at plugs, convenience 
receptacles, and the point where they exit from the 
apparatus.

11. Only use attachments/accessories specified by the 

manufacturer.

12. Use only with the cart, stand, tripod, 

bracket, or table specified by the 
manufacturer, or sold with the 
apparatus. When a cart is used, use 
caution when moving the 
cart/apparatus combination to avoid 
injury from tip-over.

13. Unplug this apparatus during lightning storms or 

when unused for long periods of time.

14. Refer all servicing to qualified service personnel. 

Servicing is required when the apparatus has been 
damaged in any way, such as power-supply cord or 
plug is damaged, liquid has been spilled or objects 
have fallen into the apparatus, the apparatus has 
been exposed to rain or moisture, does not operate 
normally, or has been dropped.

System

SC-UX100

Main unit

SA-UX100

Speakers

SB-UX100

This device complies with Part 15 of FCC Rules and 
Industry Canada licence-exempt RSS standard(s). 
Operation is subject to the following two conditions:
(1) this device may not cause interference, and
(2) this device must accept any interference, including 
interference that may cause undesired operation of this 
device.

CAN ICES-3(B)/NMB-3(B)

Contains IC: 216A-B21R1401

The device meets the exemption from the routine 
evaluation limits in section 2.5 of RSS 102 and 
compliance with RSS-102 RF exposure, users can 
obtain Canadian information on RF exposure and 
compliance.

SC-UX100 PP TQBJ0973 En.fm  Page 2  Saturday, August 13, 2016  5:06 PM

digital printing

Summary of Contents for SC-UX100

Page 1: ...upport Thank you for purchasing this product For optimum performance and safety please read these instructions carefully Please keep this manual for future reference Much simas gracias por haber adqui...

Page 2: ...blade or the third prong are provided for your safety If the provided plug does not fit into your outlet consult an electrician for replacement of the obsolete outlet 10 Protect the power cord from be...

Page 3: ...USER SERVICEABLE PARTS INSIDE REFER SERVICING TO QUALIFIED SERVICE PERSONNEL The lightning flash with arrowhead symbol within an equilateral triangle is intended to alert the user to the presence of...

Page 4: ...from a nearby broadcasting station etc is too strong Intended usage This system is for normal general use only Do not use this system near an equipment or in an environment that is sensitive to radio...

Page 5: ...cables to the terminals of the same color 3 Connect the AC power supply cord Do not use any other AC power supply cords except the supplied one Conserving power The system consumes a small amount of p...

Page 6: ...disc tray H Decrease the brightness of the display panel The illumination is also turned off To cancel press the button again I Adjust the volume level J Mute the sound To cancel press the button aga...

Page 7: ...he device connects with this system automatically after pairing is complete The name of the connected device is shown for a few seconds Using the main unit 1 Press and hold until PAIRING is shown 2 Se...

Page 8: ...Preparation If this system is connected to a Bluetooth device disconnect it Z Disconnecting a device 1 Press PLAY MENU to select LINK MODE 2 Press R T to select the mode and then press OK CD USB BLUET...

Page 9: ...ts MP3 file on USB device This system can access up to 800 albums including root folder 8000 tracks 999 tracks in one album Radio Preparation Press RADIO AUX to select FM Manual tuning 1 Press PLAY ME...

Page 10: ...is a 12 hour clock 1 Press SETUP to select CLOCK 2 Press R T to set the time and then press OK To check the time Press SETUP to select CLOCK and then press OK In standby mode press DISPLAY Note Reset...

Page 11: ...nding on the track the effect may be small Jukebox USB You can use the jukebox to add a cross fade effect between songs You can also use additional features with the Panasonic MAX Juke app Zbelow 1 Pr...

Page 12: ...l select OFF Auto off This system automatically turns off when you do not use it for approximately 20 minutes 1 Press SETUP to select AUTO OFF 2 Press R T to select ON and then press OK To cancel sele...

Page 13: ...incorrect The disc cannot be read Distorted sound is heard You put in a disc that the system cannot play Change to a playable disc You put in a disc that has not been finalized USB The USB device or t...

Page 14: ...temperature protection circuit has been activated and the system will turn off Let the unit cool down before turning it on again Check that the ventilation opening of the unit is not obstructed Ensure...

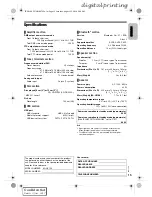
Page 15: ...er section Speaker unit s Woofer 13 cm 5 1 8 cone type x 1 per channel Tweeter 5 cm 2 cone type x 1 per channel Impedance 4 Dimensions W x H x D 181 mm x 308 mm x 165 mm 7 1 8 x 12 1 8 x 6 1 2 Mass We...

Page 16: ...as hotel office restaurant or other business or rental use of the product or service by anyone other than an Authorized Servicer or damage that is attributable to acts of God Dry cell batteries are al...

Page 17: ...Confidential Until 9 Jan 2017 17 TQBJ0973 ENGLISH SC UX100 PP TQBJ0973 En fm Page 17 Saturday August 13 2016 5 06 PM digital printing...

Page 18: ...de conexi n a tierra tiene dos cuchillas y una tercera clavija para conexi n a tierra La cuchilla ancha o la tercera cuchilla se suministran para su seguridad Si el enchufe suministrado no encaja en s...

Page 19: ...SACUDIDA EL CTRICA NO QUITE LOS TORNILLOS NO EXISTEN EN EL INTERIOR PIEZAS REPARABLES POR EL USUARIO REFIERA EL SERVICIO AL PERSONAL CALIFICADO El s mbolo del rayo con punta de flecha dentro de un tri...

Page 20: ...ionar correctamente si las ondas de radio de una estaci n de emisi n cercana etc son demasiado fuertes Uso previsto Este sistema es para el uso general normal solamente No use este sistema cerca de un...

Page 21: ...na a las terminales del mismo color 3 Conecte el cable de alimentaci n de CA No utilice otro cable de alimentaci n de CA que no sea el suministrado C mo ahorrar energ a El sistema consume una peque a...

Page 22: ...cciona o confirma la opci n G Abre o cierra la bandeja del disco H Disminuye el brillo del panel de visualizaci n La iluminaci n tambi n se apag Para cancelar pulse el bot n nuevamente I Ajusta el niv...

Page 23: ...con el sistema autom ticamente despu s que se hubiera completado el emparejamiento Se visualiza el nombre del dispositivo conectado durante unos segundos Uso de la unidad principal 1 Pulse y mantenga...

Page 24: ...tema est conectado a un dispositivo Bluetooth descon ctelo Z Desconexi n del dispositivo 1 Pulse PLAY MENU para seleccionar LINK MODE 2 Pulse R T para seleccionar el modo y despu s pulse OK CD USB BLU...

Page 25: ...Este sistema puede acceder hasta 800 lbumes incluye la carpeta ra z 8000 pistas 999 pistas en un lbum Radio Preparaci n Pulse RADIO AUX para seleccionar FM Sintonizaci n manual 1 Pulse PLAY MENU para...

Page 26: ...UP para seleccionar CLOCK 2 Pulse R T para configurar la hora y despu s pulse OK Para revisar la hora Pulse SETUP para seleccionar CLOCK y despu s pulse OK En el modo en espera pulse DISPLAY Nota Vuel...

Page 27: ...te Dependiendo de la pista el efecto podr a ser menor Jukebox USB Puede usar jukebox para agregar un efecto de atenuaci n cruzada entre las canciones Usted tambi n puede usar funciones adicionales de...

Page 28: ...ne OFF Apagado autom tico Este sistema se apaga autom ticamente cuando no lo usa durante aproximadamente 20 minutos 1 Pulse SETUP para seleccionar AUTO OFF 2 Pulse R T para seleccionar ON y despu s pu...

Page 29: ...ede leer el disco Se oye un sonido distorsionado Introdujo un disco que el sistema no puede reproducir Cambi lo por un disco que s se pueda reproducir Introdujo un disco que no se finaliz USB No es po...

Page 30: ...e ha activado y el sistema se apagar Deje que la unidad se enfr e antes de volver a encenderla Revise que la abertura de ventilaci n de la unidad no est obstruida Asegure que esta unidad est bien vent...

Page 31: ...33 pies de la l nea de visi n Secci n de bocinas Bocina s Bocina para graves Tipo c nico de 13 cm 5 1 8 x 1 por canal Bocina para agudos Tipo c nico de 5 cm 2 x 1 por canal Impedancia 4 Dimensiones An...

Page 32: ...dential Until 9 Jan 2017 16 TQBJ0973 www panasonic com Panasonic Corporation 2016 Impreso en Malasia Sp TQBJ0973 L0816LC0 SC UX100 PP TQBJ0973 Sp fm Page 16 Saturday August 13 2016 4 58 PM digital pri...

Page 33: ...dans un h tel un bureau un restaurant ou tout autre usage par affaires ou en location d une r paration effectu e par une entit autre qu un centre de service Panasonic agr ou encore d une catastrophe n...

Page 34: ...4 GHz FH SS Aire de fonctionnement 10 m 33 pi observation directe Section haut parleurs Haut parleur s Graves 13 cm 5 1 8 po de type c ne x 1 par canal Aigus 5 cm 2 po de type c ne x 1 par canal Imp...

Page 35: ...rotection de la temp rature a t activ et le syst me va se mettre hors marche Laisser l appareil refroidir avant de le remettre en marche V rifier que l ouverture d a ration de l appareil n est pas bou...

Page 36: ...e ne pouvant tre pris en charge a t mis en place Mettre en place un disque pouvant tre pris en charge Le disque mis en place n a pas t finalis USB Le dispositif USB ou son contenu ne peut tre lu Le fo...

Page 37: ...e automatique Ce syst me est mis hors marche automatiquement si vous ne l utilisez plus pendant environ 20 minutes 1 Appuyer sur SETUP pour s lectionner AUTO OFF 2 Appuyer sur R T pour s lectionner ON...

Page 38: ...ukebox USB Vous pouvez utiliser le jukebox pour ajouter un effet de fondu encha n entre les chansons Vous pouvez galement utiliser des fonctionnalit s suppl mentaires avec l application Panasonic MAX...

Page 39: ...SETUP pour s lectionner CLOCK 2 Appuyer sur R T pour r gler l heure puis appuyer sur OK Pour v rifier l heure Appuyer sur SETUP pour s lectionner CLOCK puis appuyer sur OK En mode attente appuyer sur...

Page 40: ...me peut acc der au maximum 800 albums y compris le dossier racine 8000 plages 999 plages dans un album Radio Pr paratifs Appuyer sur RADIO AUX pour s lectionner FM Syntonisation manuelle 1 Appuyer su...

Page 41: ...pour s lectionner le mode puis appuyer sur OK CD USB BLUETOOTH CD R RW au format CD DA ou des fichiers MP3 Dispositif USB avec des fichiers MP3 Dispositif Bluetooth Lecture Appuyer sur 4 9 Arr t Appu...

Page 42: ...ge effectu le dispositif est connect l appareil Le nom du dispositif connect s affiche pendant quelques secondes Utilisation de l appareil principal 1 Appuyer et maintenir enfonc e jusqu ce que PAIRIN...

Page 43: ...u confirmation de l option G Ouverture ou fermeture du plateau du disque H Att nuation de la luminosit de l afficheur L clairage est galement arr t Pour annuler appuyer de nouveau sur la touche I R gl...

Page 44: ...2 Raccorder les enceintes Connecter les c bles d enceinte aux bornes de m mes couleurs 3 Brancher le cordon d alimentation Ne pas utiliser d autres cordons d alimentation secteur que celui fourni con...

Page 45: ...nant sur la bande de fr quence de 2 4 GHz Cet appareil pourrait ne pas fonctionner ad quatement si des ondes lectromagn tiques en provenance d une station mettrice avoisinante etc sont trop fortes Uti...

Page 46: ...es vibrations excessives Cordon d alimentation La fiche d alimentation permet de d connecter l appareil L appareil doit tre install proximit d une prise secteur facile d acc s Pile Danger d explosion...

Page 47: ...deux lames avec une broche de masse La lame plus large ou la broche de masse procure une protection accrue Si ce genre de fiche ne peut tre ins r dans une prise de courant communiquer avec un lectric...

Page 48: ...ppl mentaire visiter www panasonic ca french support PP Nous vous remercions d avoir arr t votre choix sur cet appareil Pour en tirer un rendement optimal et par mesure de s curit lire attentivement l...

Reviews: