background image

Using other equipment

RQT8169

30

Using other equipment

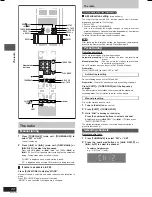
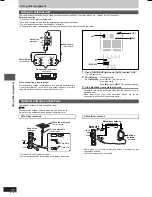
Using an external unit

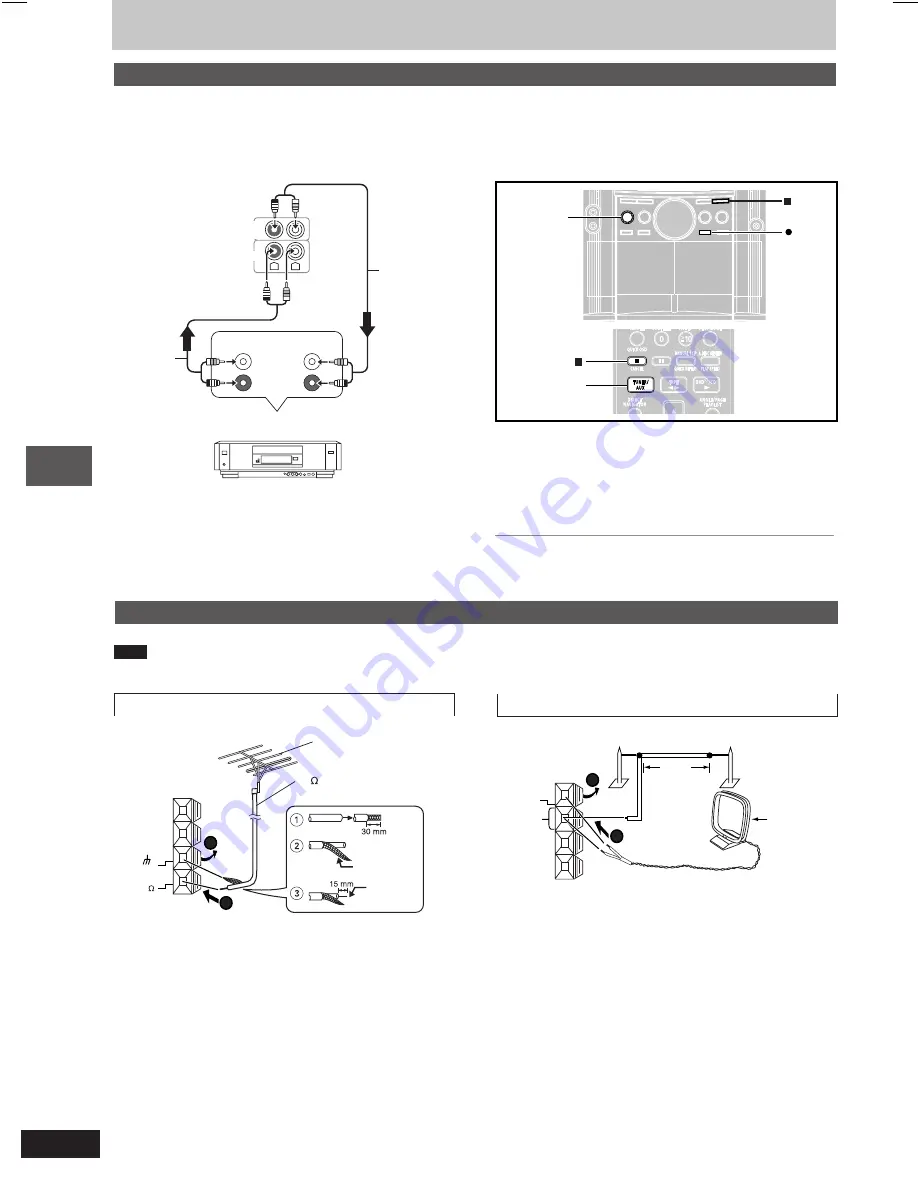
You can playback the sound from a video cassette recorder, tape deck, laser disc player, etc., through this unit’s speaker.

Before connection

Disconnect the AC power supply cord.

Turn off all equipment and read the appropriate operating instructions.

The equipment connections described are examples.

Peripheral equipment and optional cables are sold separately unless otherwise indicated.

R

L

PLAY OUT

R

L

REC IN

R

L

Video cassette recorder

(not included)

Audio cable

(not included)

Audio cable

(not included)

Back of the
main unit

AUX

LINE

OUT

When connecting a record player

We recommend using a record player with a built-in phono equalizer.
If your player doesn’t have a built-in equalizer, connect it first to a
separate equalizer and then connect that to this unit.

TUNER/AUX

 STOP

REC

AUX

1

Press [TUNER/AUX] (main unit: [AUX]) to select “AUX”.

The unit comes on.

2

For listening

: Proceed to step 3.

For recording

: Press [

[

 REC] on the main unit

(recording starts).
Press [

L

] (main unit: [

L

 STOP]) to stop recording.

3

Start playback from external source.

For details, refer to the instruction manual of the units which are to
be connected.

When units other than those described above are to be
connected, please consult your audio dealer.

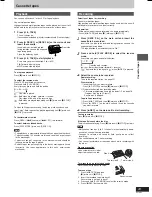
Optional antenna connections

Use outdoor antenna if radio reception is poor.

Note

Disconnect the outdoor antenna when the unit is not in use.
Do not use the outdoor antenna during a lightning storm.

FM outdoor antenna

FM outdoor antenna

(not included)

Back of the
main unit

75    coaxial cable

(not included)

1

FM ANT

GND

(75   )

2

Shield braid

Core wire

 Disconnect the FM indoor antenna.

 The antenna should be installed by a competent technician.

AM outdoor antenna

AM loop
antenna

(included)

AM outdoor antenna

(not included)

Back of the
main unit

5 -12 m

2

1

AM ANT

EXT

LOOP

Run a piece of vinyl wire horizontally across a window or other
convenient location.

 Leave the loop antenna connected.

RQT8169(30_31)new1

4/20/05, 11:35 AM

30

Summary of Contents for SC-VK72D

Page 1: ... the selected track in the CD Playing HighMATTM discs Playing RAM discs Discs Program Random play 18 Program play up to 32 items Random play ALL DISC random play Discs Using on screen menus 19 Main Menu Other Settings Discs Changing the player settings 20 Changing the delay time Speaker Settings Radio operations The radio 22 Manual tuning Preset tuning Selecting channels Tape operations Cassette t...

Page 2: ...1 unit SB PC72 1 unit Surround speakers SB PS92 2 units SB PS82 2 units SB PS72 2 units Subwoofer s SB WVK92 2 units SB WVK82 1 unit THIS UNIT IS INTENDED FOR USE IN MODERATE CLIMATES For Australia and N Z THIS UNIT IS INTENDED FOR USE IN TROPICAL CLIMATES For Saudi Arabia Kuwait and Southeast Asia CAUTION THIS PRODUCT UTILIZES A LASER USE OF CONTROLS OR ADJUSTMENTS OR PERFORMANCE OF PROCEDURES OT...

Page 3: ...ators fail to light smoke appears or any other problem that is not covered in these instructions occurs disconnect the AC power cord and contact your dealer or an authorized service center Electric shock or damage to the unit can occur if the unit is repaired disassembled or reconstructed by unqualified persons Extend operating life by disconnecting the unit from the power source if it is not to b...

Page 4: ... 7 Discs that cannot be played DVD ROM CD ROM CDV CD G SACD Divx Video Discs and Photo CD DVD RAM that cannot be removed from their cartridge 2 6 GB and 5 2 GB DVD RAM and Chaoji VCD available on the market including CVD DVCD and SVCD that do not conform to IEC62107 Playing DVDs and Video CDs The producer of these discs can control how they are played so you may not always be able to control play ...

Page 5: ... with some televisions and set up combinations If this occurs turn the television off for about 30 minutes The television s demagnetizing function should correct the problem If it persists move the speakers further away from the television Note Keep your speakers at least 10 mm away from the system for proper ventilation You cannot take the front net off the speakers STEP1 7 7 7 7 7 Attaching to a...

Page 6: ...ting front speakers and subwoofers Connect the right R side in the same way Center speaker Surround speaker right Subwoofer left Front speaker left Front speaker left Red Black Gray Blue 2 3 1 2 3 1 Note Gray Blue Black Black Red Red VK92D R L R L Gray Gray Blue Blue Surround speaker left Connecting center and surround speakers Connecting front speakers and subwoofer Center speaker Surround speake...

Page 7: ... OUT terminal by separating the chrominance C and luminance Y signals Actual results depend on the television COMPONENT VIDEO OUT terminals These terminals can be used for either interlace or progressive output and provide a purer picture than the S VIDEO OUT terminal Connection using these terminals outputs the color difference signals PB PR and luminance signal Y separately in order to achieve h...

Page 8: ...e or manganese batteries use batteries if the covering has been peeled off Mishandling of batteries can cause electrolyte leakage which can damage items the fluid contacts and may cause a fire Remove if the remote control is not going to be used for a long period of time Store in a cool dark place 7 7 7 7 7 Use Aim at the remote control signal sensor A page 10 avoiding obstacles at a maximum range...

Page 9: ...press the button CLOCK Previous display REC PLAY 2 within 7 seconds or so Press g g g g g REW 4 4 4 4 4 or f f f f f 3 3 3 3 3 FF to set the time 3 Press CLOCK TIMER to finish setting the time The display will return to whatever was displayed before you set the time To display the time Press CLOCK TIMER once when the unit is on or at standby mode The time is shown for about 5 seconds Note Reset th...

Page 10: ...nd Southeast Asia Microphone jacks MIC 1 2 24 Ä Deck 1 cassette holder 23 Å Disc tray open close button c OPEN CLOSE 12 Ç Disc change button c DISC CHANGE 12 É Remote control signal sensor Ñ DVD CD direct play buttons 1 5 12 Ö Super sound EQ button SUPER SOUND EQ 27 Ü VK92D VK82D Subwoofer button SUBWOOFER 27 VK72D Super woofer button S WOOFER 27 á Headphone jack PHONES 29 à Deck 2 cassette holder...

Page 11: ...82D Super Sound EQ Subwoofer button S SOUND EQ SUBWOOFER 27 VK72D Super Sound EQ Super woofer button S SOUND EQ S WOOFER 27 Sound EQ Manual EQ button SOUND EQ MANUAL EQ 26 27 Super surround Multi Re master button SUPER SRND M RE MASTER 26 27 Disc select Tuner program button DISC TUNER PGM 14 22 CD mode button CD MODE 14 Repeat button REPEAT 15 Play mode button PLAY MODE 18 22 23 Advanced disc revi...

Page 12: ...lose the tray Note Discs continue to rotate while menus are displayed Press L STOP when you finish to preserve the unit s motor and your television screen Total title number may not be displayed properly on R RW Check the disc location Press DISC CHECK during play Press again to close the trays To check the location of the 12 cm discs If a disc is being played the corresponding tray will not open ...

Page 13: ...selected group DVD CD Enjoy progressive video Press SHIFT PROGRESSIVE You can enjoy progressive video A page 7 Enter numbers RAM DVD A DVD V VCD CD Press the numbered buttons E g to select 12 h10 A 1 A 2 VCD with Playback control PBC Press L to cancel the PBC functions then press the numbered buttons WMA MP3 JPEG Press the numbered buttons then press ENTER E g to select 123 1 A 2 A 3 A ENTER Press...

Page 14: ... Mode CD Mode is also canceled when you open the current disc tray switch the unit to standby or select another source Quick replay Only when the elapsed play time can be displayed Except R RW Press SHIFT QUICK REPLAY to skip back a few seconds Skipping 30 seconds forward Only when the elapsed play time can be displayed RAM DVD V Except R RW Play restarts from approximately 30 seconds later Conven...

Page 15: ...to select the soundtrack RAM VCD You can use this button to select L R or L R DVD V Karaoke discs Press to select On or Off for vocals Read the disc s instructions for details Signal type data LPCM PPCM 0Digital DTS MPEG Signal type kHz Sampling frequency bit ch Number of channels Example 3 2 1ch 1 Low frequency effect not displayed if there is no signal 0 No surround 1 Mono surround 2 Stereo surr...

Page 16: ...Tree Thumbnail Next group Previous group All Audio Picture Video Help display Find 2 Press 8 9 to select an item and press ENTER 7 7 7 7 7 Searching by content or group title Highlight a group title to search the group or a content title to search its content 1 While the submenu is displayed A see above Press 8 8 8 8 8 9 9 9 9 9 to select Find and press ENTER 2 Press 8 8 8 8 8 9 9 9 9 9 to select ...

Page 17: ... unit does not support Multiple Bit Rate MBR MP3 This unit is not compatible with ID3 tags Compatible sampling rate 8 11 02 12 16 22 05 24 32 44 1 and 48 kHz 001 root 001group 001track mp3 002track mp3 003track mp3 002group 003group 001track mp3 002track mp3 003track mp3 004track mp3 001track mp3 002track mp3 003track mp3 e g MP3 Windows Media and the Windows logo are trademarks or registered trad...

Page 18: ... again to register To change a selected program 1 Press 8 9 to select an item 2 Repeat above steps 1 and 2 To clear a selected program 1 Press 8 9 to select an item 2 Press SHIFT CANCEL or press 8 9 to select Clear and press ENTER To clear the whole program Select Clear all with 8 9 and press ENTER Note The program is retained in memory unless one of the following occurs The current disc tray is o...

Page 19: ...lby Pro A page 26 Logic II To make the dialogue in movies easier to hear Dialogue DVD V Dolby Digital DTS MPEG 3 channel or Enhancer higher with the dialogue recorded in the center channel On Off Multi A page 27 Re master Enhances audio output to produce a warm Sound hall like sound Enhancement On Off L L L L L Audio Menu Information JPEG Off Date Details Subtitle Position 0 to 60 in 2 unit steps ...

Page 20: ...rted in the unit Enter your password and then follow the on screen instructions 1 Language options For Southeast Asia Chinese For others French German Italian Spanish Portuguese Russian and Dutch L L L L L Disc tab Numbered buttons SHIFT ENTER SETUP 1 Press SHIFT SETUP to show the setup menu If you have not set QUICK SETUP A page 9 the QUICK SETUP screen appears 2 Press 8 9 to select the tab then ...

Page 21: ...e range of the lowest sound level and the highest sound level Convenient for late night viewing Only works with Dolby Digital Speaker Settings A see below Center C 0 0 1 0 2 0 3 0 4 0 5 0 ms Set the delay time for your center and Surround LS RS 0 0 5 0 10 0 15 0 ms surround speakers L L L L L Audio tab L L L L L Display tab 5 For Southeast Asia 6 For Saudi Arabia Kuwait Australia and N Z L L L L L...

Page 22: ...set in the memory will be cleared Preset them again Preset tuning Remote control only There are two methods of pre setting stations Automatic presetting All the stations the tuner can receive are preset Manual presetting You can select the stations to preset and the order they are preset in Up to 15 stations each can be set in the FM and AM bands Preparation Press TUNER AUX to select FM or AM Auto...

Page 23: ...n and metal position tapes can be used but this unit will not be able to record or erase them correctly Preparation Wind up the leader tape so recording can begin immediately Press TAPE and then L main unit L STOP 1 Press DECK 2 c on the main unit and insert the cassette to be recorded Insert with the side to be recorded facing towards you and the exposed tape facing down The tape direction is aut...

Page 24: ...X AUDIO LR AUDIO L AUDIO R Display on the main unit RAM VCD L R L R On screen display on the television AUDIO LR L R Left channel sound is heard from the left speaker and right channel sound is heard from the right speaker Vocal and accompaniment AUDIO L L Only left channel sound No vocal AUDIO R R Only right channel sound Vocal Select no vocal for karaoke Vocal and no vocal may be reversed Actual...

Page 25: ...HO 3 ECHO 4 ECHO OFF off The effect increases with the level To record your karaoke performance Preparation Do the preparatory steps 1 2 on page 23 When singing along with discs Insert the disc s you want A page 12 Press DVD CD When singing along with tape Press c DECK 1 on the main unit and insert the tape you want When singing along with radio Select your desired station A page 22 When singing a...

Page 26: ...ion Press SHIFT C FOCUS Every time you press the button C FOCUS ON C FOCUS OFF This does not work when Super Surround is turned on This will also work when Dolby Pro Logic II is turned on Super Surround Press SUPER SRND main unit SUPER SURROUND Every time you press the button MUSIC Adds surround effects to stereo sources MOVIE Use this mode when playing movie software PARTY Sound is in stereo rega...

Page 27: ...set the volume level normally used for listening 3 Press 8 increase or 9 decrease to adjust the speaker level for each speaker C RS LS 6 dB to 6 dB L R Only the balance is adjustable To adjust the balance of the front speakers While outputting the test signal press Adjust the speaker level to the same level as the front speakers To stop the test signal Press SHIFT TEST again L L L L L To adjust sp...

Page 28: ...e volume muted To cancel the timer Press rPLAY REC to clear the timer indicator from the display The timer comes on at the set time everyday if the timer is on To change the settings when the unit is on To change the play record times Do steps 1 2 and 4 To change the source or volume 1 Press rPLAY REC to clear the timer indicator from the display 2 Make changes to the source or volume 3 Do steps 3...

Page 29: ...tes the strength of the sound in each tonal range Peak hold display The peak sound value of each sound range is held on the display for about one second after it occurs Aurora display The peak sound value of each sound range is displayed in inverted form Reflection display The display which indicates the strength of the sound in each tonal range is displayed in inverted form Using other equipment ...

Page 30: ...X main unit AUX to select AUX The unit comes on 2 For listening Proceed to step 3 For recording Press REC on the main unit recording starts Press L main unit L STOP to stop recording 3 Start playback from external source For details refer to the instruction manual of the units which are to be connected When units other than those described above are to be connected please consult your audio dealer...

Page 31: ...s picture has the best quality and is the best to use when adjusting the picture P Predictive coded picture This picture is calculated based on past I or P pictures B Bidirectionally predictive coded picture This picture is calculated by comparing past and future I and P pictures so it has the lowest volume of information Linear PCM Pulse Code Modulation These are uncompressed digital signals simi...

Page 32: ...s during skip or search VCD Playback control menu doesn t appear VCD with playback control The program and random play functions do not work DVD V Programmed items are not played DVD V The on screen menu shows 2 as a soundtrack option when SHIFT AUDIO is pressed but the audio does not change DVD A Play restarts from the beginning of the track when the soundtrack is changed DVD A Scenes are skipped...

Page 33: ...On in On Screen Messages in Display tab 21 The operation is prohibited by the unit or disc You are trying to display incompatible contents Television displays This disc may not be played in your region No on screen display Cannot display group xx content xx Using the cassette deck Picture abnormal or un viewable Page Some distortion is normal during SEARCH Ensure that the unit is connected directl...

Page 34: ...ity 0 7 mV 600 Ω Terminal Mono 6 3 mm jack 2 system CASSETTE DECK SECTION Type Auto Reverse Track system 4 Track 2 Channel Head Record Playback Solid Permalloy Head Erasure Double Gap Ferrite Head Motor DC Servo Motor Recording System AC Bias 100 kHz Erase System AC Erase 100 kHz Tape Speed 4 8 cm s Overall Frequency Response 3 6 dB at DECK OUT Normal 35 Hz to 14 kHz S N Ratio 50 dB A weighted Wow...

Page 35: ...0 x 155 8 mm Mass 1 3 kg VK82D Center speaker SB PC82 Type 2 way 3 speaker system Bass reflex Speaker unit s Impedance 4 Ω 1 Full range 8 cm Cone type 2 Full range 8 cm Cone type 3 Super tweeter Piezo type Input power IEC 110 W Max Output sound pressure 81 dB W 1 0 m Cross over frequency 10 kHz Frequency range 79 Hz to 28 kHz 16 dB 90 Hz to 26 kHz 10 dB Dimensions WxHxD 409 x 104 x 155 5 mm Mass 1...

Page 36: ...ot included This product incorporates copyright protection technology that is protected by method claims of certain U S patents and other intellectual property rights owned by Macrovision Corporation and other rights owners Use of this copyright protection technology must be authorized by Macrovision Corporation and is intended for home and other limited viewing uses only unless otherwise authoriz...

Reviews: