17
RQ
T
9
80
1
G
e
tt
ing S
ta
rte
d
P
lay
in
g
D
isc
s
Othe
r Op
e
ra
tions
Refer
ence
Select to suit the type of equipment you connected to the HDMI AV OUT
terminal.
Select “Bitstream” when the equipment can decode the bitstream (digital
form of 5.1-channel data). Otherwise, select “PCM”.
(If the bitstream is output to the equipment without a decoder, high levels
of noise can be output and may damage your speakers and hearing.)
Digital Output
When audio output is from HDMI AV OUT terminal, and the connected
equipment does not support the item selected, the actual output will
depend on the performance of this connected equipment.
Video menu
TV Aspect
Choose the setting to suit your TV.
≥
16:9: Widescreen TV (16:9)
≥
4:3 Pan&Scan: Regular aspect TV (4:3)
The sides of the widescreen picture are cut off so it
fills the screen (unless prohibited by the disc).
≥
4:3 Letterbox: Regular aspect TV (4:3)
Widescreen picture is shown in the letterbox style.
Time Delay
When connected with a Plasma display, adjust if you notice the audio is
out of sync with the video.
≥
0ms/Auto
≥
20ms
≥
40ms
≥
60ms
≥
80ms
≥
100ms
When using VIERA Link “HDAVI Control” with “HDAVI Control 3 or later”
compatible TV (
B
15), select “0ms/Auto”.
Audio and video will automatically be set in sync.
TV System
Choose the appropriate output source when connecting to a TV
(
B
19, Video systems).
≥
NTSC: When connected to an NTSC TV.
≥
PAL:
When connected to a PAL TV.
≥
Auto: Selects the original output source when playing PAL or NTSC
discs.
: “Auto” is the factory preset.
Video Resolution
This works only when the HDMI connection is being used.
Select suitable picture quality with your TV.
(Video recordings will be converted to, and output as, high-definition
video.)
≥
Auto
≥
480i/576i
≥
480p/576p
≥
720p
≥
1080i
≥
1080p
Ensure that your TV can support the resolution that you choose.
If a message screen appears, confirm your selection by pressing
[
2
,
1
]
8
to select “Yes” and press [OK]
8
. If the picture is distorted, wait
for 15 seconds or press [
2
,
1
]
8
to select “No”. To accept the setting,
select “Yes” again.
HD JPEG Mode
[JPEG]
(This works only when using HDMI connection with “Video Resolution”
(
B
above) set to “Auto”, “720p”, “1080i” or “1080p”.)
≥
On: HD JPEG playback is available. (JPEG images will be displayed in
original resolution.)
≥
Off
During HD JPEG playback, there will be no on-screen menus (
B
14) and
on-screen displays.
Audio menu
≥
Bitstream
≥
PCM
Dynamic Range
≥
On:
Adjusts for clarity even when the volume is low. Convenient for
late night viewing. (Only works with Dolby Digital)
≥
Off:
The full dynamic range of the signal is reproduced.
For Southeast Asia
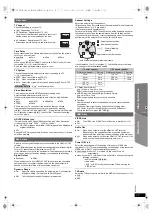
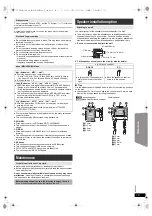
Speaker Settings
Select the delay time of the speakers.
(Effective only when “Surround layout (Recommended)” mode is selected
in “Speaker layout” (
B
9, Easy setup).)
(Center and surround speakers only)
For optimum listening with 5.1-channel sound, all the speakers, except for
the subwoofer, should be the same distance from the seating position.
If you have to place the center or surround speakers closer to the seating
position, adjust the delay time to make up for the difference.
If either distance
a
or
b
is less than
c
, find the difference in the table
and change to the recommended setting.
a
Center speaker
b
Surround speaker
Difference (Approx.)
Setting
Difference (Approx.)
Setting
30 cm
1ms
150 cm
5ms
60 cm
2ms
300 cm
10ms
90 cm
3ms
450 cm
15ms
120 cm
4ms
150 cm
5ms
≥
C Delay (Center Delay):
0ms, 1ms, 2ms, 3ms, 4ms, 5ms
Select the delay time for your center speaker.
≥
LS/RS Delay (Left Surround/Right Surround Delay):
0ms, 5ms, 10ms, 15ms
Select the delay time for your surround speakers.
≥
Test Tone:
Use the test tone to listen to the speaker output to confirm speaker
connections.
Test tone will be output to each channel in the following order.
Left, Center, Right, Surround Right, Surround Left, Subwoofer
To stop the test tone, press [RETURN]
D
.
HDMI menu
VIERA Link
≥
On:
The VIERA Link “HDAVI Control” function is available (
B
15).
≥
Off
Audio Out
≥
On:
When audio output is from the HDMI AV OUT terminal.
(Depending on the capabilities of the connected equipment,
audio output may differ from the audio settings of the main unit.)
≥
Off:
When audio output is not from the HDMI AV OUT terminal. (The
audio is output using the settings of the main unit.)
Power Off Link
Select the desired power off link setting of this unit for VIERA Link
operation (
B
15). (This works depending on the settings of the connected
VIERA Link “HDAVI Control” compatible equipment.)
≥
Video/Audio: When the TV is turned off, this unit will turn off
automatically.
≥
Video: When the TV is turned off, this unit will turn off except during the
following conditions:
– audio playback (
[CD]
[MP3]
)
– radio mode
– “AUX” or “ARC” mode (non-selected TV audio setting for
VIERA Link)
TV Audio
Select the TV audio input to work with the VIERA Link operations (
B
15).
≥
AUX
≥
ARC
L
LS
R
SW
C
RS
C
RS
LS
:
:
:
Actual speaker position
Ideal speaker position
Primary listening
distance
Approximate room dimensions
Circle of constant primary listening distance
SC-XH160-100-60_GAGSGW_RQT9801-B_eng.book 17 ページ 2012年12月26日 水曜日 午後4時57分

