background image

39

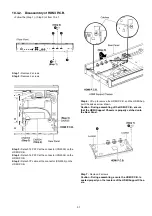
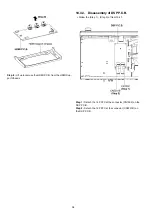
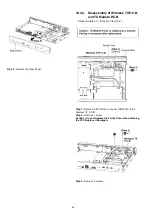
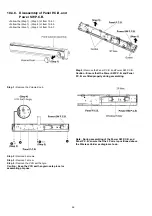
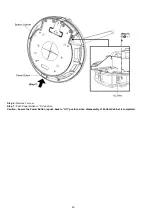
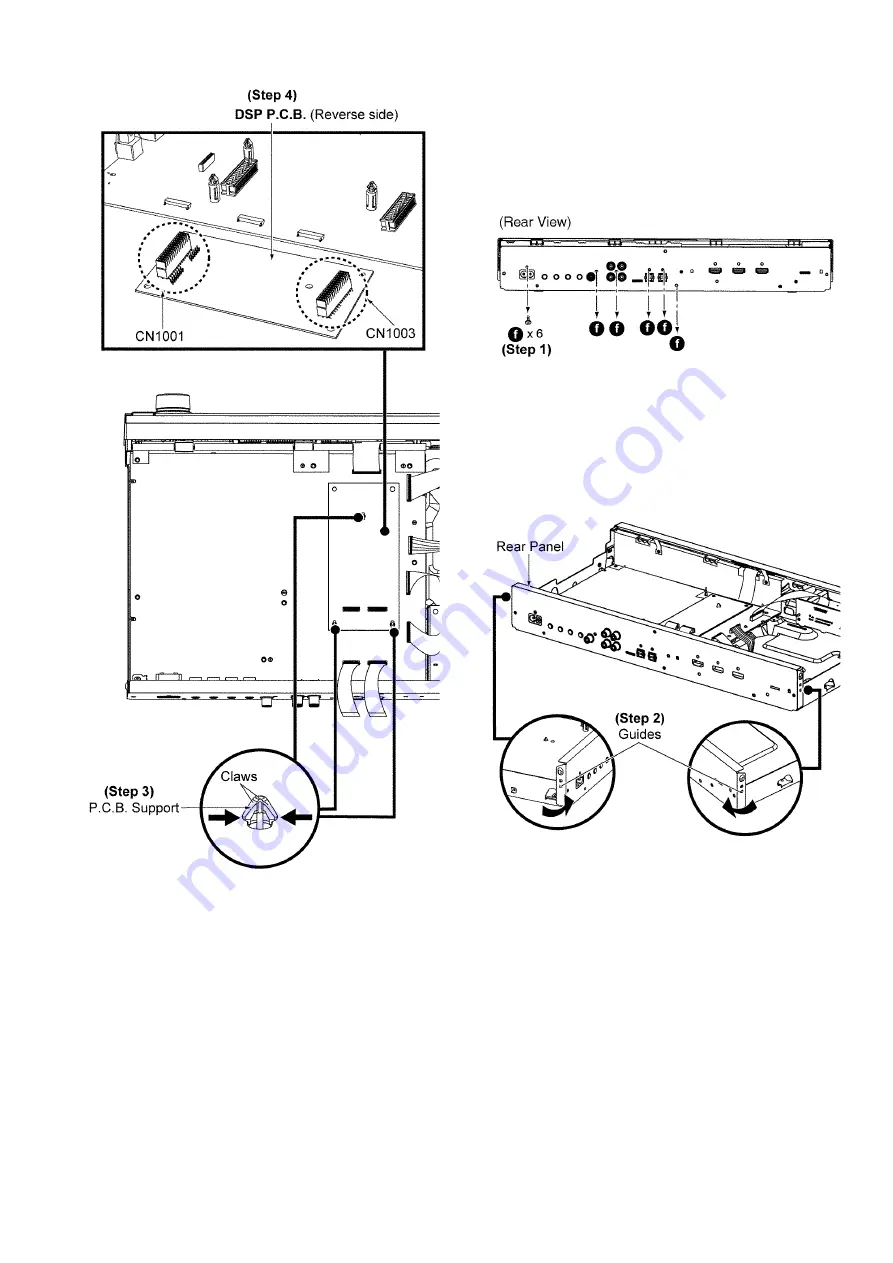
Step 3 :

 Release the claws of the P.C.B. Support.

Step 4 :

 Remove the DSP P.C.B.

Caution : During assembling, ensure the DSP P.C.B. is 

seated properly.

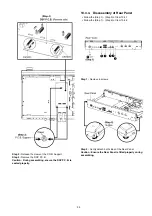
10.4.4. Disassembly of Rear Panel

• Follow the (Step 1) - (Step 3) of Item 10.4.1.
• Follow the (Step 1) - (Step 6) of Item 10.4.2

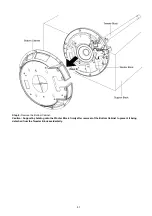
Step 1 :

 Remove 6 screws.

Step 2 :

 Gently detach both sides of the Rear Panel.

Caution : Ensure the Rear Panel is fitted properly during 

assembling.

Summary of Contents for SC-ZT1GN

Page 1: ...ribution is a violation of law PSG0907019CE Home Theater Audio System Model No SC ZT1GN SC ZT1GS SU ZT1GN SU ZT1GS SB ZT1GN SB ZT1GS Product Color S Silver Type K Black Type SU ZT1 S1 Silver Type SB ZT1 TABLE OF CONTENTS PAGE PAGE 1 Safety Precautions 3 1 1 General Guidelines 3 ...

Page 2: ...1 HDMI Checking Method 24 9 2 Troubleshooting Flow Chart 26 10 Disassembly and Assembly Instructions 30 10 1 Caution 30 10 2 Main Parts Location Diagram 32 10 3 Disassembly flow chart 34 10 4 Main Unit SU ZT1 36 10 5 Speaker Unit SB ZT1 47 11 Service Position 105 11 1 Main Unit SU ZT1 105 11 2 Speaker Unit SB ZT1 107 12 Voltage Measurement Waveform Chart 114 12 1 Main Unit SU ZT1 114 12 2 Speaker ...

Page 3: ... 5 2MW When the exposed metal does not have a return path to the chas sis the reading must be 1 1 2 Leakage Current Hot Check 1 Plug the AC cord directly into the AC outlet Do not use an isolation transformer for this check 2 Connect a 1 5kW 10 watts resistor in parallel with a 0 15mF capacitors between each exposed metallic part on the set and a good earth ground such as a water pipe as shown in ...

Page 4: ...4 1 2 Caution for AC Mains Lead ...

Page 5: ... Main Unit SU ZT1GN SU ZT1GS Speaker Unit SB ZT1 1 5 Protection Circuitry The protection circuitry may have operated if either of the following conditions are noticed No sound is heard when the power is turned on Sound stops during a performance The function of this circuitry is to prevent circuitry damage if for example the positive and negative speaker connection wires are shorted or if speaker ...

Page 6: ...U2A104MLC 0 1uF C5502 ECQU2A104MLC 0 1uF C5509 F1BAF1020020 1000pF Safety Ref No Part No Part Name Description Remarks 100 REX1346 1 BLACK WIRE SMPS AC 101 REX1356 1 RED WIRE SMPS AC 113 RGN2979C K SPEC SHEET GS 113 RGN2979D K SPEC SHEET GN 114 RGN2980C K CAUTION LABEL GS 114 RGN2980D K CAUTION LABEL GN PCB1 REP4527D P SMPS P C B RTL PCB2 RD DWKX009JM RX MODULE P C B RTL PCB6 REP4527D P AC INLET P...

Page 7: ...e of the assembly 3 Use only a grounded tip soldering iron to solder or unsolder ES devices 4 Use only an anti static solder remover device Some solder removal devices not classified as anti static ESD protected can generate electrical charge sufficient to damage ES devices 5 Do not use freon propelled chemicals These can generate electrical charges sufficient to damage ES devices 6 Do not remove ...

Page 8: ...is used Definition The letter of PbF is printed on the PCB using the lead free solder To put lead free solder it should be well molten and mixed with the original lead free solder Remove the remaining lead free solder on the PCB cleanly for soldering of the new IC Since the melting point of the lead free solder is higher than that of the normal lead solder it takes the longer time to melt the lead...

Page 9: ...llowed by supplement service manual to be filled with original service manual Printed Circuit Boards This model supports to wireless speakers SB ZT1 The TX Module P C B and RX Module P C B used for wireless signal transmission are supplied as an assembled module TX Module P C B Part No RD DWKX006JM RX Module P C B Part No RD DWKX009JM Note Retention time limit applies Micro processor IC This model...

Page 10: ...e between the main unit and the speaker And installing a main unit in the position with equal to or more than 50 cm height POWER AMPLIFIER SECTION 2 RMS output power at AC 220 to 240 V 10 total harmonic distortion Woofer Speaker ch 60 W 100 Hz 3 Ω Mid High Speaker ch 20 W 1 kHz 8 Ω System Total Power 3 160 W 80 W 80 W DIN output power at AC 220 to 240 V 1 0 total harmonic distortion 100Hz Woofer S...

Page 11: ...11 5 Location of Controls and Components 5 1 Main Unit SU ZT1 ...

Page 12: ...12 5 2 Speaker Unit SB ZT1 5 3 Remote Control ...

Page 13: ...13 6 Installation ...

Page 14: ...14 6 1 Basic Connections 6 1 1 Connecting equipment with HDMI terminal TV DVD recorder etc ...

Page 15: ...15 6 1 2 Connecting equipment without HDMI termial DVD player VCR etc ...

Page 16: ...16 6 1 3 Other connections ...

Page 17: ...17 6 2 AC mains lead connection ...

Page 18: ...18 7 Speaker setting SB ZT1 7 1 Setting the speakers ...

Page 19: ...19 ...

Page 20: ...hod of initializing the setting of the speaker Please initialize it when the main body of the speaker is changed or it added Please set the speaker after ID is reset Preparation Please connect the power supply code of the speaker Please confirm the power supply of the speaker cuts 1 It keeps pushing the power switch for about five seconds with ID switch pushed ID is reset 2 Please turn off power o...

Page 21: ... 1 Fig 1 3 To confirm the μP software version When VOL button is pressed M is displayed is current main micon version is current checksum If no ROM correction NO is displayed When VOL is pressed display H is current version of HDMI micon 8 2 Activating Doctor Mode This mode can be used during servicing 1 Plug the AC adapter to the power source Press and hold down the INPUT SELECTOR button and the ...

Page 22: ...video signals that are incompatible with it through HDMI connection Check the settings of the connected equipment U703 A problem has occured with the HDMI connec tion A problem has occurred with the HDMI connection Try the following to correct the problem Consult your dealer if the error code remains on the display Turn the connected equipment off and on again Disconnect the HDMI cable then reconn...

Page 23: ...ned off TEST AUX 4 Analog All CH output mode 18dB 0dB TV OPT1 STEREO Balance is set to leftmost 18dB 0dB TV OPT1 STEREO Balance is set to rightmost 18dB 0dB VIRTUAL SPEAKER AUX 4 Analog DVS REF WIDE Switch alternately 18dB 0dB Remote Control Test Mode Function and settings Selector Sound Mode Other settings Vol Tone ...

Page 24: ...ack No 40 Zero Check the Level and Noise output from L C R SL SR SW speaker or pin c DVD AUDIO TEST DISC V 612 Track No 7 192kHz 2ch if this source can be reproduced it is OK 3 Check of HDMI Picture a The picture quality of TV is checked by watching that using DVD TEST DISK S 20 or DVD disc with the colour bar signal b DVD TEST DISK S 20 Track No 2 Flag of the rising sun Colour bar disc Colour bar...

Page 25: ...ion nor a noise on the screen If it is a picture quality equal when DVD was connected directly to TV it is OK 1 Connect directly DVD player to TV 2 Connect DVD player to set then connect it to TV 3 Do the comparison for 1 and 2 if same it is OK ...

Page 26: ... B check ޓ IC1000 IC1001 Connector FFC checking ޓ Optical Input Jack㧦JK4501 JK4502 ޓ CN4102 ĺ CN1002 Main P C B ޓ Micro processor IC㧦IC8001 Main P C B ޓ Micro processor IC㧦IC8001 Main P C B Check ޓ IC4001 IC4101 IC4102 ޓ CN4101 Pin 25 26 Pin 28 29 DSP P C B Check ޓ IC1000 IC1001 Power supply check For audio circuit ޓ ޓ 7V㧦Q5507 7V㧦Q5508 Input terminal signal checking JK4001 ĺ IC4001 Pin ԛԜԟԠ Switc...

Page 27: ...27 9 2 2 Speaker Unit SB ZT1 ...

Page 28: ...28 9 2 3 Speaker Unit SB ZT1 Wireless Link ...

Page 29: ...29 ...

Page 30: ...aution when removing the top cabinet and avoid touching heat sinks located in the unit 7 Select items from the following index when checks or replacement are required Main Unit SU ZT1 Disassembly of Top Cabinet Disassembly of HDMI P C B Disassembly of DSP P C B Disassembly of Rear Panel Disassembly of Wireless TX P C B and TX Module P C B Disassembly of Main P C B Disassembly of Front Cabinet Disa...

Page 31: ...31 ...

Page 32: ...32 10 2 Main Parts Location Diagram 10 2 1 Main Unit SU ZT1 ...

Page 33: ...33 10 2 2 Speaker Unit SB ZT1 ...

Page 34: ...rt The following chart is the procedure for disassembling the casing and inside parts for internal inspection when carrying out the ser vicing To assemble the unit reverse the steps shown in the chart below 10 3 1 Main Unit SU ZT1 ...

Page 35: ...35 10 3 2 Speaker Unit SB ZT1 ...

Page 36: ...y of Top Cabinet Step 1 Remove 2 screws Step 2 Remove 3 screws Step 3 Lift up the rear part of the Top Cabinet and remove it in order as arrows shown Caution During assembling ensure that the Top Cabinet is fully inserted into the Front Cabinet ...

Page 37: ...2004 on the HDMI P C B Step 5 Detach 7P cable at the connector CN2005 on the HDMI P C B Step 6 Lift up to remove the HDMI P C B and the HDMI Sup port Chassis as arrow shown Caution During assembling of the HDMI P C B ensure that the HDMI Support Chassis is properly catched onto the Rear Panel Step 7 Remove 2 screws Caution During assembling ensure the HDMI P C B is seated properly on the locators ...

Page 38: ...C B from the HDMI Sup port Chassis 10 4 3 Disassembly of DSP P C B Follow the Step 1 Step 3 of Item 10 4 1 Step 1 Detach the 14P FFC at the connector CN1002 on the DSP P C B Step 2 Detach the 12P FFC at the connector CN2201B on the DSP P C B ...

Page 39: ...bling ensure the DSP P C B is seated properly 10 4 4 Disassembly of Rear Panel Follow the Step 1 Step 3 of Item 10 4 1 Follow the Step 1 Step 6 of Item 10 4 2 Step 1 Remove 6 screws Step 2 Gently detach both sides of the Rear Panel Caution Ensure the Rear Panel is fitted properly during assembling ...

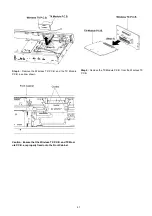
Page 40: ...X P C B and TX Module P C B Follow the Step 1 Step 3 of Item 10 4 1 Step 1 Detach 9P FFC at the connector CN4702 on the Wireless TX P C B Step 2 Remove 1 screw Caution Do not misplace the Ferrite Core when detaching the FFC Replace if damaged Step 3 Remove 2 screws ...

Page 41: ...Wireless TX P C B and the TX Module P C B as arrow shown Caution Ensure that the Wireless TX P C B and TX Mod ule P C B are properly fixed onto the Front Cabinet Step 5 Remove the TX Module P C B from the Wireless TX P C B ...

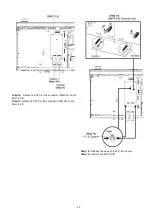
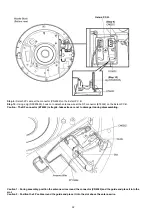
Page 42: ...Step 3 Remove 4 screws Step 4 Remove 1 screw Step 5 Detach 22P FFC at the connector CN4601 on the Main P C B Step 6 Detach 19P FFC at the connector CN4701 on the Main P C B Step 7 Detach 7P cable at the connector CN2005 on the HDMI P C B Step 8 Detach 16P FFC at the connector CN4204 on the Main P C B Step 9 Detach 15P FFC at the connector CN4203 on the Main P C B ...

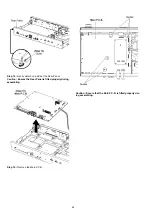
Page 43: ...Step 10 Detach 12P FFC at the connector CN4221 on the Main P C B Step 11 Detach 14P FFC at the connector CN4102 on the Main P C B Step 12 Release the claws of the P C B Support Step 13 Remove the DSP P C B ...

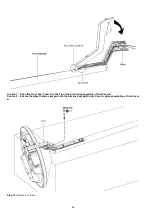
Page 44: ... Gently detach one side of the Rear Panel Caution Ensure the Rear Panel is fitted properly during assembling Step 15 Remove the Main P C B Caution Ensure that the Main P C B is fitted properly dur ing assembling ...

Page 45: ...llow the Step 1 Step 4 of Item 10 4 5 Step 1 Remove 1 screw Step 2 Detach 22P FFC at the connector CN4601 on the Main P C B Step 3 Lift both sides of the Front Cabinet to release from the guides and release the 3 catches at the bottom of the Main Unit Step 4 Remove the Front Cabinet ...

Page 46: ...e 3 screws Step 3 Remove 1 screw Step 4 Remove the VCR earth angle Caution Keep the VCR earth angle in safe place for assembling purpose Step 5 Remove the Panel P C B and Power SW P C B Caution Ensure that the Power SW P C B and Panel P C B are fitted properly during assembling Note During assembling of the Power SW P C B and Panel P C B ensure that the 3P wire is positioned above the Wireless Hol...

Page 47: ...47 10 5 Speaker Unit SB ZT1 10 5 1 Disassembly of Woofer Block Step 1 Lay the Speaker Unit on a support block as shown Step 2 Remove 9 screws Step 3 Remove 3 screws ...

Page 48: ...48 Step 4 Remove the Weight ...

Page 49: ...49 Step 5 Remove 10 screws ...

Page 50: ...50 Step 6 Remove 1 screw Step 7 Push Power Button to On position Caution Ensure the Power Button is push back to Off position when disassembly of Bottom Cabinet is completed ...

Page 51: ...51 Step 8 Remove the Bottom Cabinet Caution Support by holding onto the Woofer Block firmly after removal of the Bottom Cabinet to prevent it being detached from the Tweeter Block accidentally ...

Page 52: ...tor ET6002 on the Extent P C B Caution The RF connector ET6002 is fragile take extra care not to damage it during disassembling Caution 1 During assembly position the antenna wire around the connector CN6052 and the guide and place it into the slot Caution 2 Position the 2P cable around the guide and place it into the slot above the antenna wire ...

Page 53: ...53 Step 11 Remove 2 screws Step 12 Lift up to remove Arm Cover A ...

Page 54: ...gn the Tip of Arm Cover A to the Tip of the Arm during assembly of Arm Cover A Caution 2 Ensure the wires that are clamped onto the Arm are kept within Arm Cover A when assembling of Arm Cover A Step 13 Remove 1 screw ...

Page 55: ...55 Step 14 Tilt the Woofer Block in order as arrows shown to detach it from the Tweeter Block ...

Page 56: ...56 10 5 2 Disassembly of Middle Cabinet Assembly Follow the Step 1 Step 14 of item 10 5 1 Step 1 Remove 7 screws ...

Page 57: ...om the Woofer Cover Assembly Caution 1 Light Panel easily drop off take extra care not to misplace it Caution 2 Replace the EPT Sealer if it is torn Caution 3 Ensure Middle Cabinet Assembly is properly fitted onto the arm slot and guides during assembling ...

Page 58: ... 2 Detach 2P cable at the connector CN6051 on the Extent P C B Step 3 Using a Jig RFKZ0535 hook on to detach coaxial cable at the RF connector ET6001 on the Extent P C B as shown Step 4 Remove the Extent P C B Caution The RF connector ET6001 is fragile take extra care not to damage it during disassembling ...

Page 59: ...59 Caution 1 During assembly position the coaxial cable around the connector CN6051 and place it into both slots Caution 2 Position the 2P cable into both slot above the coaxial cable ...

Page 60: ...of SMPS P C B and AC Inlet P C B Follow the Step 1 Step 14 of item 10 5 1 Follow the Step 1 Step 2 of item 10 5 2 Step 1 Detach 10P cable at the connector CN5802 on the SMPS P C B Step 2 Remove 3 screws Step 3 Remove 1 screw ...

Page 61: ...61 Caution Ensure that the SMPS P C B is properly fitted onto the Middle Cabinet Assembly during assembling ...

Page 62: ...d place the SMPS P C B aside as arrow shown Step 5 Remove 1 screw Step 6 Remove the Support P C B with tweezers Caution Ensure that the Support P C B is properly fitted onto the Middle Cabinet Assembly during assembling ...

Page 63: ... C B until the AC Inlet is released from the Middle Cabinet Assembly then lift up to remove both AC Inlet P C B and SMPS P C B Caution Ensure that the wires Black and Red are dressed to the right side of the boss during assembling of the AC Inlet P C B ...

Page 64: ...AC Inlet P C B is properly fitted onto the Middle Cabinet Assembly during assembling Caution 2 Ensure that the AC Inlet is fully inserted and protruding slightly from the exterior of the Middle Cabinet Assem bly when completed ...

Page 65: ... Follow the Step 1 Step 7 of item 10 5 4 Caution Handle the SMPS P C B with care due to its high temperature after prolonged use Avoid touching the heatsink as it may lead to injuries Step 1 Desolder pins of IC5701 on the solder side of SMPS P C B Step 2 Desolder pins of heatsink on the solder side of SMPS P C B ...

Page 66: ...66 Step 3 Remove the heatsink with the IC5701 ...

Page 67: ...67 Step 4 Remove 1 screw Step 5 Remove IC5701 from the heatsink ...

Page 68: ...68 Assembly of IC5701 Step 1 Apply grease on the heatsink Step 2 Place IC5701 against the heatsink Step 3 Fix 1 screw Caution Ensure that IC5701 is firmly fixed onto the heatsink ...

Page 69: ...69 Step 4 Place the heatsink with the IC5701 onto the SMPS P C B ...

Page 70: ...er pins of IC5701 on the solder side of SMPS P C B Step 6 Solder pins of heatsink on the solder side of SMPS P C B Caution Ensure that pins of IC5701 and heatsink are properly located and soldered onto the SMPS P C B ...

Page 71: ...14 of item 10 5 1 Follow the Step 1 Step 2 of item 10 5 2 Follow the Step 1 Step 7 of item 10 5 4 Caution Handle the SMPS P C B with care due to its high temperature after prolonged use Avoid touching the heatsink as it may lead to injuries Step 1 Remove 1 screw ...

Page 72: ...72 Step 2 Desolder pins of Diode D5802 on the solder side of SMPS P C B Step 3 Remove the Diode D5802 ...

Page 73: ...73 Assembly of Diode D5802 Step 1 Apply grease on the heatsink Step 2 Place Diode D5802 on the SMPS P C B against the heatsink Caution Ensure that Diode D5802 is firmly fixed onto the heatsink ...

Page 74: ...74 Step 3 Solder pins of Diode D5802 on the solder side of the SMPS P C B Caution Ensure that pins of Diode D5802 are properly located and soldered onto the SMPS P C B Step 4 Fix 1 screw ...

Page 75: ...the Step 1 Step 2 of item 10 5 2 Follow the Step 1 of item 10 5 4 Caution D Amp P C B is replaced as a module Step 1 Remove 2 screws Step 2 Remove 1 screw Step 3 Detach 15P FFC at the connector CNB6501 on the D Amp P C B Step 4 Detach 2P cable at the connector CNB6004 on the D Amp P C B ...

Page 76: ... 1 Replace the Sealer if it is torn Caution 2 When connecting 2P cable to the connector CNB6004 ensure the 2P cable is dressed behind the RX Module P C B and placed onto the slot Step 5 Remove the Sound Absorber ...

Page 77: ...ires from the slot in the Middle Cabinet Assembly Step 8 Remove the D Amp P C B Caution 1 Ensure that the D Amp P C B is properly fitted onto the Middle Cabinet Assembly during assembling Caution 2 Ensure that the speaker wires are placed within the slot in the Middle Cabinet Assembly ...

Page 78: ...p 14 of item 10 5 1 Follow the Step 1 Step 2 of item 10 5 2 Follow the Step 1 Step 4 of item 10 5 7 Caution RX Module P C B is replaced as a module Pairing is necessary after replacement Step 1 Remove the speaker wires from the slot in the Middle Cabinet Assembly ...

Page 79: ... C B Caution The connector U18 is fragile take extra care not to damage it during disassembling Step 4 Release catches on the P C B Holders as arrows shown Step 5 Apply gentle force to detach RX Module P C B at the P C B connector CN6501 Caution Ensure that the RX Module P C B is properly and fully inserted onto the P C B connector CN6501 when assem bling ...

Page 80: ...the Step 1 Step 4 of item 10 5 4 Follow the Step 1 Step 7 of item 10 5 7 Follow the Step 1 Step 3 of item 10 5 8 Step 1 Remove 1 screw Step 2 Remove the Sheet Metal Step 3 Remove the Light Panel Caution Using the guide and boss ensure that the Sheet Metal is properly located onto the Middle Cabinet Assembly during assembling ...

Page 81: ...81 Step 4 Remove 3 screws Step 5 Remove the Power Button ...

Page 82: ...on to the P C B Holder to remove the Input P C B as arrow shown Caution 1 During assembling of the Input P C B ensure that the TEST Terminal Jack is properly slot into the guide hole in the Middle Cabinet Assembly Caution 2 Ensure that the Input P C B is properly fitted onto the Middle Cabinet Assembly during assembling ...

Page 83: ...tep 14 of item 10 5 1 Step 1 Remove 4 screws Step 2 Remove the wires from the slots in the Middle Cabinet Assembly Step 3 Lift up to remove the Port Assembly Caution Ensure that the wires are placed within the 2 slots in the Middle Cabinet Assembly during assembling of the Port Assembly ...

Page 84: ...e on Port Assembly C D to the guide slot in Port Assem bly A B Caution 2 During replacement of the Port Noise Absorber use the rib of Port Assembly C D as reference when pasting the Port Noise Absorber Caution 3 Ensure that the Port Noise Absorber is firmly pasted on Port Assembly C D by pressing on the whole sur face ...

Page 85: ... 5 11 Disassembly of Woofer Speaker SP1 Follow the Step 1 Step 14 of item 10 5 1 Follow the Step 1 Step 3 of item 10 5 10 Step 1 Remove the Sound Absorber Step 2 Detach the White Blue and White speaker wires ...

Page 86: ...86 Step 3 Remove 4 screws Step 4 Lift up to remove Woofer Speaker SP1 ...

Page 87: ...12 Disassembly of Arm Unit Follow the Step 1 Step 14 of item 10 5 1 Step 1 Remove 2 screws Step 2 Lift and flip over the Arm as arrow shown Caution Take extra care not to damage the wires while flipping the Arm ...

Page 88: ... to remove the Arm Caution During assembling replace with new wire clampers and ensure that the wire clampers are tightened such that the wires are firmly located in the Arm Step 4 Remove 2 screws Step 5 Detach Arm Cover B from the Arm ...

Page 89: ...1 Follow the Step 1 Step 2 of item 10 5 12 Step 1 Remove 1 screw Caution During assembling do not tighten the screw too tight to avoide the screw hole becomes bigger Step 2 Remove the Pipe Bottom Cover Caution Replace the himelon if it is torn during disassembling of the Pipe Bottom Cover ...

Page 90: ...e folded part and apply gentle force to push out the Prepared Net Assembly as arrows 1 and 2 shown Step 4 Apply gentle force to remove the Prepared Net Assembly completely from the Pipe Caution Take extra care not to tear or damage the Net during removal and assembling of the Prepared Net Assembly ...

Page 91: ...tep 1 Step 14 of item 10 5 1 Follow Step 1 Step 2 of item 10 5 12 Follow Step 1 Step 4 of item 10 5 13 Step 1 Remove 2 screws Step 2 Remove the Antenna Cover Assembly Caution Replace the himelon if it is torn during disaasembling of the Antenna Cover Assembly ...

Page 92: ...s arrow 1 shown Step 4 Release the 6 catches on the Antenna Front Ornament gradually in order as arrows 2 3 and 4 shown Step 5 Remove Antenna Front Ornament Caution Ensure that the catches are properly catched to the Antenna Cover A in order during assembling of the Antenna Front Ornament ...

Page 93: ...mbling replace the himelon if it is torn Step 8 Lift up to detach Antenna Cover A from Antenna Cover B Caution Using the 4 catches on Antenna Cover A and the guide on Antenna Cover B ensure that Antenna Cover A and Antenna Cover B are fitted firmly together during assembling ...

Page 94: ... 4 of item 10 5 13 Follow Step 1 Step 2 of item 10 5 14 Step 1 Detach the Wire Protector from the Pipe Assembly and remove it from the wires Caution During assembling of the Wire Protector align the Wire Protector s guide to the Pipe Assembly s guide hole and ensure that the Wire Protector is properly fitted onto the Pipe Assembly ...

Page 95: ...heets A B and C until the Sound Absorber on each side is in sight Step 3 Remove the Sound Absorbers Caution During assembling replace the Blind Sheet if it is torn Caution Ensure that all holes are fully covered by the Blind Sheets ...

Page 96: ...ep 4 Remove 5 screws Caution Fix 5 screws in order during assembling Caution Use a minus screwdriver to scrape off the burr around the screw hole before disassembling and assembling of the Tweeter Base Frame ...

Page 97: ... being removed Caution 2 Take extra care not to damage the wires during assembling and removal of the Tweeter Base Frame Caution 3 Take extra care not to damage the antenna during assembling and removal of the Tweeter Base Frame Caution 4 During assembling of the Tweeter Base Frame insert the Tweeter Base Frame into the Pipe gradually from the bottom edge ...

Page 98: ...98 Caution 5 During assembling gradually insert the Tweeter Base Frame by using a ball point pen with the ball point hid den to push at the 4 designated gray areas ...

Page 99: ...ted into the Pipe pull out the wires with tweezers Caution 7 During assembling of the Tweeter Base Frame ensure that the screw holes of the Tweeter Base Frame are respectively aligned with the screw holes in the interior of the Pipe to allow proper fixation of screws ...

Page 100: ...100 Step 6 Remove 1 screw Step 7 Remove the Antenna Holder Caution Ensure that the 2 guides on the Antenna Holder are properly located into the Tweeter Base Frame during assem bling ...

Page 101: ...place the himelon if it is torn Step 9 Gradually remove the antenna wire amongst the 2P cable tweeter wires bound by the himelon Caution During assembling of the antenna wire replace the himelon and ensure that the 2P cable tweeter wires and antenna wire are firmly bound to the Tweeter Base Frame ...

Page 102: ...na wire Caution 1 During assembling place the 2P cable tweeter wires and antenna wire on the gray area of the Tweeter Base Frame under the Tweeter as shown in the cross section view Caution 2 Before pasting the himelon ensure that the antenna wire stay within the Tweeter Base Frame ...

Page 103: ...103 Caution 3 Ensure that the wires are bound by the himelon at the bottom side of the Tweeter Base Frame ...

Page 104: ...tep 1 Step 3 of item 10 5 12 Follow the Step 1 Step 4 of item 10 5 13 Follow the Step 1 Step 2 of item 10 5 14 Follow the Step 1 Step 8 of item 10 5 15 Step 1 Remove 2 screws Step 2 Press to release catch in order as arrows shown to remove Tweeter Speaker SP2 Repeat the same steps for Tweeter Speakers SP3 SP4 SP5 ...

Page 105: ... C B according to the diagram shown 11 1 2 Checking and Repairing of HDMI P C B Step 1 Remove the Top Cabinet Step 2 Remove the HDMI P C B Step 3 Place a support block underneath the HDMI P C B Step 4 Connect 15P FFC at the connector CN2003 on the HDMI P C B Step 5 Connect 16P FFC at the connector CN2004 on the HDMI P C B Step 6 Connect 7P cable at the connector CN2005 on the HDMI P C B Step 7 Che...

Page 106: ...eless TX P C B Step 3 Remove the Front Cabinet Step 4 Remove the Panel P C B and Power SW P C B Step 5 Connect 22P FFC at the connector CN4601 on the Main P C B Step 6 Connect 19P FFC at the connector CN4702 on the Wireless TX P C B Step 7 Check and repair the Wireless TX P C B Panel P C B and Power SW P C B according to the diagram shown ...

Page 107: ...see the Section 10 5 11 2 1 Checking and Repairing of SMPS P C B D Amp P C B and Input P C B Step 1 Lift up Middle Cabinet Assembly from the Woofer Cover Assembly Step 2 Remove the SMPS P CB and AC Inlet P C B Step 3 Remove 2 screws Step 4 Remove 1 screw Step 5 Remove Wire Clamper ...

Page 108: ...108 Step 6 Remove the speaker wires from the slot 1 Step 7 Remove the tweeter wires from slots 2 6 ...

Page 109: ...109 Step 8 Flip over the D Amp P C B and place it on an insulation sheet Step 9 Remove 1 screw Step 10 Remove the Sheet Metal ...

Page 110: ...110 Step 11 Remove 3 screws ...

Page 111: ...111 Step 12 Remove the Light Panel Step 13 Remove the Power Button ...

Page 112: ...112 Step 14 Hold on to the P C B Holder and lift up the Input P C B as arrow shown Step 15 Place the D Amp P C B and Input P C B on an insulation sheet ...

Page 113: ...113 Step 16 Connect the 10P cable at the connector CN5802 on the SMPS P C B Step 17 Check and repair the SMPS P C B D Amp P C B and Input P C B according to the diagram shown ...

Page 114: ... 37 38 39 40 CD PLAY 0 0 0 0 0 3 3 6 9 0 0 0 0 0 0 0 0 0 1 0 0 0 0 STANDBY 0 0 0 0 0 3 3 6 9 0 0 1 0 0 0 0 0 0 0 1 0 0 0 0 REF NO MODE 41 42 43 44 45 46 47 48 49 50 51 52 53 54 55 56 CD PLAY 0 0 0 0 0 0 0 0 0 0 0 0 2 0 0 0 0 STANDBY 0 0 0 0 0 0 0 0 0 0 0 0 2 0 0 0 0 REF NO MODE 1 2 3 4 5 6 7 8 CD PLAY 2 3 2 3 2 3 0 2 3 2 3 2 3 6 9 STANDBY 2 3 2 3 2 3 0 2 3 2 3 2 3 6 9 REF NO MODE 1 2 3 4 5 6 7 8 C...

Page 115: ...2 5 0 STANDBY 4 4 2 5 0 REF NO MODE 1 2 3 4 5 CD PLAY 9 8 12 6 0 10 5 1 0 STANDBY 9 8 12 7 0 10 5 1 0 REF NO MODE 1 2 3 4 5 CD PLAY 5 7 3 4 0 1 2 2 1 STANDBY 5 7 3 4 0 1 2 2 1 REF NO MODE 1 2 3 4 5 CD PLAY 5 7 2 5 0 1 2 2 0 STANDBY 5 7 2 5 0 1 2 2 0 REF NO MODE 1 2 3 4 5 CD PLAY 5 7 3 9 0 1 2 2 1 STANDBY 5 7 3 9 0 1 2 2 1 REF NO MODE 1 2 3 4 5 CD PLAY 5 7 0 3 3 0 5 3 STANDBY 5 7 0 3 3 0 5 3 REF NO...

Page 116: ...4 65 66 67 68 69 70 71 72 73 74 75 76 77 78 79 80 CD PLAY 2 7 3 3 0 0 0 0 0 0 0 5 3 3 3 3 3 3 3 3 0 5 3 3 2 3 3 3 3 3 0 0 STANDBY 2 7 3 3 0 0 0 0 0 0 0 5 3 3 3 3 3 3 3 3 0 5 3 3 2 3 3 3 3 3 0 1 0 REF NO MODE 81 82 83 84 85 86 87 88 89 90 91 92 93 94 95 96 97 98 99 100 CD PLAY 3 3 3 3 3 3 3 3 0 0 0 0 0 0 3 3 3 3 0 3 3 3 3 0 1 4 3 3 3 3 0 STANDBY 3 3 3 3 3 3 3 3 0 0 0 0 0 0 3 3 3 3 0 3 3 3 3 0 1 4 3...

Page 117: ... 0 2 1 0 0 0 3 3 0 4 7 0 0 3 3 0 0 3 3 3 1 REF NO MODE E C B E C B CD PLAY 0 0 2 8 0 0 3 3 STANDBY 0 0 2 8 0 0 3 3 Q4304 Q4305 Q5504 Q5505 Q5506 Q5510 Q5551 Q5561 QR4301 QR4305 Q5507 Q5508 Q5509 QR4310 QR4311 QR4312 QR5501 QR5502 QR5503 QR4306 QR4307 QR4308 QR4309 QR5582 QR5562 QR5563 QR5571 QR5581 SC ZT1GN GS SU ZT1GN GS MAIN P C B QR5591 QR5592 REF NO MODE 1 2 3 4 5 6 7 8 9 10 11 12 13 14 15 16 ...

Page 118: ...8 0 0 0 0 0 3 3 0 0 0 0 3 3 1 8 0 0 0 0 3 3 STANDBY 3 3 3 3 1 8 0 0 0 0 0 3 3 0 0 0 0 3 3 1 8 0 0 0 0 3 3 REF NO MODE 101 102 103 104 105 106 107 108 109 110 111 112 113 114 115 116 117 118 119 120 CD PLAY 0 0 0 0 0 0 3 3 3 3 3 3 3 3 0 1 8 0 0 0 0 0 3 3 3 3 3 3 STANDBY 0 0 0 0 0 0 3 3 3 3 3 3 3 3 0 1 8 0 0 0 0 0 3 3 3 3 3 3 REF NO MODE 121 122 123 124 125 126 127 128 CD PLAY 3 3 0 0 5 3 3 1 8 0 5 ...

Page 119: ... 19 20 CD PLAY 3 3 3 3 2 6 0 3 3 3 3 3 3 3 3 3 3 0 3 3 3 3 3 3 3 3 3 3 3 3 3 3 3 3 0 0 STANDBY 3 3 3 3 2 6 0 3 3 3 3 3 3 3 3 3 3 0 3 3 3 3 3 3 3 3 3 3 3 3 3 3 3 3 0 0 REF NO MODE 21 22 23 24 25 26 27 28 29 30 31 32 33 34 35 36 37 38 39 40 CD PLAY 0 0 0 0 3 3 0 0 0 0 0 0 0 0 3 3 3 3 3 3 0 3 3 3 3 3 3 STANDBY 0 0 0 0 3 3 0 0 0 0 0 0 0 0 3 3 3 3 3 3 0 3 3 3 3 3 3 REF NO MODE 41 42 43 44 45 46 47 48 4...

Page 120: ... 64 65 66 67 68 69 70 71 72 73 74 75 76 77 78 79 80 CD PLAY 0 3 3 0 0 0 0 0 3 2 3 3 3 3 0 0 0 0 0 3 3 3 3 3 3 0 0 STANDBY 0 3 3 0 0 0 0 0 3 2 3 3 3 3 0 0 0 0 0 3 3 3 3 3 3 0 0 REF NO MODE 81 82 83 84 85 86 87 88 89 90 91 92 93 94 95 96 97 98 99 100 CD PLAY 0 0 0 0 0 0 0 0 0 0 0 0 0 1 8 2 0 0 3 3 3 3 0 STANDBY 0 0 0 0 0 0 0 0 0 0 0 0 0 1 8 2 0 0 3 3 3 3 0 REF NO MODE 1 2 3 4 5 6 7 8 CD PLAY 0 0 3 3...

Page 121: ... 100 CD PLAY 1 2 1 3 1 3 1 3 1 3 1 2 0 0 3 3 1 3 1 3 1 3 1 3 1 3 1 3 1 3 1 3 1 3 1 8 0 STANDBY 1 2 1 3 1 3 1 3 1 3 1 2 0 0 3 3 1 3 1 3 1 3 1 3 1 3 1 3 1 3 1 3 1 3 1 8 0 REF NO MODE 1 2 3 4 5 CD PLAY 2 5 3 3 1 8 0 0 STANDBY 2 5 3 3 1 8 0 0 REF NO MODE 1 2 3 4 5 6 7 8 9 10 11 12 13 14 15 16 17 18 19 20 CD PLAY 0 0 0 0 0 0 0 0 0 0 0 0 0 0 0 0 0 0 0 3 3 STANDBY 0 0 0 0 0 0 0 0 0 0 0 0 0 0 0 0 0 0 0 3 ...

Page 122: ...8 99 100 CD PLAY 0 0 0 0 0 0 0 3 3 0 0 1 8 1 8 0 1 6 1 6 3 3 3 3 0 0 3 3 STANDBY 0 0 0 0 0 0 0 3 3 0 0 1 8 1 8 0 1 6 1 6 3 3 3 3 0 0 3 3 REF NO MODE 101 102 103 104 105 106 107 108 109 110 111 112 113 114 115 116 117 118 119 120 CD PLAY 0 3 3 0 3 3 0 0 1 8 2 8 2 8 2 8 2 8 0 3 3 2 8 2 8 2 8 2 8 0 1 8 2 8 STANDBY 0 3 3 0 3 3 0 0 1 8 2 7 2 7 2 7 2 7 0 3 3 2 7 2 7 2 6 2 7 0 1 8 2 7 REF NO MODE 121 122...

Page 123: ... 19 0 18 3 0 18 6 0 2 0 4 5 0 0 0 4 6 SC ZT1GN GS SB ZT1GN GS SMPS P C B IC5701 IC5799 IC5801 IC5899 Q5862 Q5890 Q5720 Q5721 Q5722 REF NO MODE 1 2 3 4 5 6 7 8 9 10 11 12 13 14 15 16 CD PLAY 3 3 0 1 3 2 0 4 6 4 6 0 4 6 0 0 4 6 4 6 4 5 4 6 4 6 4 5 STANDBY 3 3 0 1 3 2 0 4 6 4 6 0 4 6 0 0 4 6 4 6 4 5 4 6 4 6 4 5 REF NO MODE 1 2 3 4 5 6 7 8 CD PLAY 0 0 0 4 8 0 0 0 5 0 STANDBY 0 0 0 4 8 0 0 0 5 0 REF NO...

Page 124: ... 4 5 6 CD PLAY 0 5 4 0 6 20 4 20 4 20 4 20 4 20 4 20 4 3 3 3 3 3 3 3 3 3 3 3 3 STANDBY 0 5 4 0 6 20 4 20 4 20 4 20 4 20 4 20 4 3 3 3 3 3 3 3 3 3 3 3 3 REF NO MODE 1 2 3 4 5 6 1 2 3 4 5 6 E C B CD PLAY 20 4 20 4 20 4 20 4 20 4 20 4 3 3 3 3 3 3 3 3 3 3 3 3 0 0 2 8 STANDBY 20 4 20 4 20 4 20 4 20 4 20 4 3 3 3 3 3 3 3 3 3 3 3 3 0 0 2 8 REF NO MODE E C B E C B E C B E C B CD PLAY 5 0 5 0 0 4 8 5 0 4 8 1...

Page 125: ...01 7 PLAY 3 2Vp p 2usec div WF No IC1001 13 16 PLAY 0 34Vp p 500nsec div WF No IC1001 14 15 PLAY 0 24Vp p 500nsec div WF No IC1001 20 21 26 27 PLAY 0 68Vp p 5msec div WF No IC1001 30 31 32 33 PLAY 0 3Vp p 500usec div WF No IC1001 34 35 36 37 PLAY 0 64Vp p 500usec div WF No IC1004 1 PLAY 5 6Vp p 50nsec div WF No IC2201 15 PLAY 3 2Vp p 1msec div WF No IC2232 5 PLAY 4 5Vp p 20nsec div WF No IC2232 81...

Page 126: ...01 40 41 PLAY 0 56Vp p 500usec div WF No IC4001 48 49 PLAY 0 76Vp p 500usec div WF No IC4102 1 PLAY 0 28Vp p 500nsec div WF No IC2232 89 PLAY 6Vp p 50nsec div WF No IC2232 94 PLAY 6 8Vp p 20nsec div WF No IC2232 95 PLAY 2Vp p 20nsec div WF No IC4304 1 7 PLAY 6 8Vp p 500usec div WF No IC4301 1 7 PLAY 6Vp p 500usec div WF No IC4302 1 7 PLAY 4 2Vp p 2msec div WF No IC4303 1 PLAY 2 5Vp p 2msec div WF ...

Page 127: ...GN GS WF No IC8001 59 PLAY 3 4Vp p 2msec div WF No IC5701 1 PLAY 310Vp p 2usec div WF No IC5701 6 PLAY 0 4Vp p 2usec div WF No IC5799 2 PLAY 0 11Vp p 2usec div WF No IC5799 5 PLAY 270Vp p 1usec div WF No IC6901 1 PLAY 8Vp p 2msec div WF No IC6901 7 PLAY 5 6Vp p 2msec div WF No IC6902 1 PLAY 7 6Vp p 2msec div WF No IC6902 7 PLAY 4 4Vp p 5msec div SC ZT1GN GS SB ZT1GN GS ...

Page 128: ...F000001 B1GBCFJA0017 B1GBCFGG0030 B1ADMB000003 B1HBDCA00001 B0BC026A0007 B0ACCK000005 MA2J7280GL B0JCMD000010 B0JCAE000001 MA2J1110GL Cathode Anode A Ca A Ca Cathode Cathode Anode Anode Anode Cathode Anode Anode B0EAMM000057 B0HAMP000094 B0JAME000029 B0JAMF000011 B0HBSM000054 B0EDKT000009 Ca A A Ca A A MAZ8200GML MAZ8300GML MAZ8075GML MAZ8120GML MAZ8150GML MAZ8051GML MAZ8091GML C0EBE0000338 C0ZBZ0...

Page 129: ...129 14 Overall Simplified Block 14 1 Signal Flow SU ZT1 ...

Page 130: ... 71 RESET DSP 72 73 MOSI DSP 74 MISO DSP 77 CS CODEC 76 INTREQ CODEC 75 RESET CODEC 78 DT OUT CODEC 79 33 SCLK 32 RXD 34 BUSY 41 PIN 41 46 PIN 46 20 AC SYNC 30 SDA 29 SCL 9 CNVSS 31 TXD 12 RESET 48 HDMI MUTE 27 HDMIMUTE DIS 88 LINE OUT DET 21 MUTE AMP 23 MUTE HP 91 HP DET 5 VOL CLK 6 VOL DT X8001 81 KEY1 S4601 POWER CN4611 CN4601 JW4612 1 12 11 JW4602 82 KEY2 S4602 SELECTOR CN4611 CN4601 10 13 92 ...

Page 131: ...2004 CN4204 2 CN2001 3 CN2001 4 CN2001 5 CN2001 6 CN2001 8 10 CN2001 CN2001 4 POWER SENSE 42 HDMI POWER HDMI POWER 21 5 SDA IDROM DT 47 DSDA 51 HPD 46 DSCL 30 TXC 31 TXC 45 DDCPWR5V 22 6 SCL IC2001 RESET C0EBE0000338 1 OUT 2 VDD IDROM CK 53 AMUTE HDMI MUTE BUSY 75 TX HPD 24 19 TX INT 79 STBY H 94 V CHECK INT 25 38 TX RESET 34 FLASH BUSY SCLK 33 FLASH SCLK RXD 32 UPCON SCL CE 46 FLASH CE EPM 41 FLA...

Page 132: ... Pin No Port Name TMDS D0 9 R1X0 41 TMDS D0 7 R1X0 42 TMDS D1 6 R1X1 44 TMDS D1 4 R1X1 45 TMDS D2 3 R1X2 47 TMDS D2 1 R1X2 R1X0 R1X0 R1X1 R1X1 R1X2 R1X2 48 IC2201 HDMI RECEIVER JK2201 HDMI BD DVD IN SIGNAL NAME TC 2 Pin No Port Name Pin No Port Name TMDS D0 9 R2X0 61 TMDS D0 7 R2X0 62 TMDS D1 6 R2X1 64 TMDS D1 4 R2X1 65 TMDS D2 3 R2X2 67 TMDS D2 1 R2X2 R2X0 R2X0 R2X1 R2X1 R2X2 R2X2 68 IC2201 HDMI ...

Page 133: ...101 16 CN1001 CN4101 14 CN1001 CN4101 17 CN1001 CN4101 1 CN1001 CN4101 4 CN1001 CN4101 2 CN1001 CN4101 5 CN1001 CN4101 7 CN1001 CN4101 10 CN1001 CN4101 8 CN1001 CN4101 11 CN1001 CN4101 29 CN1001 CN4101 28 CN1001 CN4101 26 CN1001 CN4101 25 CN1001 CN4101 27 AOUTB3 26 AOUTB3 36 AOUTA1 37 AOUTA1 35 AOUTB1 34 AOUTB1 33 AOUTA2 31 AOUTB2 30 AOUTB2 15 AINL 16 AINL JK4502 OUTPUT 3 JK4501 OUTPUT 3 CN1002 CN...

Page 134: ...me Pin No Port Name SC ZT1GN GS SU ZT1GN GS IC TERMINAL DSP CHART EXT DQ0 68 DQ0 2 EXT DQ1 65 DQ1 3 EXT DQ2 64 DQ2 5 EXT DQ3 63 DQ3 6 EXT DQ4 61 DQ4 8 EXT DQ5 60 DQ5 9 EXT DQ6 59 DQ6 11 EXT DQ7 58 DQ7 12 EXT DQ8 78 DQ8 39 EXT DQ9 77 DQ9 40 EXT DQ10 75 DQ10 42 EXT DQ11 74 DQ11 43 EXT DQ12 72 DQ12 45 EXT DQ13 71 DQ13 46 EXT DQ14 70 DQ14 48 EXT DQ15 69 DQ15 DQ0 DQ1 DQ2 DQ3 DQ4 DQ5 DQ6 DQ7 DQ8 DQ9 DQ1...

Page 135: ... C0AABB000085 IC4304 DUAL OP AMP 3 2 1 5 7 6 MUTING Q4302 MUTING Q4301 MUTING Q4303 VOL DT VOL CLK SWOUT COUT COUT SWOUT ROUT LOUT LOUT ROUT SROUT SLOUT SLOUT SROUT AINR AINR AINL AINL V CIN V SWIN V LIN V RIN V SLIN V SRIN AFR OUT AFL OUT AUX3 R AUX3 L AUX2 R AUX2 L VOL DT VOL CLK V SLOUT V SROUT V LOUT V ROUT V SWOUT SC ZT1GN GS SU ZT1GN GS AUDIO BLOCK DIAGRAM AUX OPTICAL AUDIO INPUT SIGNAL LINE...

Page 136: ... C0DBAYH00005 SWITCHING REGULATOR IC5562 VIN 1 ON OFF 5 VOUT 2 C0DBAYH00005 SWITCHING REGULATOR IC5561 QR5562 INVERTER PCONT D5582 5VA D5563 SC ZT1GN GS SU ZT1GN GS MAIN SMPS BLOCK DIAGRAM 1 2 3 C0DAEMZ00001 SHUNT REGULATOR IC5502 VIN 3 VOUT 1 C0CBACC00046 VOLTAGE REGULATOR IC5571 D8001 D5571 5 12 CN4204 CN2004 1 16 CN4204 CN2004 VIN 2 VC 1 VOUT 4 C0DBEKG00004 REGULATOR IC5572 VIN 1 ON OFF 5 VOUT ...

Page 137: ...14 CNA6051 CNB6501 RED GREEN OFF ON WL 4V WL 4V PCONT 6 10 CNA6051 CNB6501 9 7 CNA6051 CNB6501 1 15 CNA6051 CNB6501 3 13 CNA6051 CNB6501 14 P43 11 P44 13 P32 6 P47 LEDOUT PSW PCONTOUT DETIN LINKOUT 10 6 CNA6051 CNB6501 15 P42 8 CN6501 10 CN6501 9 CN6501 2 CN6501 5 CN6501 4 CN6550 1 CN6550 2 CN6550 S6051 ID SET POWER CONTROL Q6008 LINKIN IDOUT VON IDIN D6023 D6022 6 CN6550 MUTEOUT S6001 POWER SW SC...

Page 138: ...2 AMP Q6102 AMP 21 LO4 25 HO3 26 VS3 22 LO3 DC DET 17 VCC2 9 7 CNA6051 CNB6501 1 15 CNA6051 CNB6501 3 13 CNA6051 CNB6501 10 6 CNA6051 CNB6501 QR6004 SWITCH 38 IN3 40 IN4 Q6001 MUTING QR6001 QR6003 MUTING CONTROL Q6012 Q6013 DC DETECT SC ZT1GN GS SB ZT1GN GS D AMP BLOCK DIAGRAM CN6051 CN6051 CNB6004 CNB6004 AUDIO OUTPUT SIGNAL LINE FROM SMPS FROM SMPS FROM INPUT ...

Page 139: ... 4 7 8 12 11 5V REGULATOR C0CBADC00042 VOUT VIN 3 1 QR6005 DC DETECT IC6008 28V 28V WL 4V 5V SC ZT1GN GS SB ZT1GN GS SMPS BLOCK DIAGRAM DZ5701 F1 AC IN P5701 L5702 DC DET DC DET 1 2 3 C0DAEMZ00001 SHUNT REGULATOR IC5801 7 8 8 9 CNB6501 CNA6051 8 CN5802 JW5802 3 13 CNB6501 CNA6051 10 CN5802 JW5802 PCONT Q5890 INVERTER Q6015 POWER CONTROL Q6014 5V REGULATOR 5 CNB6501 CNA6051 11 QR6070 DC DETECT Q586...

Page 140: ...1 16 30 15 2 1 13 14 2 1 11 12 1 11 12 22 2 1 14 15 1 3 2 1 VCC 2 GND 3 OPT 1 VCC 2 GND 3 OPT 7 1 2 1 18 19 2 1 21 22 7 6 5 4 3 2 1 7 6 5 4 3 2 1 7 6 5 4 3 2 1 7 6 5 4 3 2 1 6 AUX2_L 5 AUX2_R 4 GND 3 AUX3_L 2 AUX3_R 1 GND 1 2 9 10 2 1 15 16 9 8 7 6 5 4 3 2 1 PANEL P C B MAIN P C B HDMI P C B B SIDE DSP P C B B SIDE WIRELESS TX P C B POWER SW P C B DSP P C B A SIDE SOLDER SIDE SOLDER SIDE SOLDER SI...

Page 141: ...D TO WRITER 1 9 10 2 22 21 2 1 1 2 15 14 7 6 5 4 3 2 1 I CN6052 CN6051 ET6001 1 2 1 2 J TL1 TL2 CN5802 AC IN SPEAKER 220 240V 50Hz P5701 TL10 TL20 1 10 INPUT P C B B SIDE TEST TERMINAL D AMP P C B B SIDE AC INLET P C B EXTENT P C B B SIDE SMPS P C B RED RED BLACK BLACK RED BLACK T5701 MAIN TRANSFORMER T5751 BACKUP TRANSFORMER TO LF SPEAKER SOLDER SIDE SOLDER SIDE SOLDER SIDE SOLDER SIDE SOLDER SID...

Page 142: ...d voltage Capacitors the part no and val ues will be indicated in the Schematic Diagram AC rated voltage capacitors C5501 C5502 C5509 C5700 C5701 C5703 C5704 Resistor Unit of resistance is OHM Ω K 1 000 M 1 000 000 Capacitor Unit of capacitance isμF unless otherwise noted F Farads pF pico Farad Coil Unit of inductance is H unless otherwise noted REF IS FOR INDICATION ONLY Voltage and Signal lines ...

Page 143: ...J0JCC0000119 VA2113 R2111 100 VA2111 VA2112 R2112 1 8K 47K R2114 6 8K R2120 6 8K R2121 10K R2109 D2101 MA2J7280GL B1ABCF000079 Q2103 R2106 10K C2108 10 C2107 0 1 698 R2124 1000P C2109 C2110 1000P LB2106 CEC_OUT I2C_DT J0JHC0000021 LB2105 LB2105 LB2108 47 R2122 47 R2123 I2C_CK LB2107 LB2108 3 3K R2103 27K R2104 820 R2102 VA2109 EZJZ0V80008B CEC R2118 100K CEC_IN VCC BK5V 220 R2105 C2103 220P 220K R...

Page 144: ...00400018 X2002 M_CS TX_INT RX_INT H_SO RX_RST I2C_CK I2C_DT R2022 10K TX_RST D2004 B0ACCK000005 R2021 100 M_CLK R2027 1 8K M_SI SW_RST 100 R2033 R2026 100 4 7K R2032 R2031 4 7K SCLK RXD 100 R2034 TXD 0 01 C2006 BUSY R2023 47 C2001 0 1 PIN41 R2024 47 R2025 100 PIN46 3 4 2 5 98 94 95 92 91 93 97 96 1 100 99 80 78 76 77 79 87 86 88 89 82 84 83 81 85 90 16 14 15 17 11 13 12 69 67 65 64 66 68 70 51 49 ...

Page 145: ...13 VA2220 C2202 0 1 R2207 100K VA2223 C2205 1000P 1000P C2206 G3 G4 G1 G2 5 3 4 7 9 8 6 1 2 10 13 15 17 19 18 16 14 11 12 C2204 1000P G3 G4 G1 G2 5 3 4 7 9 8 6 1 2 10 13 15 17 19 18 16 14 11 12 33 R2220 R2205 0 47 R2215 LB2210 LB2211 1000P C2219 RX0_5V RX0_HPD VA2221 VA2224 VA2209 VA2212 VA2201 VA2208 EZJZ0V80008B EZAEG2A50AX EZJZ0V80008B EZAEG2A50AX LB2209 LB2211 LB2205 LB2208 LB2201 LB2204 J0JHC...

Page 146: ... 0 1 C2236 0 1 C2233 10 C2235 1 C2234 10 0 1 C2244 0 1 C2243 C2245 0 1 C2239 0 1 0 1 C2237 0 1 C2238 1 C2241 0 1 C2242 0 1 C2240 I2S_0_H 8 6 5 7 4 2 1 3 H0J283500018 RX2231 IEC958 47 R2256 47 R2255 C2249 0 1 R2278 33 0 1 C2248 33 R2252 82K R2237 22K R2239 22K R2238 RX1_HPD RX1_5V CVCC18 REGVCC Q28 CGND CVCC18 Q29 OUT ON OFF IN Q22 Q21 Q23 Q16 Q17 Q14 Q10 Q13 Q15 Q19 Q18 IOGND IOGND ODCK Q11 CVCC18...

Page 147: ...I_SDOUT C1074 0 1 I2S3 I2S1 I2S0 I2S2 C1067 0 1 SCLK SCP1_MISO BUSY_DSP BUSY_DSP 2 1 49 12 10 91 1 40 39 41 13 38 6 45 45 47 46 8 7 43 42 44 27 26 24 25 22 20 18 16 14 15 17 19 21 30 29 34 33 36 37 35 31 32 23 28 3 48 50 IC1005 C3ABMG000238 R1012 3 3K R1018 3 3K CS_DSP 0 1 C1063 C1064 0 1 C1065 0 1 C1073 0 1 0 1 C1066 A5V A5V 103 107 106 110 113 119 118 124 127 128 125 126 121 120 123 122 115 114 ...

Page 148: ...LB1004 LB1007 J0JHC0000021 C1027 0 1 SPDIF SAI_SDOUT C1055 10 SCLK 0 01 C1048 0 R1006 CLK C1012 1000P 100K R1022 C1016 10P C1013 10P C1015 10P C1014 10P 0 1 C1011 10 C1050 CX_SDIN1 CX_SCLK CX_LRCLK RMCK I2S0 I2S1 LRCLK I2S3 I2S2 SPDIF 7 9 10 8 4 5 1 3 2 6 12 11 CNB2201 SRBOUT AINL AINL SRBOUT AINR AINR 6 7 5 9 25 24 26 21 20 22 17 18 13 10 12 11 16 14 15 19 23 28 27 8 1 3 4 2 29 30 CN1001 C1019 27...

Page 149: ...K_DSP INTREQ_DSP 22P C8074 22P C8077 22P C8073 RESET_DSP BUSY_DSP R8076 1K R8078 1K R8079 0 R8075 1K RESET_CODEC DT_OUT_CODEC INTREQ_CODEC CS_CODEC R8074 1K 22P C8079 R8072 1K R8069 0 R8071 1K R8070 1K DGND R8073 0 R8077 1K CS_DSP MISO_DSP MOSI_DSP 5VA PGND AGND 1000P C5594 C5591 6 3V330 6 5 8 9 11 12 10 18 15 17 16 20 19 13 14 7 2 1 4 3 22 21 CN4103 SL_OUT SR_OUT 0 01 C5597 3 2 1 E5503 W_INT W_SC...

Page 150: ...T 100P C4364 1000P C4366 390 R4366 DUAL OP AMP 1K R4362 100P C4368 390P C4327 V_SLOUT 1000P C4325 1K R4331 2 2K R4327 6 8K R4325 2 2K R4321 1 C4329 10K R4392 V_LOUT 1K R4361 100P C4363 2 2K R4322 V_SROUT V_SWOUT HP_LOUT 3 2 5 4 1 6 Q4305 B1HBDCA00001 HP_GND C4371 0 01 3 2 5 4 1 6 Q4304 B1HBDCA00001 47K R4369 82 R4373 82 R4377 82 R4381 82 R4371 82 R4379 82 R4375 C4358 16V10 C4357 16V10 10K R4367 39...

Page 151: ... 10K R8084 10K R8083 15K R8082 15K R8081 R8092 10K PCONT KEY2 KEY1 VOL_ENC1 VOL_ENC2 HP_DET DT_OUT_CODEC PCONT D3 3V D3 3V 0 01 C8015 10K R8102 R8093 10K R8091 220K R8087 220K R8088 10K R8097 10K C8007 0 01 R8098 6 8K C8006 0 01 C8005 6 3V100 1 4 2 3 C0EBG0000107 IC8004 6 7 5 2 4 3 8 1 IC8002 RFKWEUZT1PP D8003 MA2J1110GL D8002 MA2J1110GL 4 7K R8101 C8014 6 3V100 W_DET W_SSB R8001 100 R8002 100 47K...

Page 152: ...50P DUAL OP AMP DUAL OP AMP DUAL OP AMP 5 6K R4246 3 9K R4242 12K R4248 47K R4338 V_SWIN C4244 2700P C4248 150P C4253 0 01 2700P C4242 R4211 5 6K 1 8K R4203 6 8K R4209 C4209 150P V_LIN 5 6K R4205 R4207 6 8K C4203 2700P C4214 0 01 C4207 150P 2700P C4201 1 8K R4201 1 8K R4241 FR_OUT 100 R4336 2700P C4241 1 8K R4224 1 8K R4222 1 8K R4243 100P C4336 JK4006 V_CIN 5 6K R4245 6 8K R4228 5 6K R4226 R4247 ...

Page 153: ... D5506 B0JAMF000011 B0JAMF000011 D5505 D5507 B0EAMM000057 25V470 C5512 9 15 13 14 16 11 10 12 4 1 2 3 7 5 6 T5501 ETS25AD1V6AG L5504 D5582 MAZ8075GML R5517 47K D3 3V R5520 15K R5519 2 7K PCONT PCONT_5VA D5581 MAZ8300GML QR5581 B1GBCFGG0030 DGND S_DET D5583 MAZ8120GML A 7V R5529 2 7K R5528 470 Q5507 2SC3940ARA R5527 1 5K C5521 1000P PGND A 7V 16V10 C5523 R5530 2 7K Q5508 2SB0621AHA R5526 1 5K D5510...

Page 154: ...0005 R5563 10K R5567 47K G0A330ZA0045 L5561 C5562 16V470 UNR221300L QR5563 4 2 1 3 5 IC5561 C0DBAYH00005 5 3 4 8 7 6 2 1 9 T5551 G4D1A0000117 R5552 47 1 2 K5H7512A0010 IP5501 L5551 G0C390JA0055 C5551 25V47 5 6K R5551 D5552 MAZ8200GML MAZ8200GML D5551 3900P C5552 B1BABK000001 Q5551 D5553 B0BC026A0007 0 1 C4501 0 R4501 2 1 3 JK4501 8 9 13 11 10 12 2 3 1 5 7 6 4 15 15 1 14 CN4203 7 9 10 8 4 5 1 3 2 6...

Page 155: ...4607 0 1 C4608 0 1 50V22 C4614 C4612 50V22 26 24 22 19 20 16 15 18 17 21 23 25 27 12 10 8 11 13 5 7 9 6 3 2 1 4 14 50 49 51 46 45 47 42 41 43 38 37 39 34 35 30 29 31 28 33 32 36 40 44 48 52 FL4601 A2BB00000158 FL DISPLAY GRID9 C4641 0 01 100P C4635 EVEKE2F2524M VR4601 VOLUME JOG 100P C4636 5 4 2 3 7 1 6 JK4611 G2 2 1 3 G1 B3RAB0000081 Z4601 C4634 1 R4609 0 C4652 0 01 L4614 J0JBC0000014 L4611 J0JBC...

Page 156: ...709 100P C4705 100P C4713 R4701 4 7K 18 16 14 8 9 11 12 10 2 3 1 5 7 6 4 13 15 17 19 CN4702 R4703 4 7K LB4723 J0JBC0000014 C4721 6 3V1200 100P C4704 R4715 100 R4707 2 7K R4711 100 R4712 100 R4716 100 100P C4716 LB4724 J0JBC0000014 R4708 2 7K 100P C4708 1000P C4712 R4704 4 7K R4702 4 7K 100 R4710 2 7K R4706 100 R4714 1000P C4710 100P C4714 LB4722 J0JBC0000014 100P C4702 100P C4706 1000P C4711 100P ...

Page 157: ... 01 C6000 C6029 1 150 R4002 220K R6031 C6028 1000P 6 3 4 1 S6001 POWER SW C6023 10 220K R6021 10K R6025 220K R6033 220K R6032 R6023 1K UNR5111J0L QR6503 8 9 13 11 10 12 2 3 1 5 7 6 4 15 14 CNA6051 D6023 B0ACCK000005 7 5 6 1 2 4 3 10 12 14 15 16 13 11 8 9 C2BBCB000016 IC6021 B1ADMB000003 Q6008 R6024 68K 1K R6022 100 C6037 0 R6035 0 R6045 0 R6041 0 R6042 0 R6036 S6051 ID SET 7 6 3 4 2 5 1 JK6051 C60...

Page 158: ...000005 B1ADNB000003 Q6014 0 01 C6039 0 01 C6047 16V22 C6048 4 7K R6058 220 R6056 10K R6077 0 01 C6079 22K R6072 C6078 16V47 D6071 B0ACCK000005 QR6070 B1GBCFJA0017 22K R6070 D6072 B0ACCK000005 2 7K R6055 D6003 B0ACCK000005 D6004 B0ACCK000005 QR6005 B1GBCFJJ0007 35V22 C6077 C6021 1 3 1 2 4 5 IC6003 C0ZBZ0001675 2 1 3 IC6008 C0CBADC00042 0 01 C6040 2 2K R6057 10K R6071 B1ADCE000012 Q6015 16V10 C6049 ...

Page 159: ... C5713 0 01 R5703 200K 1 2 3 11 10 12 6 5 8 7 9 T5701 ETS28BH166AC 20V_SENSE 20V_SENSE 2 2K R5833 C5815 0 1 D5809 MA2J1110GL C5791 1 2 2K R5832 6 8K R5800 Q5862 B1ABCF000176 20V_SENSE 27K R5801 C5812 0 1 C5805 35V470 3 1 2 B0HDRM000002 D5801 D5733 B0BC035A0007 2 2K R5864 22K R5865 R5862 1 5K 6 8 9 7 2 1 4 5 3 10 CN5802 C5896 0 1 C5808 35V470 C5725 0 1 100 R5732 D5725 B0BC6R100010 2 2K R5808 R5730 ...

Page 160: ...817 TH5702 D4CAA5R10001 0 K1 C5703 ECQU2A224MLC 0 22 3 2 4 1 B0EBNR000015 D5701 R5729 10K 400V100 C5712 R5718 1K 330 R5810 GND VCC C5700 F1BAF2220023 2200P AMPGND 4 3 1 2 PC5701 B3PBA0000402 R5799 SWITCHING REGULATOR 15K 15K R5797 MAZ8091GML D5799 R5795 330K 7 8 5 1 2 4 3 IC5799 MIP2F20MSSCF 1000P C5795 Q5721 2SA207700L 0 1 C5796 4 3 1 2 B3QAZ0000062 PC5799 39 R5798 1K R5894 D5798 B0EAMM000057 50V...

Page 161: ...M 18 SCHEMATIC DIAGRAM 19 I EXTENT CIRCUIT K AC INLET CIRCUIT SC ZT1GN GS SB ZT1GN GS EXTENT AC INLET CIRCUIT A B C D E F G H 1 2 3 4 5 6 7 8 9 10 11 12 13 14 1 2 3 4 5 6 7 8 9 10 11 12 13 14 A B D E F H G C 1 2 CN6052 1 2 CN6051 HF HF HF HF 3 2 1 ET6001 3 2 1 ET6002 P5701 TL10 TL20 BLK RED AC IN 220V 240V 50Hz GN 110V 240V 50 60Hz GS ...

Page 162: ...LB2009 R2065 R2218 R2219 R2278 IC2002 C2007 C2008 C2009 C2011 C2013 C2014 C2015 C2016 C2017 C2117 C2127 C2128 C2209 C2213 C2233 C2235 C2251 C2256 C2257 C2265 C2268 C2269 CN2001 CN2002 CN2003 CN2004 CN2005 D2001 D2002 D2005 D2006 IC2003 IC2004 IC2005 IC2101 IC2102 IC2201 IC2232 IC2233 JK2101 JK2201 JK2202 L2101 L2102 L2103 L2104 L2231 LB2001 LB2002 LB2003 LB2004 LB2005 LB2006 LB2007 LB2008 LB2109 L...

Page 163: ...R1019 R1020 R1021 R1022 R1023 R1024 R1030 R1031 R1033 R1051 R1052 R1053 R1054 R1055 RX1001 RX1002 RX1003 RX1004 RX1005 RX1006 RX1007 RX1008 X1000 R1036 C1035 IC1004 C1000 C1018 C1019 C1021 C1022 C1026 C1030 C1040 C1042 C1056 C1057 C1062 C1063 C1064 C1065 C1066 C1067 C1068 C1069 C1070 C1071 C1072 C1073 C1074 C1075 C1076 C1077 C1083 CN1001 CN1003 R1000 R1001 R1002 R1003 R1004 R1013 R1014 R1025 R1027...

Page 164: ...0 LB4781 LB4782 LB4783 LB4784 LB4785 LB4786 LB4787 LB4788 LB4789 LB4790 LB4791 LB4792 LB4793 LB4794 LB4795 LB5551 LB5552 LB5553 PC5501 Q4303 Q4304 Q4305 Q5504 Q5505 Q5506 Q5509 Q5561 QR4305 QR4306 QR4307 QR4308 QR4309 QR4310 QR4311 QR4312 QR5501 QR5502 QR5503 QR5562 QR5563 QR5571 QR5581 QR5582 R4001 R4002 R4003 R4004 R4101 R4102 R4103 R4104 R4105 R4106 R4107 R4108 R4111 R4112 R4113 R4114 R4115 R41...

Page 165: ...13 C4614 C4615 C4633 CN4611 D4601 FL4601 JK4611 JW4602 K4601 S4602 VR4601 Z4601 W519 W518 W517 W516 W515 W514 W513 W512 W511 W503 W509 W504 W523 W524 W525 W526 W527 W528 W529 W530 W531 W532 W520 W540 W537 W538 W535 W534 W533 W536 W522 W521 W510 W502 W501 W505 W506 W507 W508 W539 TP4601 TP4611 C4701 C4702 C4703 C4704 C4705 C4706 C4707 C4708 C4709 C4710 C4711 C4712 C4713 C4714 C4715 C4716 C4719 C472...

Page 166: ... C6000 CN6550 S6001 CN6501 C5908 C6022 C6023 C6901 C6903 C6905 C6915 C6925 C6951 ID SET C6955 C6991 C6992 CNA6051 IC6021 IC6901 IC6902 JK6051 Q6008 QR6501 QR6502 QR6503 R4001 R4002 R6021 R6022 R6023 R6024 R6025 R6032 R6033 R6905 R6906 R6907 R6908 R6917 R6925 R6927 R6950 R6951R6955 S6051 C6037 C6038 R6035 R6041 POWER SW C6919 R6915 R6034 C6024 C6025 R6020 CN6052 CN6051 ET6001 ET6002 TEST TERMINAL T...

Page 167: ...01 C6106 C6111 C6201 C6206 C6211 CNB6501 D6003 D6004 D6993 IC6001 IC6008 L6101 L6201 Q6001 Q6012 Q6013 Q6014 Q6015 Q6101 Q6102 Q6201 Q6202 QR6001 QR6003 QR6004 QR6005 R6001 R6002 R6005 R6007 R6008 R6009 R6016 R6037 R6038 R6039 R6040 R6049 R6055 R6056 R6057 R6077 R6078 R6079 R6083 R6084 R6102 R6104 R6105 R6107 R6113 R6114 R6119 R6202 R6204 R6205 R6207 R6213 R6214 R6219 JW5802 RED JW6003 BLK C6005 D...

Page 168: ...892 R5893 R5895 R5865 W11 W13 R5806 R5809 R5807 R5894 R5832 R5814 R5833 D5799 K1 D5801 W12 W9 W8 W10 D5732 R5798 R5799 C5700 C5 70 1 C5703 C 5 7 0 4 C5713 C5726 C5747 C5805 C5808 C5851 C5852 C5899 D5701 D5702 D5729 D5731 D5793 D5798 D5802 D5851 D5852 D5896 DZ5701 IC5701 IC5799 IC5801 IC5899 Q5720 R 5 7 2 6 T H 5 7 0 2 ZA721 ZA722 ZA5701 T2AH 250V ZA5702 W1 F1 RED BLK C5712 TL1 TL2 C5817 W7 W3 W2 W...

Page 169: ...MI_MUTE O HDMI MUTING CONTROL 49 H_REQ O HDMI INTERRRUPT REQUEST 50 HDMI_CTRL I O HDMI CONTROL 51 NC NO CONNECTION 52 NC NO CONNECTION 53 NC NO CONNECTION 54 VOL_LED O VOLUME LED DRIVE 55 W_SDO O WIRELESS SERIAL DATA OUT PUT 56 W_SCL I O WIRELESS SERIAL CLOCK 57 W_SDI I WIRELESS SERIAL DATA INPUT 58 NC NO CONNECTION 59 FL_CS O FL DRIVER DISPLAY CHIP SELECT 60 FL_CLK I O FL DRIVE DISPLAY CLOCK 61 F...

Page 170: ...1 JK2202 JK2201 JK2101 FL4601 E5503 E5502 E5501 F701 CN4703 CN4702 CN4701 CN4611 CN4601 CN4221 CN4204 CN4203 CN4106 CN4103 CN4102 CN4101 CN1001 CNB2201 CN2005 CN2004 CN2003 CN2002 CN2001 CN1003 CN1002 42 41 40 40 39 38 37 35 34 33 32 31 30 29 29 29 28 28 27 27 27 26 26 26 26 26 26 25 24 23 22 20 19 18 17 16 16 16 15 14 14 14 14 13 13 13 13 13 13 13 13 13 13 12 12 12 12 12 12 12 12 12 12 12 11 10 9...

Page 171: ...160 159 159 159 159 158 158 158 158 158 157 156 156 156 155 154 154 153 152 151 150 149 149 148 147 146 145 144 143 142 141 140 140 140 139 139 139 139 138 137 136 136 135 134 133 132 131 130 128 127 126 125 125 124 123 122 121 120 119 119 119 119 119 119 118 118 118 117 117 117 117 117 117 117 117 117 117 117 117 117 117 117 117 117 117 117 117 117 117 117 117 117 117 117 116 116 116 116 116 116 ...

Page 172: ...R GS ONLY AC CORD x 3 x 3 A2 FOR GN ONLY AC CORD TAG For Saudi Arabia Kuwait Malaysia and Hong Kong only For Thailand only A1 A1 1 P6 P5 P5 P5 P5 P4 P4 P3 P3 P2 P2 FRONT P1 1 2 3 4 5 6 7 8 9 A B C D E F G H 10 11 12 13 SC ZT1GN GS S PACKAGING DRAWINGS P5 POLYFOAM BOTTOM LEFT POLYFOAM BOTTOM RIGHT POLYFOAM TOP LEFT POLYFOAM TOP RIGHT P5 P4 POLYFOAM FRONT POLYFOAM REAR NOTE PART IS NOT SUPPLIED ...

Page 173: ...28 INSULATION SHEET B 1 18 RSCV0082 HDMI SUPPORT CHAS SIS 1 19 RFKGUZT1E K FRONT CABINET ASS Y 1 20 REE1508 22P FFC PANEL MAIN 1 22 RGL0724 Q LIGHTING RING 1 23 RGU2643 K POWER BUTTON 1 24 RGU2644 K SELECTOR BUTTON 1 25 RGWX0116 K VOLUME KNOB 1 26 RHD26046 SCREW 6 27 XSN3 4FJ SCREW 3 28 RHD30007 K2J SCREW 2 29 RHD30119 K SCREW 3 30 RKM0613 K TOP CABINET 1 31 RSC0824 RADIATOR SHEET 1 32 REX1304 1P ...

Page 174: ... 127 XTB3 10GFJK SCREW 1 128 RXM0086Z ANTENNA 1 130 RMQ1726 WOOFER BLOCK SPACER 1 131 RYQ0710 W PORT ASSY 1 132 RMF0428A SEALER 1 133 RMQ1740B SEALER 1 134 RYQ0711 W PORT ASSY C D 1 135 RMQ1740C EPT SEALER 1 136 RMQ1755 2 BUTTON BBD SHEET A 2 137 RYQ0714A S WOOFER COVER ASSY 1 138 RMR1937 K WIRE PROTECTOR 1 139 XTB4 10JFJ SCREW 4 140 XYN4 F20FJ SCREW 3 Safety Ref No Part No Part Name Description Q...

Page 175: ...1 IC4101 C0ABBB000038 IC 1 IC4102 C0ABBB000038 IC 1 IC4201 C0ABBB000230 IC 1 IC4202 C0ABBB000230 IC 1 IC4203 C0ABBB000230 IC 1 IC4301 C0ABBB000230 IC 1 IC4302 C0ABBB000230 IC 1 IC4303 C0ABBB000230 IC 1 IC4304 C0AABB000085 IC 1 IC4601 C0HBB0000057 IC 1 IC5501 MIP2F50MSSCF IC 1 IC5502 C0DAEMZ00001 IC 1 IC5503 C0DBEKG00004 IC 1 IC5504 C0DBAYH00005 IC 1 IC5561 C0DBAYH00005 IC 1 IC5562 C0DBAYH00005 IC ...

Page 176: ...CK000005 DIODE 1 Safety Ref No Part No Part Name Description QTY Remarks D5591 B0BC4R600016 DIODE 1 D8001 MA2J1110GL DIODE 1 D8002 MA2J1110GL DIODE 1 D8003 MA2J1110GL DIODE 1 D8006 B0ACCK000005 DIODE 1 DZ5501 ERZV10V511CS ZNR 1 VARISTORS VA2101 EZAEG2A50AX ESD SUPRESSOR 1 VA2102 EZAEG2A50AX ESD SUPRESSOR 1 VA2103 EZAEG2A50AX ESD SUPRESSOR 1 VA2104 EZAEG2A50AX ESD SUPRESSOR 1 VA2105 EZAEG2A50AX ESD...

Page 177: ...1 J0JCC0000119 INDUCTOR 1 LB2202 J0JCC0000119 INDUCTOR 1 LB2203 J0JCC0000119 INDUCTOR 1 LB2204 J0JCC0000119 INDUCTOR 1 LB2205 J0JCC0000119 INDUCTOR 1 LB2206 J0JCC0000119 INDUCTOR 1 LB2207 J0JCC0000119 INDUCTOR 1 LB2208 J0JCC0000119 INDUCTOR 1 LB2209 J0JHC0000021 INDUCTOR 1 LB2210 J0JHC0000021 INDUCTOR 1 Safety Ref No Part No Part Name Description QTY Remarks LB2211 J0JHC0000021 INDUCTOR 1 LB2235 J...

Page 178: ...D0GBR00JA008 0 1 16W 1 R1007 D0GB330JA008 33 1 16W 1 R1008 D0GB330JA008 33 1 16W 1 R1009 D0GB330JA008 33 1 16W 1 R1010 D0GB330JA008 33 1 16W 1 R1011 D0GB330JA008 33 1 16W 1 R1012 D0GB332JA008 3 3K 1 16W 1 R1013 D0GB332JA008 3 3K 1 16W 1 R1014 D0GB332JA008 3 3K 1 16W 1 R1015 D0GBR00JA008 0 1 16W 1 R1016 D0GB330JA008 33 1 16W 1 R1017 D0GB330JA008 33 1 16W 1 R1018 D0GB332JA008 3 3K 1 16W 1 R1019 D0GB...

Page 179: ... R2213 ERJ3GEYJ751V 750 1 10W 1 Safety Ref No Part No Part Name Description QTY Remarks R2215 D0GB470JA008 47 1 16W 1 R2216 D0GB470JA008 47 1 16W 1 R2217 D0GB102JA008 1K 1 16W 1 R2218 D0GB472JA008 4 7K 1 16W 1 R2219 D0GB472JA008 4 7K 1 16W 1 R2220 D0GB330JA008 33 1 16W 1 R2221 D0GB330JA008 33 1 16W 1 R2222 D0GB473JA008 47K 1 16W 1 R2223 D0GB823JA008 82K 1 16W 1 R2224 D0GB473JA008 47K 1 16W 1 R2225...

Page 180: ...1K 1 16W 1 R4362 D0GB102JA008 1K 1 16W 1 R4365 D0GB391JA008 390 1 16W 1 Safety Ref No Part No Part Name Description QTY Remarks R4366 D0GB391JA008 390 1 16W 1 R4367 D0GB103JA008 10K 1 16W 1 R4368 D0GB103JA008 10K 1 16W 1 R4369 D0GB473JA008 47K 1 16W 1 R4370 D0GB473JA008 47K 1 16W 1 R4371 D0GB820JA008 82 1 16W 1 R4372 D0GB820JA008 82 1 16W 1 R4373 D0GB820JA008 82 1 16W 1 R4374 D0GB820JA008 82 1 16W...

Page 181: ...16W 1 R8059 D0GB101JA008 100 1 16W 1 Safety Ref No Part No Part Name Description QTY Remarks R8060 D0GB101JA008 100 1 16W 1 R8061 D0GB101JA008 100 1 16W 1 R8069 D0GBR00JA008 0 1 16W 1 R8070 D0GB102JA008 1K 1 16W 1 R8071 D0GB102JA008 1K 1 16W 1 R8072 D0GB102JA008 1K 1 16W 1 R8073 D0GBR00JA008 0 1 16W 1 R8074 D0GB102JA008 1K 1 16W 1 R8075 D0GB102JA008 1K 1 16W 1 R8076 D0GB102JA008 1K 1 16W 1 R8077 D...

Page 182: ...4A042 0 1uF 16V 1 C2010 F1H1H102A219 1000pF 50V 1 Safety Ref No Part No Part Name Description QTY Remarks C2011 EEE0JA101SP 100uF 6 3V 1 C2012 F1H1H102A219 1000pF 50V 1 C2013 F1H0J1050013 1uF 6 3V 1 C2014 EEE0JA101SP 100uF 6 3V 1 C2015 F1H0J1050013 1uF 6 3V 1 C2016 F1H0J1050013 1uF 6 3V 1 C2017 F1H0J1050013 1uF 6 3V 1 C2018 F1H1H103A219 0 01uF 50V 1 C2019 F1H0J1050013 1uF 6 3V 1 C2101 F1H0J1050013...

Page 183: ...105 ECJ1VB1H391K 390pF 50V 1 Safety Ref No Part No Part Name Description QTY Remarks C4106 ECJ1VB1H391K 390pF 50V 1 C4107 F1H1C105A097 1uF 16V 1 C4108 F1H1C105A097 1uF 16V 1 C4109 F1H1C105A097 1uF 16V 1 C4110 F1H1C105A097 1uF 16V 1 C4115 F1H1H103A219 0 01uF 50V 1 C4116 F1H1H103A219 0 01uF 50V 1 C4117 F2A1C100A234 10uF 16V 1 C4118 F2A0J470A245 47uF 6 3V 1 C4201 ECJ1VB1H272K 2700pF 50V 1 C4202 ECJ1V...

Page 184: ...H101A230 100pF 50V 1 C4718 D0GBR00JA008 0 1 16W 1 Safety Ref No Part No Part Name Description QTY Remarks C4719 F1H1H104A013 0 1uF 50V 1 C4720 F1J1A106A043 10uF 10V 1 C4721 F2A0J1220028 1200uF 6 3V 1 C5501 ECQU2A104MLC 0 1uF 1 C5502 ECQU2A104MLC 0 1uF 1 C5504 F2B2G2200001 22uF 400V 1 C5505 F1J1H104A717 0 1uF 50V 1 C5506 ECJ2VC1H102J 1000pF 50V 1 C5507 F1K2J2220002 2200pF 630V 1 C5508 F2A1H1000077 ...

Page 185: ...5728 MA2J1110GL DIODE 1 D5729 B0EAMM000057 DIODE 1 D5731 B0EAMM000057 DIODE 1 D5732 MAZ8300GML DIODE 1 D5733 B0BC035A0007 DIODE 1 Safety Ref No Part No Part Name Description QTY Remarks D5793 B0HAMP000094 DIODE 1 D5798 B0EAMM000057 DIODE 1 D5799 MAZ8091GML DIODE 1 D5801 B0HDRM000002 DIODE 1 D5802 B0HBSM000054 DIODE 1 D5808 MA2J1110GL DIODE 1 D5809 MA2J1110GL DIODE 1 D5851 B0EAMM000057 DIODE 1 D585...

Page 186: ... 3K 1 16W 1 R6009 D0GB122JA008 1 2K 1 16W 1 R6016 D0GB223JA008 22K 1 16W 1 R6017 D0GB562JA008 5 6K 1 16W 1 R6019 D0GBR00JA008 0 1 16W 1 R6020 ERJ14YJ1R5U 1 5 1 4W 1 R6021 D0GB224JA008 220K 1 16W 1 R6022 D0GB102JA008 1K 1 16W 1 R6023 D0GB102JA008 1K 1 16W 1 R6024 D0GB683JA008 68K 1 16W 1 R6025 D0GB103JA008 10K 1 16W 1 R6026 D0GB103JA008 10K 1 16W 1 R6027 D0GB103JA008 10K 1 16W 1 R6028 D0GB224JA008 ...

Page 187: ...908 EEEFK1C100R 10uF 16V 1 C6000 F1H1H103A219 0 01uF 50V 1 C6001 F1H1H104A013 0 1uF 50V 1 C6003 F1H1A105A025 1uF 10V 1 C6004 F1H1A105A025 1uF 10V 1 C6005 F1K1C1060001 10uF 16V 1 C6009 ECJ2FB1E105K 1uF 25V 1 Safety Ref No Part No Part Name Description QTY Remarks C6011 ECJ2FB1E105K 1uF 25V 1 C6017 ECJ3VB1H104K 0 1uF 50V 1 C6018 ECJ3VB1H104K 0 1uF 50V 1 C6019 F2A1V4710035 470uF 35V 1 C6020 F2A1V4710...

Reviews: