background image

RQ

TX00

19

9

Si

mp

le

 S

etu

p

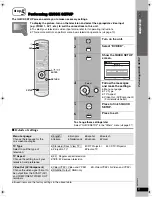
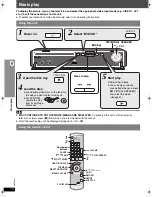
The QUICK SETUP screen assists you to make necessary settings.

To display the picture, turn on the television and select the appropriate video input 
(e.g. VIDEO 1, AV 1, etc.) to suit the connections to this unit.

To select your television’s video input mode, refer to its operating instructions.

This remote control can perform some basic television operations (

page 10).

To change these settings later

Select “QUICK SETUP” in the “Others” menu (

page 27).

Details of settings

Boxed items are the factory settings in the above table.

step

5

Performing QUICK SETUP

MA

N

UAL SKIP

, , , 

ENTER

SETUP

DVD

RETURN

1

Turn on the unit.

2

Select “DVD/CD”.

3

Show the QUICK SETUP 
screen.

4

Follow the messages 
and make the settings.

Menu Language

TV Type

TV Aspect

Video Out (AV/Component)
(For details 

below)

5

Press to finish QUICK 
SETUP.

6

Press to exit.

D

V

D

SETUP

Setup

RETURN

to  return

QUICK SETUP

Select the menu lan

g

ua

g

e.

En

g

lish

Deutsch

Nederlands

Polski

Italiano

Svenska

ENTER

to  select and press

Select

Register

E

N

TER

RETUR

N

E

N

TER

SETUP

Menu Language

Choose the language for the
on-screen messages.

English

Français

Español

Deutsch

Italiano

Nederlands

Svenska

Polski

TV Type

Select to suit the type of 
television.

Standard (Direct View TV)

CRT Projector

LCD TV/Projector

Projection TV

Plasma TV

TV Aspect

Choose the setting to suit your 
television and preference.

4:3 : Regular aspect television

16:9: Widescreen television

Video Out (AV/Component)

Choose the video signal format to 
be output from the SCART (AV) 
and COMPONENT VIDEO OUT 
terminals.

Video/YPbPr: Video and YPbPr

S-Video/YPbPr: S-Video and YPbPr

RGB/No Output : RGB only

P

e

rf

or

ming Q

U

ICK 

SETUP

0019EB_p03-13.fm  Page 9  Thursday, April 26, 2007  5:36 PM

Summary of Contents for SCPTX5 - DVD HOME THEATER SOUND SYSTEM

Page 1: ...ng the region number 2 or ALL Example Before connecting operating or adjusting this product please read the instructions completely Please keep this manual for future reference Note EB on the packaging indicates the United Kingdom 2 ALL 3 5 2 31 Dolby Virtual Speaker Enjoy surround sound effect with a variety of sources 34 USB connectivity 35 High quality picture HDMI capability Advanced progressi...

Page 2: ...t is not to be used for a long time Operations in these instructions are described mainly with the remote control but you can perform the operations on this unit if the controls are the same System SC PTX5 This unit SA PTX5 Front speakers SB HFX5 Subwoofer SB HW750 CAUTION THIS PRODUCT UTILIZES A LASER USE OF CONTROLS OR ADJUSTMENTS OR PERFORMANCE OF PROCEDURES OTHER THAN THOSE SPECIFIED HEREIN MA...

Page 3: ...9 About DivX VOD content 19 Using on screen menus 20 Main menu 20 Other Settings 21 Changing the player settings 24 Using the VIERA Link HDAVI ControlTM 28 One touch play 28 Auto input switching 28 Power off link 28 Speaker control 29 VIERA Link Control only with TV s remote control for HDAVI Control 2 29 Using the FM radio 30 Presetting stations automatically 30 Selecting the preset channels 30 M...

Page 4: ...hat it is approved by ASTA or BSI to BS1362 Check for the ASTA mark Ï or the BSI mark Ì on the body of the fuse If the plug contains a removable fuse cover you must ensure that it is refitted when the fuse is replaced If you lose the fuse cover the plug must not be used until a replacement cover is obtained A replacement fuse cover can be purchased from your local dealer If a new plug is to be fit...

Page 5: ...onnect the supplied speakers and subwoofer to the external amplifier and so on Caution Do not touch the front netted area of the speakers Hold by the sides If irregular colouring occurs on your television The front speakers are designed to be used close to a television but the picture may be affected with some televisions and setup combinations If this occurs turn the television off for about 30 m...

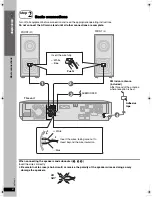
Page 6: ...ctly Be careful not to cross short circuit or reverse the polarity of the speaker wires as doing so may damage the speakers step 2 Basic connections FM ANT 75 L R 1 2 3 1 3 2 4 This unit FRONT R FRONT L SUBWOOFER i White j Blue Insert the wire fully Push Insert the wires taking care not to insert beyond the wire insulation FM indoor antenna included Affix this end of the antenna where reception is...

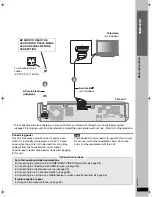
Page 7: ... this unit only Do not use it with other equipment Also do not use cords for other equipment with this unit AC IN AV AV 5 6 BE SURE TO READ THE CAUTION FOR THE AC MAINS LEAD ON PAGE 4 BEFORE CONNECTION To household mains socket AC 230 240 V 50 Hz AC mains lead included Scart cable not included Television not included This unit For other audio and video connections Connecting to a television with C...

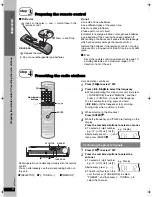
Page 8: ...ries Press in and lift up Replace the cover step 4 Presetting the radio stations MANUAL SKIP ENTER FM Numbered buttons SELECTOR TUNING MEMORY TUNE MODE 1 Press FM 1 to select FM 2 Press 6 5 2 to select the frequency When performing this step on this unit first press TUNE MODE to select MANUAL and then press X TUNING W to select the frequency To start automatic tuning press and hold 6 5 until the f...

Page 9: ... Menu Language TV Type TV Aspect Video Out AV Component For details below 5 Press to finish QUICK SETUP 6 Press to exit DVD SETUP Setup RETURN to return QUICKSETUP Select the menu language English Deutsch Nederlands Polski Italiano Svenska ENTER to select and press Select Register ENTER RETURN ENTER SETUP Menu Language Choose the language for the on screen messages English Français Español Deutsch...

Page 10: ...ay RDS text data 30 Show a disc menu 18 or playlist 19 Return to previous screen 15 Cancel 15 Display current playback condition 16 Select Dolby Virtual Speaker mode 31 Turn the unit off automatically Sleep timer The maximum setting is 120 min in 30 min steps Press the button again to confirm the remaining time on the unit s display To cancel select OFF in this unit s display Start up and play a d...

Page 11: ...RT Connect an external device 32 9 X TUNING W Skip 14 Select the radio stations channels 8 30 SELECTOR DVD CD USB FM AV AUX MUSIC P D IN OPTION Return to DVD CD TUNE MODE FM MODE Stop playing 14 Select the tuning mode 8 30 Adjust the FM reception condition 30 1 MEMORY Play discs 14 Memorize the receiving radio stations channels 8 30 Display OPEN CLOSE Open Close the disc tray 14 Headphone plug typ...

Page 12: ...it was recorded on 8 Closing the session will also work Discs that cannot be played Blu ray HD DVD AVCHD discs DVD RW version 1 0 DVD ROM CD ROM CDV CD G SACD and Photo CD DVD RAM that cannot be removed from their cartridge 2 6 GB and 5 2 GB DVD RAM and Chaoji VCD available on the market including CVD DVCD and SVCD that do not conform to IEC62107 Video systems This unit can play PAL and NTSC but y...

Page 13: ...jpg JPEG jpeg JPEG files taken on a digital camera that conform to DCF Standard Design rule for Camera File system Version 1 0 are displayed Files that have been altered edited or saved with computer picture editing software may not be displayed This unit cannot display moving pictures MOTION JPEG and other such formats still pictures other than JPEG e g TIFF or play pictures with attached audio M...

Page 14: ...ly on iR iRW Using this unit Using the remote control OPEN CLOSE MUSIC PORT SELECTOR TUNING TUNEMODE FMMODE MEMORY SELECTOR OPEN CLOSE VOL 5 Start play Adjust the volume You can enjoy surround sound effect when you press Î VIRTUAL SPEAKER and select the mode page 31 Stop 2 Select DVD CD 1 Power on Press to skip 3 Open the disc tray 4 Load the disc Load double sided discs so the label for the side ...

Page 15: ...A folder on WMA MP3 MPEG4 JPEG and DivX discs is treated as a Group ONE TOUCH PLAY STOP PAUSE SKIP SLOW SEARCH Select Register GROUP Register Select Enter number DVD VR DVD A DVD V VCD CD e g To select 12 S10 1 2 VCD with playback control Press STOP to cancel the PBC function and then press the numbered buttons WMA MP3 JPEG MPEG4 DivX e g To select 123 1 2 3 ENTER Press CANCEL to cancel the number...

Page 16: ...structions for details Signal type data LPCM PPCM ÎDigital DTS MP3 MPEG Signal type kHz Sampling frequency bit ch Number of channels e g 3 2 1ch 1 Low frequency effect 1 not displayed if there is no signal 0 No surround 1 Mono surround 2 Stereo surround left right 1 Center 2 Front leftiFront right 3 Front leftiFront rightiCenter DivX It may take some time for play to start if you change the audio ...

Page 17: ...ber 2 Press the numbered buttons to change each item WMA MP3 JPEG MPEG4 DivX Press ENTER to register the selection To clear the selected program 1 Press 3 4 to select the program number 2 Press CANCEL or press 3 4 2 1 to select Clear and press ENTER To clear the whole program Select Clear all with 3 4 2 1 and press ENTER The whole program is also cleared when the disc tray is opened the unit is tu...

Page 18: ...To exit the screen press MENU 2 Press 2 followed by 3 4 to select the group and press ENTER 3 To play content in the group in order Press ENTER To start play from the selected content Press 3 4 to select and ENTER MANUAL SKIP ENTER TOP MENU DIRECT NAVIGATOR MENU PLAY LIST FUNCTIONS STOP SLOW SEARCH ANGLE PAGE Numbered buttons MENU T O P M E N U Playback Menu ENTER to select and press All Total 436...

Page 19: ...FUNCTIONS 2 Press 3 4 2 1 to select the item and then press ENTER Repeat this step if necessary Selecting from the list 1 During play Press MENU To exit the screen press MENU 2 Press 2 followed by 3 4 to switch among Playlist Group and Content lists 3 Press 1 followed by 3 4 to select an item and press ENTER Press ANGLE PAGE to skip page by page Playing RAM and DVD R RW DVD VR discs DVD VR Playing...

Page 20: ...p for play only 1 Press ENTER twice to show the Time Slip indicator 2 Press 3 4 to select the time and press ENTER To change the steps more quickly press and hold 3 4 To change remaining elapsed time display Video MPEG4 DivX To display pixel number DivX fps frame per second is also displayed Audio page 16 Changing soundtracks WMA MP3 To display the current bitrate or sampling frequency Still Pictu...

Page 21: ... to give a greater feeling of depth Video Output Mode To select suitable picture quality with your television Video recordings will be converted to and output as high definition video When using HDMI connection with Video Mode page 26 HDMI menu set to On 480p 576p 720p 1080p progressive 480i 576i 1080i interlace Select a video output with an mark The mark shows that the video output is acceptable ...

Page 22: ...gher with the dialogue recorded in the center channel DivX Dolby Digital 3 channel or higher with the dialogue recorded in the center channel On Off Information JPEG On Off Subtitle Position 0 to s60 in 2 unit steps Subtitle Brightness Auto 0 to s7 4 3 Aspect To select how to show images made for 4 3 aspect screens on a 16 9 aspect television Normal Laterally stretches images Auto Expands 4 3 lett...

Page 23: ...he type of disc Setup page 24 Play as DVD Video or Play as DVD Audio To play DVD Video contents of DVD Audio Select Play as DVD Video Play as DVD VR Play as HighMAT or Play as Data Disc To use functions for data discs page 18 To play MP3 JPEG MPEG4 or DivX files on DVD RAM or DVD R RW or to play a HighMAT disc without using the HighMAT function Select Play as Data Disc HDMI Status HDMI is connecte...

Page 24: ...Register Select Register SETUP QUICK SETUP enables successive settings of the items in the shaded area Audio Choose the audio language English French Spanish German Italian Dutch Swedish Polish Original 1 Other 2 Subtitle Choose the subtitle language Automatic 3 English French Spanish German Italian Dutch Swedish Polish Other 2 Menus Choose the language for disc menus Changing the menu language in...

Page 25: ...Plasma display adjust if you notice the audio is out of sync with the video 0ms 20ms 40ms 60ms 80ms 100ms Video Out AV Component Choose the video signal format to be output from the SCART AV and COMPONENT VIDEO OUT terminals Video YPbPr Video and YPbPr S Video YPbPr S Video and YPbPr RGB No Output RGB only Still Mode Specify the type of picture shown when paused Automatic Field 4 The picture is no...

Page 26: ...se select PCM If the bitstream is output to the equipment without a decoder high levels of noise can be output and may damage your speakers and hearing DTS Digital Surround 5 Bitstream PCM MPEG 5 PCM Bitstream Dynamic Range Compression Off On Adjusts for clarity even when the volume is low Convenient for late night viewing Only works with Dolby Digital RGB Range Set HDMI Colour Space to RGB page 2...

Page 27: ...Bulgarian 6671 Burmese 7789 Byelorussian 6669 Cambodian 7577 Catalan 6765 Chinese 9072 Corsican 6779 Croatian 7282 Czech 6783 Danish 6865 Dutch 7876 English 6978 Esperanto 6979 Estonian 6984 Faroese 7079 Fiji 7074 Finnish 7073 French 7082 Frisian 7089 Galician 7176 Georgian 7565 German 6869 Greek 6976 Greenlandic 7576 Guarani 7178 Gujarati 7185 Hausa 7265 Hebrew 7387 Hindi 7273 Hungarian 7285 Icel...

Page 28: ...aying the disc with a single press of a button Press ONE TOUCH PLAY Theater speakers will be automatically activated page 29 This function also works if you press 1 PLAY on the home theater remote control during home theater standby mode Note Playback may not be immediately displayed on the television If you miss the beginning portion of playback press or 6 to go back to where playback started Whe...

Page 29: ...ch to press SETUP while this unit is in AUX or D IN mode The default setting is AUX You can control the disc menus of the home theater system with the TV s remote control when using the DVD CD or USB source When operating the TV s remote control refer to the below illustration for operation buttons 1 Select the theater operation menu by using the television menu settings For details refer to the o...

Page 30: ...ed The tuner tunes to the lowest frequency and starts to preset all the stations it can receive into the channels in ascending order It automatically stops searching when 30 stations are preset to the last SET OK is displayed when the stations are set and the radio tunes to the last preset station ERROR is displayed when automatic presetting is unsuccessful Preset the channels manually right Selec...

Page 31: ...ion screen You can select the level from SUB W 1 weakest to SUB W 4 strongest To check the current setting press SUBWOOFER LEVEL The setting you make is retained and recalled every time you play the same type of source You can enjoy a surround sound effect similar to 5 1 ch Dolby Digital or DTS with any audio source using the included front speakers and the subwoofer You can also enjoy a surround ...

Page 32: ...hour charging OPTION continues to be displayed throughout this duration even when your iPod is fully charged You can turn off this display by removing the iPod from the dock Compatibility depends on the software version of your iPod For more information refer to the operating instructions for iPod or SH PD10 Enjoying audio from the television Using the Music Port 1 Connect the external device not ...

Page 33: ...und level and the highest sound level Convenient for late night viewing Only works with Dolby Digital DRC OFF Audio Mode This function only works with Dolby Digital Dual Mono Press and hold 3 Settings can be confirmed on the display AUDIO ST stereo audio AUDIO L AUDIO R Dolby Virtual Speaker page 31 Press ÎVS Note Audio that is input through the OPTICAL IN terminal cannot be output through the HDM...

Page 34: ... with Janus enabled MTP Media Transfer Protocol devices Maximum folder 400 folders Maximum file 4000 files Maximum file name 44 characters Maximum folder name 44 characters Only one memory card will be selected when connecting a multiport USB card reader Typically the first memory card inserted USB connection and operation 1 Connect the USB mass storage device not included 2 Press EXT IN repeatedl...

Page 35: ...s recommended that you use Panasonic s HDMI cable Recommended part number RP CDHG15 1 5 m RP CDHG30 3 0 m RP CDHG50 5 0 m etc When the HDMI cable is connected there will be no video output from the SCART AV and COMPONENT VIDEO OUT terminals of this unit Necessary Settings Set Video Mode to On page 26 HDMI menu Set Video Output Mode page 21 Picture Menu VIERA Link HDAVI Control If your Panasonic te...

Page 36: ... Use outdoor antenna if radio reception is poor Disconnect the FM indoor antenna The antenna should be installed by a competent technician Note Disconnect the antenna when the unit is not in use Do not use the outdoor antenna during an electrical storm Other audio and video connections Connecting to a digital audio source Connecting to a 5 1 channel amplifier Connecting to a set top box satellite ...

Page 37: ...d and then reconnect it If the service numbers fail to clear note the service number and contact a qualified service person D MIX is flashing DVD A Down mixing is the process of remixing the 5 1 channel sound found on some discs into two channels The disc contains single channel or 5 1 channel signals which may not be reproduced authentically U70 stands for a number The actual number following U70...

Page 38: ...track has still picture data Even after the track starts the correct play time will not be displayed This is normal MP3 This is normal on DivX video DivX Folders on a data CD are not displayed correctly WMA MP3 JPEG MPEG4 DivX Folders deeper than the eighth layer are displayed as the eighth layer A menu screen appears during skip or search VCD This is normal for Video CDs Playback control menu doe...

Page 39: ...Mobile telephone chargers can cause some disturbance If you are using an indoor television antenna change to an outdoor antenna The television antenna wire is too close to the unit Move it away from the unit Change Source Select in Picture Menu DivX Picture may not be seen when more than 4 devices are connected with HDMI cables Reduce the number of connected devices When using the COMPONENT VIDEO ...

Page 40: ...not be read The USB drive format or its contents is are not compatible with the system The USB host function of this product may not work with some USB devices USB devices with storage capacity of more than 32 GB may not work in some instances 34 Slow operation of the USB device Large file size or high memory USB device takes longer time to read and display on the TV Television displays The operat...

Page 41: ... is made up of two fields A regular television shows these fields one after the other to create frames A still is shown when you pause a moving picture A frame still is made up of two alternating fields so the picture may appear blurred but overall quality is high A field still is not blurred but it has only half the information of a frame still so picture quality is lower HDMI High Definition Mul...

Page 42: ... WMA 3 5 JPEG 4 5 MPEG4 5 7 DivX 5 6 HighMAT Level 2 Audio and Image 1 Conforming to IEC62107 2 MPEG 1 Layer 3 MPEG 2 Layer 3 3 Windows Media Audio Ver 9 0 L3 Not compatible with Multiple Bit Rate MBR 4 Exif Ver 2 1 JPEG Baseline files Picture resolution between 160k120 and 6144k4096 pixels Sub sampling is 4 0 0 4 2 0 4 2 2 or 4 4 4 Extremely long and narrow pictures may not be displayed 5 The tot...

Page 43: ...moved stickers or labels rented discs etc Discs that are badly warped or cracked Irregularly shaped discs such as heart shapes Clean this unit with a soft dry cloth Never use alcohol paint thinner or benzine to clean this unit Before using chemically treated cloth carefully read the instructions that came with the cloth Do not use commercially available lens cleaners as they may cause malfunction ...

Page 44: ...Microsoft Corporation It achieves the same sound quality as MP3 with a file size that is smaller than that of MP3 This product is licensed under the MPEG 4 Visual patent portfolio license for the personal and non commercial use of a consumer for i encoding video in compliance with the MPEG 4 Visual Standard MPEG 4 Video and or ii decoding MPEG 4 Video that was encoded by a consumer engaged in a pe...

Reviews: