background image

6

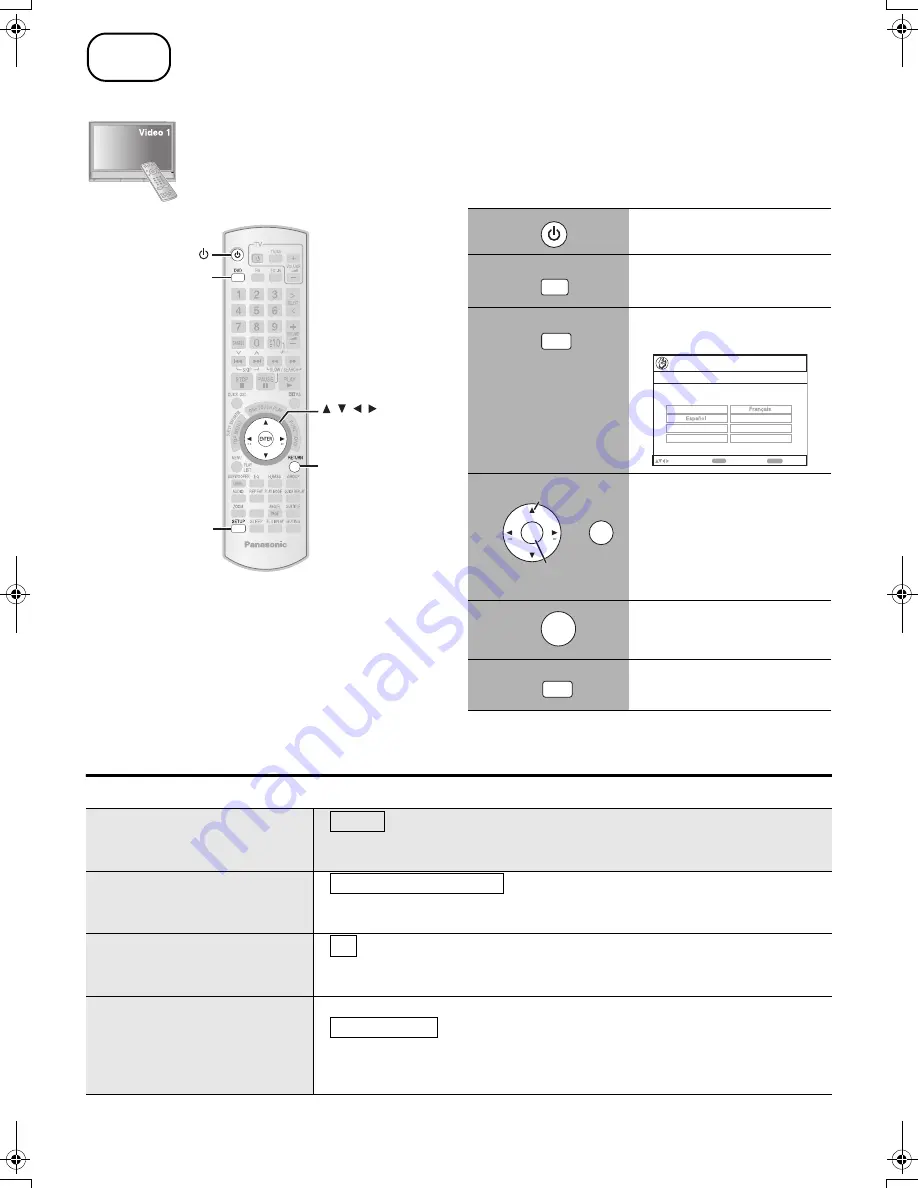
The QUICK SETUP screen assists you to make necessary settings.

To display the picture, turn on the television and select the appropriate video input 
(e.g. VIDEO 1, AV 1, etc.) to suit the connections to this unit.

To select your television’s video input mode, refer to its operating instructions.

This remote control can perform some basic television operations (

page 10, Operations Guide).

To change these settings later

Select “QUICK SETUP” in the “Others” menu 
(

page 27, Operations Guide).

Details of settings

Boxed items are the factory settings in the above table.

step

5

Performing QUICK SETUP

MA

N

UAL SKIP

, , , 

ENTER

SETUP

DVD

RETURN

1

Turn on the unit.

2

Select “DVD/CD”.

3

Show the QUICK SETUP 
screen.

4

Follow the messages and 
make the settings.

Menu Language

TV Type

TV Aspect

Video Out (AV/Component)
(For details 

below)

5

Press to finish QUICK 
SETUP.

6

Press to exit.

D

V

D

SETUP

Setup

RETURN

to  return

QUICK SETUP

Select the menu lan

g

ua

g

e.

En

g

lish

Deutsch

Nederlands

Polski

Italiano

Svenska

ENTER

to  select and press

Select

Register

E

N

TER

RETUR

N

E

N

TER

SETUP

Menu Language

Choose the language for the
on-screen messages.

English

Français

Español

Deutsch

Italiano

Nederlands

Svenska

Polski

TV Type

Select to suit the type of 
television.

Standard (Direct View TV)

CRT Projector

LCD TV/Projector

Projection TV

Plasma TV

TV Aspect

Choose the setting to suit your 
television and preference.

4:3 : Regular aspect television

16:9: Widescreen television

Video Out (AV/Component)

Choose the video signal format to 
be output from the SCART (AV) 
and COMPONENT VIDEO OUT 
terminals.

Video/YPbPr: Video and YPbPr

S-Video/YPbPr: S-Video and YPbPr

RGB/No Output : RGB only

0020_PTX5EB_Setup_Guide.fm  Page 6  Thursday, April 26, 2007  9:08 PM

Summary of Contents for SCPTX5 - DVD HOME THEATER SOUND SYSTEM

Page 1: ...ions DVD Home Theater Sound System Model No SC PTX5 All necessary steps of setup are completed Please see the Operations Guide for playback operations step 1 Positioning step 2 Basic connections step...

Page 2: ...t the supplied speakers and subwoofer to the external amplifier and so on Caution Do not touch the front netted area of the speakers Hold by the sides If irregular colouring occurs on your television...

Page 3: ...y Be careful not to cross short circuit or reverse the polarity of the speaker wires as doing so may damage the speakers step 2 Basic connections FM ANT 75 L R 1 2 3 1 3 2 4 This unit FRONT R FRONT L...

Page 4: ...is unit only Do not use it with other equipment Also do not use cords for other equipment with this unit AC IN AV AV 5 6 BE SURE TO READ THE CAUTION FOR THE AC MAINS LEAD ON PAGE 4 IN THE OPERATIONS G...

Page 5: ...se rechargeable type batteries Press in and lift up Replace the cover step 4 Presetting the radio stations MANUAL SKIP ENTER FM Numbered buttons SELECTOR TUNING MEMORY TUNE MODE 1 Press FM 1 to select...

Page 6: ...make the settings Menu Language TV Type TV Aspect Video Out AV Component For details below 5 Press to finish QUICK SETUP 6 Press to exit DVD SETUP Setup RETURN to return QUICKSETUP Select the menu lan...

Page 7: ...ecommended part number RP CDHG15 1 5 m RP CDHG30 3 0 m RP CDHG50 5 0 m etc When the HDMI cable is connected there will be no video output from the SCART AV and COMPONENT VIDEO OUT terminals of this un...

Page 8: ...oor antenna if radio reception is poor Disconnect the FM indoor antenna The antenna should be installed by a competent technician Note Disconnect the antenna when the unit is not in use Do not use the...

Reviews: