background image

10

11

English

Using the Settings Correctly

Using Different Settings

Select a menu.

Press the “Menu Select” button to select a menu.
The menu with the indicator on is selected.

O

O

When selecting “Porridge”, “Soup/Slow Cook”, “Cake/Bread” or “Steam”, set the 
cooking timer. 
Press the “   ” or “   ” button to set the desired cooking time.

Menu

Default setting

Allowable timer setting

Unit

Porridge

1 h 00 min

1 h 00 min – 4 h 00 min

30 min

Soup/Slow Cook

1 h 00 min

1 h 00 min – 12 h 00 min

30 min

Cake/Bread

40 min

20 min – 65 min

5 min

Steam*

10 min

1 min – 60 min

1 min

* Countdown of the steam setting time begins when the Rice Cooker starts 

releasing steam.

Press the “Start” button.

O

O

Once the rice is cooked, the program switches to the keep warm function 
automatically. 

O

O

Using the keep warm function is not recommended for “Quinoa”, “Brown”, “Multi 
Grain”, “Sticky”, “Porridge”, “Clay Pot”, “Soup/Slow Cook”, “Cake/Bread” or 
“Steam”. 
Please press the “Off” button to turn off the keep warm function. 

Timer

Press the “Menu Select” button to select a menu.

O

O

When “Porridge” is selected, set the cooking time.

Press the “Timer” button to set preset mode.

Press the “


” or “ 


” button to adjust the desired time.

O

O

Timer can be set in 10 minute units between the start of timer setting to 
24 h 00 min. 

O

O

Preset time is the working completing time.

O

O

The “Timer” button also works the same as the “   ” button in preset mode.

Press the “Start” button to start presetting mode.

O

O

When the preset mode is started, the indicator of a menu and the “Timer” 
indicator turn on.

O

O

When the Rice Cooker starts cooking, the “Timer” indicator turns off and the 
“Start” indicator turns on.
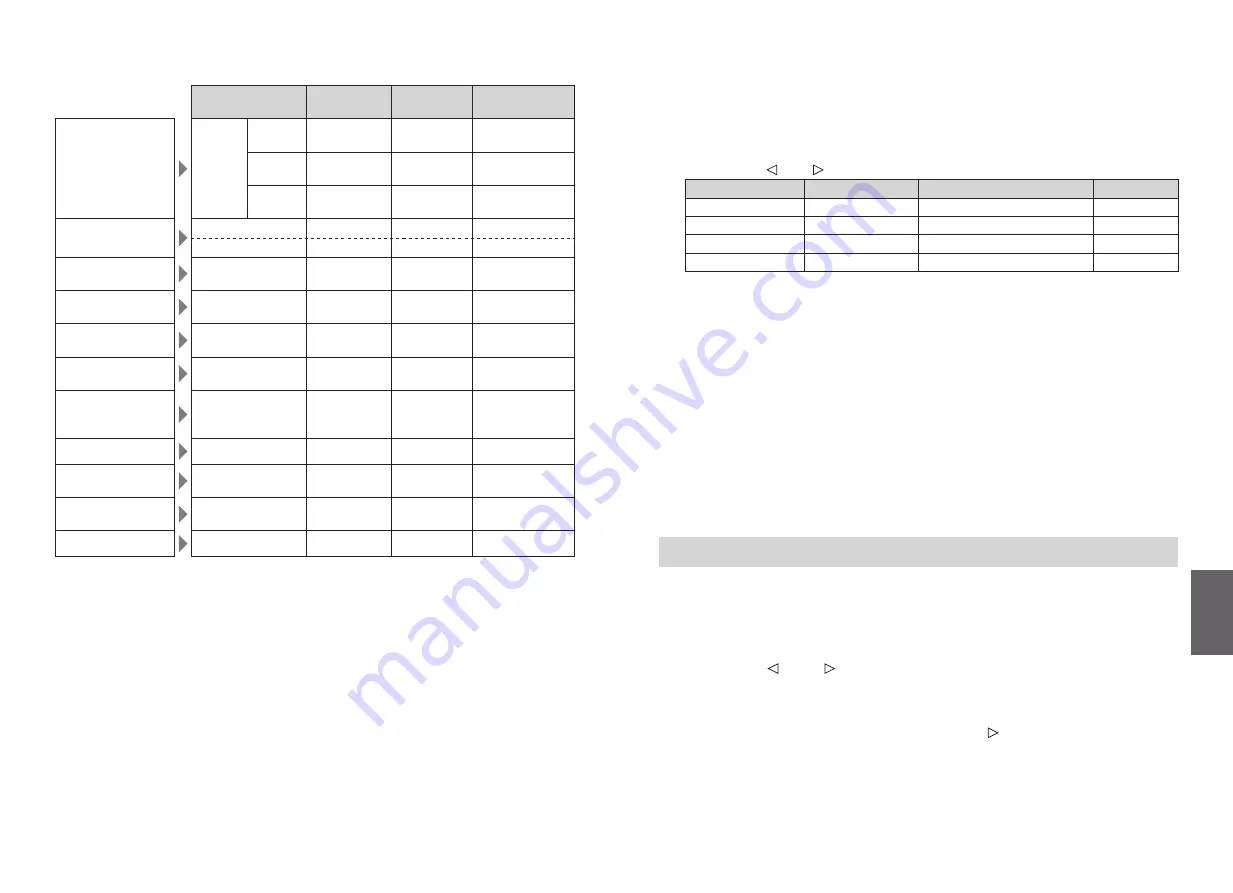
Menu

Water Level 
of Inner Pan

Keep Warm 
Function*

1

Timer Setting 
Restriction*

2

Cook white rice in 
different textures

White

Regular

White Rice

From 60 min 
before done

Soft

White Rice

From 60 min 
before done

Hard

White Rice

From 60 min 
before done

Quick cooking or 
cook quinoa

Quick/

White Rice

Quinoa

—*

3

×

Cook brown rice

Brown

Brown Rice

×

From 180 min 
before done

Cook rice of 
various grains

Multi Grain

Multi Grain

×

From 60 min 
before done

Cook jasmine rice

Jasmine

Jasmine 

Rice

From 60 min 
before done

Cook sticky rice

Sticky

Sticky Rice

×

From 60 min 
before done

Cook porridge

Porridge

Porridge

×

Cooking time +  
10 min or more 
before done

Cook clay pot rice

Clay Pot

White Rice

×

Cook soup or 
slow cooking

Soup/Slow Cook

—*

4

×

Bake a cake or 
bread

Cake/Bread

—*

5

×

Steam

Steam

—*

6

×

*

1

 ● With “

×

”, the Rice Cooker will switch automatically to the keep warm function, but 

we do not recommend this.

● Do not use the keep warm function for more than 12 hours.

● A keep warm time of up to 23 hours is displayed in 1 hour units (“0” is displayed for 

times of less than 1 hour). 
The keep warm function will continue for more than 24 hours.

*

2

   Timer Setting is not available for menus marked with “—”.

*

3

   One cup of quinoa requires two cups of water. Quinoa can only be cooked one cup 

at a time. Use the supplied Measuring Cup. 

*

4

   The total amount of ingredients and water shall not exceed the maximum water level 

for “White Rice”.

*

5

   The maximum allowable weight (total weight of the ingredients) is 500 

g

*

6

   Use the supplied Measuring Cup and fill with 3 cups of water for 1.0 L model, 4 cups 

of water for 1.8 L model.

Summary of Contents for SR-CX188

Page 1: ...read Safety Precautions Pages 2 4 O OKeep the operating instructions and the warranty for future use Warranty appended Contents Safety Precautions 2 Notes on Use 5 Part Names Accessories 6 Cooking Rice 8 Using the Settings Correctly 10 Using Different Settings 11 O OTimer Cleaning 12 Troubleshooting 14 O OError Indications Specifications 18 MAL SIN DBD SIN RBD AST NZ Panasonic Corporation Web Site...

Page 2: ... to avoid fire The instrument plug and power plug must be inserted into the socket and power outlet thoroughly to avoid fire electric shock or short circuit When the power cord or power plug is damaged or the power plug is loosely connected to the power outlet never use the appliance to avoid fire electric shock or short circuit Never pull off the power plug with a wet hand to avoid electric shock...

Page 3: ...t Safety Precautions Before the Rice Cooker works check the Inner Pan and Steam Cap for in place to avoid any malfunction During use the Rice Cooker may generate tiny sound of click or sizz which is a normal sound of operation and do not panic Never have the Rice Cooker to operate again immediately after cooking Wait at least for 15 minutes so as to have the heating plate cool down Never cook rice...

Page 4: ...dicator Timer indicator Menu Select button O O This button is used to select the desired menu Keep Warm button O O After cooking the Keep Warm indicator automatically turns on O O This button is used to start the keep warm function Timer button O O This button is used to set the timer Cooking Timer button O O When selecting Porridge this button is used after pressing the Timer button to go back to...

Page 5: ... Make sure that both plugs are firmly connected The Inner Pan in the illustration is the 1 0 L model 5 Press the Start button to enter the working process of a corresponding menu The Start indicator lights up O O By default White Regular is selected When changing it see page 11 O O When using the timer see page 11 O O Entering state of stewing rice The display shows remaining stewing time in count...

Page 6: ...indicator turn on O O When the Rice Cooker starts cooking the Timer indicator turns off and the Start indicator turns on Menu Water Level of Inner Pan Keep Warm Function 1 Timer Setting Restriction 2 Cook white rice in different textures White Regular White Rice From 60 min before done Soft White Rice From 60 min before done Hard White Rice From 60 min before done Quick cooking or cook quinoa Quic...

Page 7: ... it Button Open while pressing the button OPEN CLOSE Turn it in the direction of the arrow and pull it Q QAttaching In the reverse order to removing Close it Shaft Insert the shaft and close firmly until it clicks OPEN CLOSE Fold and press it firmly When a clear sound is heard it indicates completion of assembly Attach on the Outer Lid Packing Packing Accessories Wash with a mild washing up liquid...

Page 8: ...Panel Whether power cut off The rice was not loosened after cooking was completed Whether the Steam Cap has been fixed properly Excessive long hours on preset timer Whether the Outer Lid has been closed properly Did not wash the rice fully Grain of rice or foreign objects stayed at the Packing Inner Pan border areas Excessive long hours on keep warm function Symptom Probable cause Cooking rice pro...

Page 9: ...too long Inadequate mixing or mixed too long Wrong ingredient quantity Please send to an authorised service centre for repair if the unit is found to be defective after the inspection carried out on the table above Troubleshooting Others Symptom Probable cause Strange sound occurs Sound occurs because of water that has stuck to the Inner Pan No power Pull out the Power Plug and check the power out...

Page 10: ... 5 SR CP188 4 4 SR CN188 3 8 Singapore Domestic SR CX108 230 V 50 Hz 700 1 0 5 5 Direct Heating 352 251 214 3 5 SR CN108 3 0 SR CX188 835 1 8 10 387 284 249 4 5 SR CN188 3 8 Singapore Re export SR CX188 220 V 50 Hz 765 1 8 10 Direct Heating 387 284 249 4 5 SR CP188 4 4 SR CN188 3 8 Australia New Zealand SR CX108 220 240 V 50 Hz 640 765 1 0 5 5 Direct Heating 352 251 214 3 5 SR CN108 3 0 SR CN188 7...

Reviews: