14
6 Service Mode
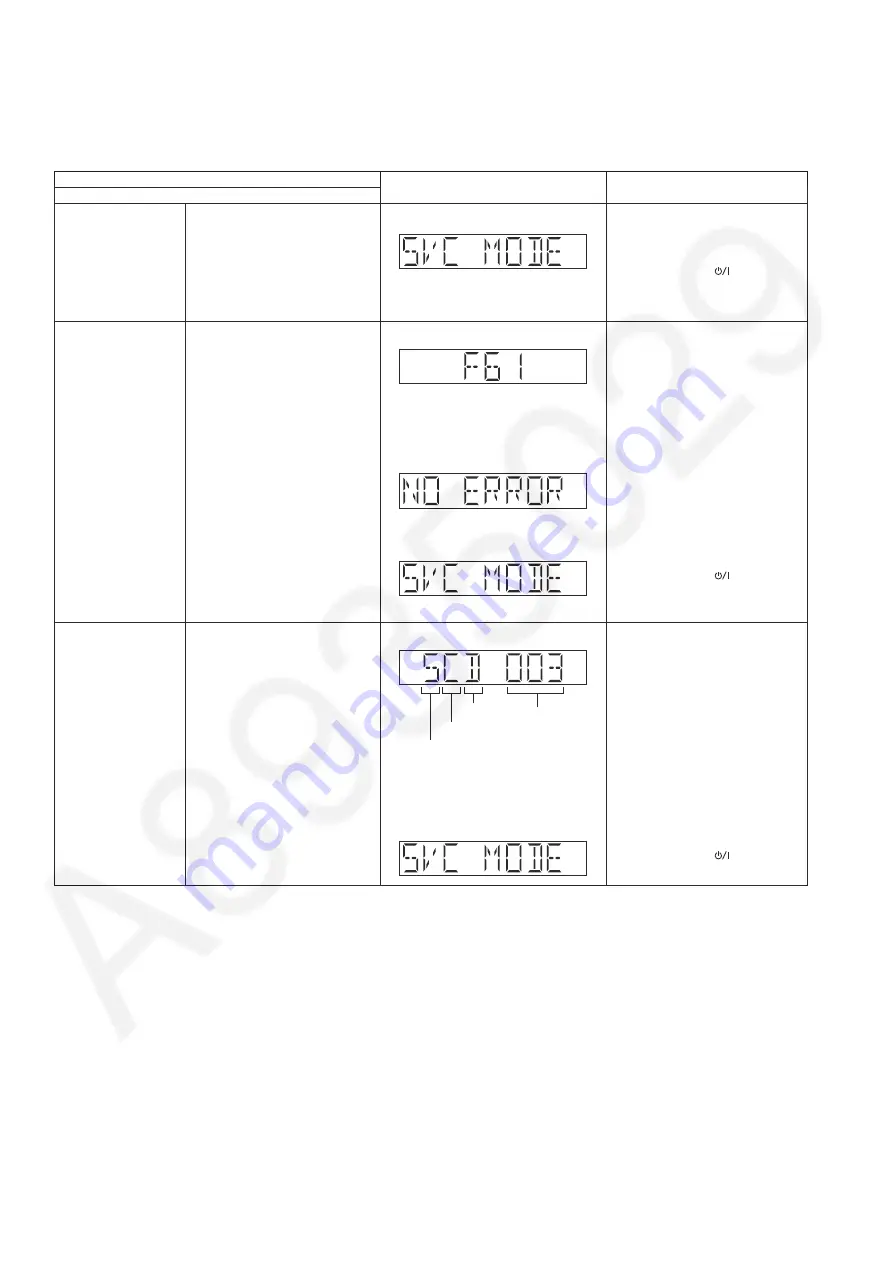
This unit is equipped with features of service mode mode setting for checking the functions & reliability.
6.1.
Service Mode Table 1
Service Mode
Upon entering into Service Mode
Item
FL display
Key operation
Mode name
Description
Error code information
Example: F61, F76,F70HDMI
Example:
Example:
Error History Display by pressing
button, it goes back its history list.
Software Version
information
Display the current SW version
Software Version display is being
indicated in FL display in the
format of [5CD XXX].
1) 5 represent the Sales Year
2) C represent the Model Type
3) B represent the ROM Type
4) xxx represent the Version
number (Range from 000-999)
Refer to 6.3 for more information
The [SVC MODE] display will appear
after 3s,
Year of sales
ROM type
Model type
Running
version
number
In service
mode
:
Press [INPUT] button on the remote
control.
Error History Display by pressing
button, it goes back its history list.
After Pressing [INPUT] key, display
the last encounter Error display,
subsequent pressed will displayed
the second last Error and so on.
(Maximun of 10 display and if the
11th Error occurred, it will replace
the 1st error display, First IN First
OUT approach)
Refer to 6.6 for more information
In service
mode
:
Press [VOL+] button on the remote
control.
Example: If already at the last error
display (earlier error) or No Error Log,
pressing [INPUT] key on the remote
control, [NO ERROR] will display
Pressing and hold [VOL-] on main
unit then press [▼] follow by [▲]
using the remote control.
• To exit, press the [
TA
] on the main
unit or using the remote control.
• Unplug the AC cord.
• To exit, press the [
TA
] on the main
unit or using the remote control.
The [SVC MODE] display will appear
after 3s,
• To exit, press the [
TA
] on the main
unit or using the remote control.
Summary of Contents for SU-HTB485EB
Page 4: ...4 1 2 Caution for AC Cord For EB only Figure 1 2 ...
Page 13: ...13 5 2 Remote Control Key Button Operations ...
Page 25: ...25 8 3 Types of Screws 8 3 1 Main Speaker Unit SU HTB485 8 3 2 Active Subwoofer SB HWA480 ...
Page 33: ...33 Step 5 Remove 2 screws Step 6 Remove HDMI P C B ...
Page 35: ...35 Step 9 Slightly lift up Main P C B Step 10 Remove Main P C B ...
Page 36: ...36 Step 11 Slightly lift up Connecting Plate Assembly Unit Step 12 Release Main P C B ...
Page 54: ...54 ...
Page 64: ...64 ...
Page 94: ...94 ...


