20
8 Service Mode
This unit is equipped with features of self-diagnostic & special mode setting for checking the functions & reliability.
Special Note : Checking of the reliability (ageing) & operation must be carry out to ensure good working condition in unit.
8.1.
Service Mode
This mode can be used during servicing.
1 :
Checking the Main Microprocessor Firmware version and Region.
2 :
Checking the Model Display and ROM Correction Information.
3 :
Wireless pairing.
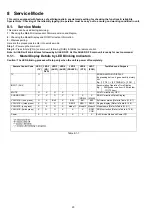
Here are the procedures to enter into service mode:
Step 1 :
Power up the main unit.
Step 2 :
Press & hold [VOL-] on main unit, follow by [SUB-] & [SUB+] on remote control.
Note : All LED will blink 4 times followed by All LED OFF. At this All LED OFF, main unit is ready for next command.
8.1.1.
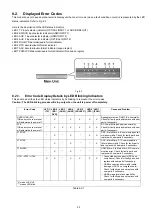
Model Display Details by LED Blinking Indicators
Caution: The LED blinking process will stop only when the unit is power off completely.
Table 8-1-1
Remote Control Code
LED 1
(TV)
LED 2
(BD/
DVD)
LED 3
(AUX1)
LED 4
(AUX2)
LED 5
(DOLBY D)
LED 6
(DTS)
LED 7
(PCM)
Test Mode and Purpose
TV
O
-
-
-
-
-
-
ERROR HISTORY DISPLAY
By pressing button, it goes back its history
list.
Eg: [1 F76 ] -> [2 F70HDM] -> [3 F61 ]
INPUT / AUX
O
-
-
-
-
-
-
Accumulation Operation Time Display
Eg: [ 20M](under one hour / 20 minutes),
[ 12] (12 hour)
MUTE
O
X
O
X
*
*
*
ROM Correction by CEC
SUBWOOFER -
X
X
O
X
X
X
(HDMI)
X
(MAIN)
ROM Correction Status Display
(one press)
O
X
Bit 3
X
Bit 2
Bit 1
Bit 0
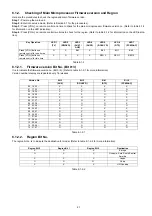
Software version (Refer to Table 8-1-2-1)
(twice press)
X
O
X
X
REG 2
REG 1
REG 0
Region display (Refer to Table 8-1-2-2)
VOLUME - (one press)
X
X
O
X
Model 1
Model 2 Model 3 Model name (Refer to Table 8-1-3-1)
VOLUME - (twice press)
X
O
O
X
X
X
ROM
COR
ROM correction (Refer to Table 8-1-3-2)
Power
X
X
X
X
X
X
X
Exit Service Mode and Power Off
Summary of Contents for SU-HTB550GK
Page 5: ...5 1 6 Caution for the AC Mains Lead For GS only ...
Page 7: ...7 1 8 Safety Installation Instructions ...
Page 12: ...12 5 General Introduction 5 1 About VIERA Link ...
Page 26: ...26 ...
Page 30: ...30 11 1 3 Active Subwoofer SB HWA520 ...
Page 33: ...33 11 3 2 2 Standing Position 11 3 3 Active Subwoofer SB HWA520 ...
Page 84: ...84 ...
Page 96: ...96 ...
Page 98: ...98 ...
Page 120: ...120 ...
Page 136: ...136 ...
Page 142: ...142 ...

