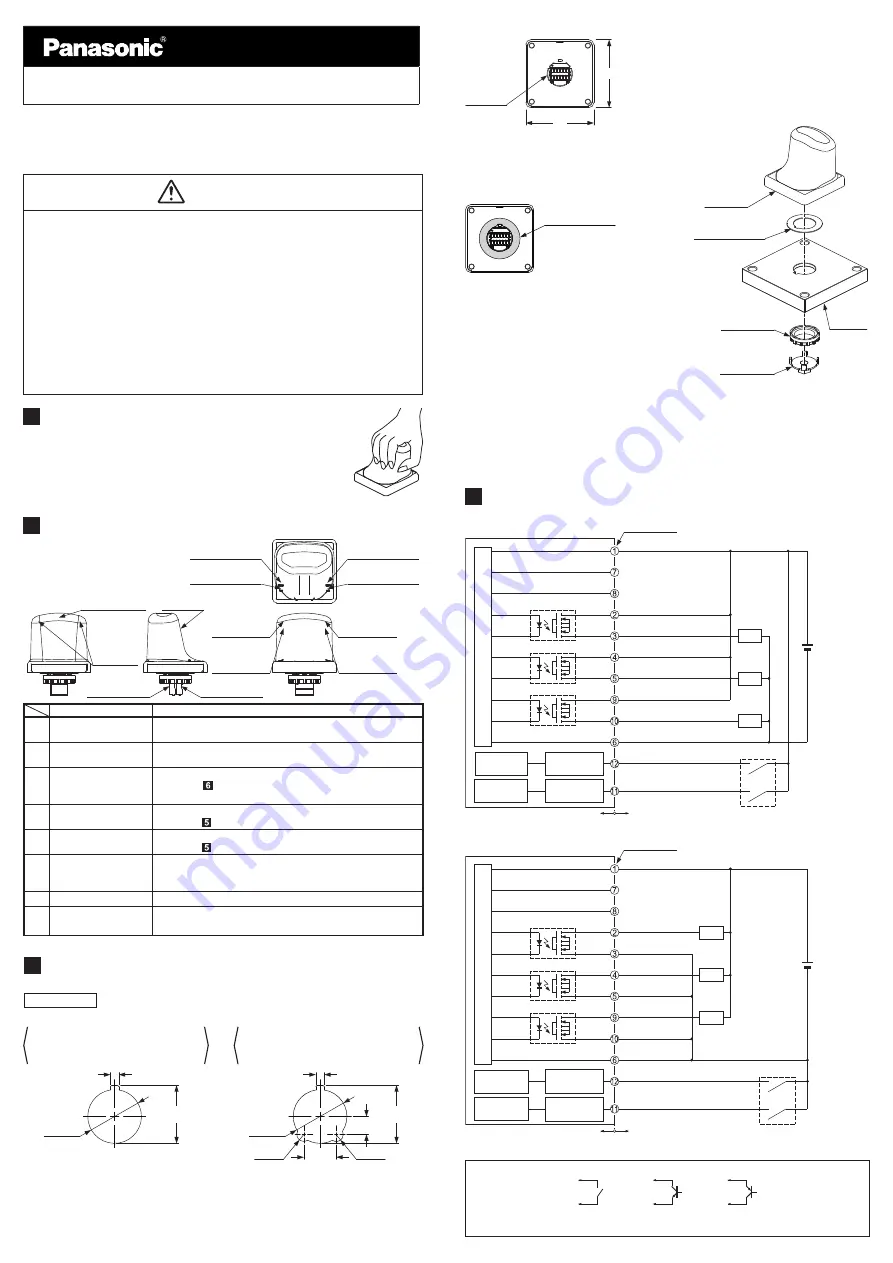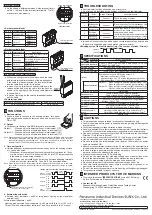
<In case of Minus Common>
I/O CIRCUIT DIAGRAMS
4
Main Circuit
12 to 24V DC
±10%
+
-
Load
Load
Load
+
V
Output 1_1
Output 1_2
Output 2_1
Output 2_2
Output 3_1
Output 3_2
0V
Terminal No.
Internal circuit
Users’ circuit
*1
External input
indicator 2
External input
indicator 1
External input
circuit 2
External input
circuit 1
External input 2
External input 1
Switching terminal of
time-out function (IN)
Switching terminal of
time-out function (+V)
<In case of Plus Common>
12 to 24V DC
±10%
+
-
+
V
0V
Terminal No.
Main Circuit
Load
Load
Load
Output 1_1
Output 1_2
Output 2_1
Output 2_2
Output 3_1
Output 3_2
Internal circuit
Users’ circuit
External input
indicator 2
External input
circuit 2
External input
indicator 1
External input
circuit 1
External input 2
External input 1
*1
Switching terminal of
time-out function (IN)
Switching terminal of
time-out function (+V)
*1
Non-voltage contact or NPN open-collector transistor, PNP open-collector transistor
or
or
0 to 1V or 10V to +V: Valid (External input indicator lights up )
4 to 6V or Open: Invalid (External input indicator turns OFF)
<Bottom of the product (Unit: mm)>
M30 × 1.5
80
80
2. Make sure to fit a mounting packing (ac
-
cessory) to the terminal area of the main
body first, then put the main body into the
mounting plate. (Note 1)
Main body
Mounting packing
(Accessory)
Mounting nut
(Accessory)
Mounting tool
SW-MT1
(Optional)
Mounting
plate
Notes: 1) Make sure to use the mounting packing (accessory), or waterproof property will be
invalid.
2) A mounting tool
SW-MT1
for fastening the mounting nut is available separately.
The shape of fastening part of
SW-MT1
is M10 nut.
3) When using the products for two-hand control, be sure to mount the products by
complying with ISO 13851 (EN 574, JIS B 9712) and ANSI B11.1, B11.9.
In ad-
dition, be sure to use a controller for two-hand control which complies with ISO
13851 (EN 574, JIS B 9712).
<Fitting diagram of the mounting packing>
Mounting packing
(Accessory)
3. Fasten a mounting nut (accessory) from
the reverse side of the mounting plate.
(Note 2)
The tightening torque should be 2 to
3N·m.
FUNCTIONAL DESCRIPTION
2
1. Operation indicator
(Green)
1. Operation indicator
(Green)
3. Fault indicator
(Yellow)
2. Power indicator
(Green)
4. External input
indicator 1
(Green)
5. External input
indicator 2
(Orange)
4. External input
indicator 1
(Green)
5. External input
indicator 2
(Orange)
4. External input
indicator 1
(Green)
5. External
input
indicator 2
(Orange)
6. Sensing
surface
8. B side terminal
block
7. A side terminal
block
Designation
Function
1
Operation indicator
× 2 (Green)
Lights up when an object is detected.
2
Power indicator
(Green)
Lights up when the power is ON.
3
Fault indicator
(Yellow)
Blinks or lights up when fault occurs.
Refer to “
TROUBLESHOOTING
” for details in blink
-
ing operation.
4
External input indi-
cator 1 × 3 (Green)
Lights up when external input 1 is valid.
Refer to “
FUNCTIONS
” for details.
5
External input indica-
tor 2 × 4 (Orange)
Lights up when external input 2 is valid.
Refer to “
FUNCTIONS
” for details.
6
Sensing surface
Thru-beam type photoelectric sensor is incorporated in the sensing
surface. Thus, when the light beam is interrupted by fingers, the sensor
goes into the beam interrupted condition and output turns ON or OFF.
7
A side terminal block
CoV, output 1, 2 and 0V.
8
B side terminal block Connects switching terminals of time-out function, output
3, and external input 1, 2.
● This product is an optical touch switch which detects a hand
by a thru-beam type photoelectric sensor.
● When a hand is touched to the sensing surface, output turns
ON or OFF.
OUTLINE
1
● Follow the procedures below when mounting this product on a mounting plate.
MOUNTING
3
1. Drill a hole in a mounting plate (thickness: 3mm or less.)
Procedures
Dimensions of a mounting hole
to be drilled when mounting on
a metal plate (Unit: mm)
Dimensions of a mounting hole
to be drilled when mounting on
a resin plate (Unit: mm)
4.8
+0.2
0
33
+0.5
0
ø30.5
+0.5
0
4.8
+0.2
0
ø30.5
+0.5
0
18.4
+0.5
0
33
+0.5
0
10.2
+0.5
0
R4±0.1
R4±0.1
WARNING
● Never use this product in a device for personnel protection.
● In case of using devices for personnel protection, use products which meet laws and standards,
such as OSHA, ANSI or IEC etc., for personnel protection applicable in each region or country.
● Do not use this product as a device for emergency stop.
● This product is used to start up the machinery. Securing safety for the start-
up of machinery should be performed separately.
● When using the products for two-hand control, comply with the following contents.
• Select a model of a control device for two-hand control, based on results of risk assessment.
• Make sure to use a controller for two-hand control which complies with
ISO 13851 (EN 574.)
• For another requirements such as mounting of this product, or prevention of
accidental actuation and of defeat etc., comply with ISO 13851 (EN 574, JIS
B 9712) and ANSI B11.1, B11.9. Furthermore, comply with the regulations es
-
tablished by national or regional security committees (Occupational Safety and
Health Administration: OSHA, the European Standardization Committee, etc.)
INSTRUCTION MANUAL
Optical Touch Switch
SW-101
MJE-SW101 No.0055-94V
Thank you very much for purchasing Panasonic products. Read this Instruction
Manual carefully and thoroughly for the correct and optimum use of this product.
Kindly keep this manual in a convenient place for quick reference.


