background image

31

COMPONENT VIDEO INPUT

INPUT

2

1

S-VIDEO

VIDEO

AUDIO OUT

VIDEO

Y

P

B

P

R

AUDIO

L

R

P

R

P

B

Y

R

L

COMPONENT VIDEO OUT

Audio

OUT

S-Video

OUT

Video

OUT

R

L

Audio

OUT

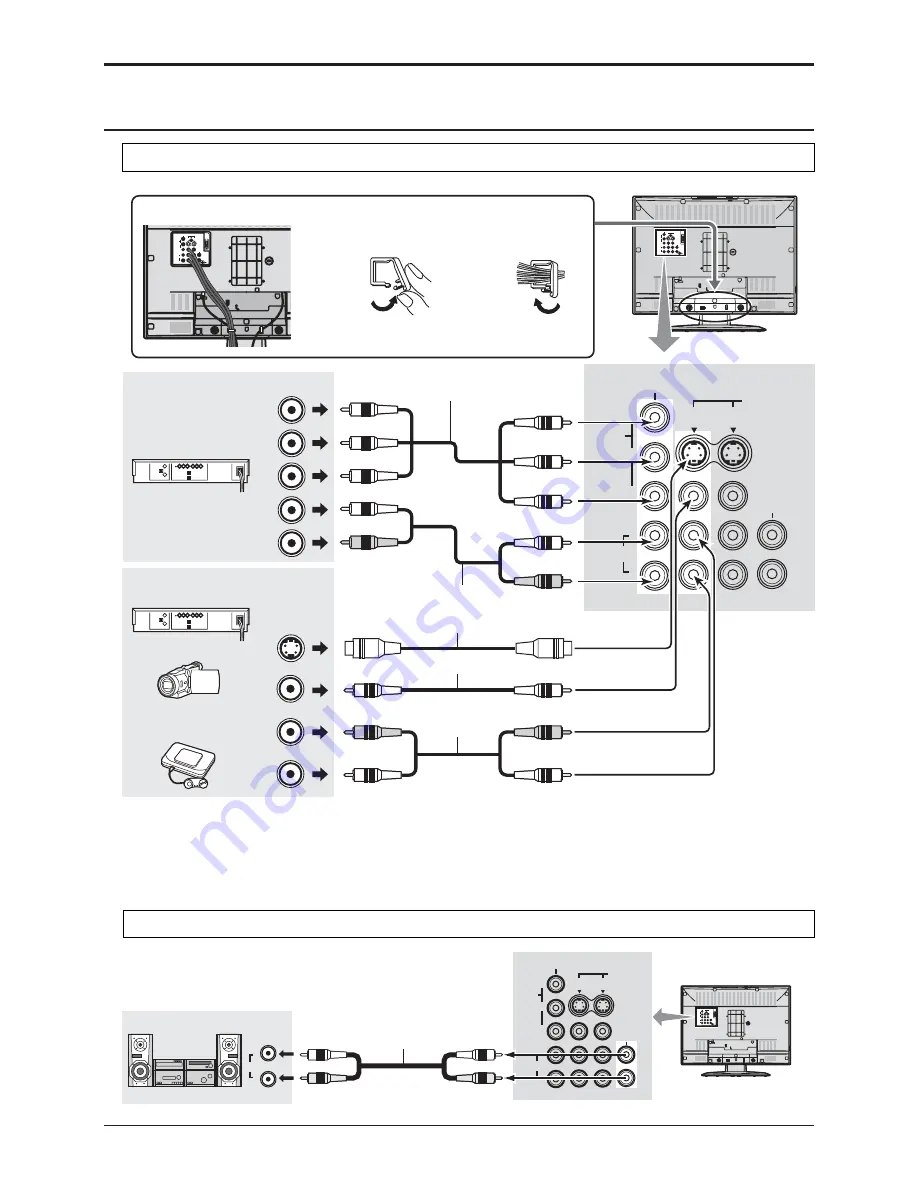
Conexión

Conexión de otro equipo

Notas:

• Al conectar cables de vídeo se da prioridad al cable de S-vídeo cuando están conectados el terminal de

entrada S-VIDEO y el terminal de entrada VIDEO.

• Consulte a los fabricantes de los videojuegos acerca de los cables necesarios para conectar la consola

de videojuegos.

Cable de audio

Reproductor de DVD
Caja sobre el Equipo

Cable de vídeo componente

Cable de audio

Cable de s-vídeo

Videograbadora
Super-VHS

VIDEOCAMARA

CONSOLA DE
VIDEOJUEGOS

COMPONENT VIDEO INPUT

INPUT

2

1

S-VIDEO

VIDEO

AUDIO OUT

VIDEO

Y

P

B

P

R

AUDIO

L

R

Audio

IN

R

L

El panel posterior
del televisor

Cable de audio

Cable de vídeo

Terminales de entrada traseros

Terminales de salida traseros

La parte posterior del televisor

Nota:

Para evitar ruidos, no ponga juntos el cable
de la antena y el de la alimentación.

Para liar los cables con la abrazadera

1. Tire hacia arriba.

2. Ponga los cables en

los abrazadera y
cierre.

Summary of Contents for TC 19LX50

Page 1: ...FF REW ASPECT TV VCR VCR DBS CH SAP CH O K CH VOL VOL DBS CBL TV POWER R STANDBY G POWER ON TC 19LX50 TC 23LX50 TC 19LE50 TC 23LE50 Operating Instructions LCD Television For assistance please call 1 800 211 PANA 7262 or visit us at www panasonic com contactinfo U S A For assistance please call 787 750 4300 or visit us at www panasonic com Puerto Rico For assistance please call 1 800 561 5505 or vi...

Page 2: ... manufacturer 12 Use only with the cart stand tripod bracket or table specified by the manufacturer or sold with the apparatus When a cart is used use caution when moving the cart apparatus combination to avoid injury from tip over 13 Unplug this apparatus during lightning storms or when unused for long periods of time 14 Refer all servicing to qualified service personnel Servicing is required whe...

Page 3: ...d for service 21 When replacement parts are required be sure the service technician uses replacement parts specified by the manufacturer that have the same characteristics as the original parts Unauthorized substitutions may result in fire electric shock or other hazards 22 WARNING TO REDUCE THE RISK OF FIRE OR ELECTRIC SHOCK DO NOT EXPOSE THIS APPARATUS TO RAIN OR MOISTURE DO NOT PLACE LIQUID CON...

Page 4: ...ive interference which can be determined by turning equipment off and on the user is encouraged to try to correct the interference by one or more of the following measures Reorient or relocate the TV antenna Increase the separation between TV and other equipment Connect TV into separate outlet from other equipment Consult the dealer or an experienced radio TV technician for help FCC Caution Any ch...

Page 5: ...pecifications 39 Manuel de instrucciones Resumen Instalación 29 Instalación de las pilas del mando a distancia 29 Conexión 30 Conexión de antena 30 Conexión del receptor de TV por cable 30 Conexión de otro equipo 31 Conexión de auriculares 32 Conexión desconexión de la alimentación 32 Controles básicos 33 Operaciones con menús 34 Sintonización de canales 36 Maintenance To clean this unit wipe with...

Page 6: ...use battery leakage and corrosion that will damage the remote control transmitter Disposal of batteries should be in an environmentally friendly manner 1 Always use new batteries when replacing the old set 2 Do not attempt to charge short circuit disassemble heat or burn used batteries 3 Battery replacement is necessary when remote control acts sporadically or fails to operate this unit 2 Install ...

Page 7: ...vailable from your dealer or electronic supply store Before you purchase any cables be sure you know what type of output and input connectors your various components require Also determine the length of cable you ll need For optimum quality picture When the LCD is exposed to light from outdoors or lighting fixtures high contrast pictures may not be displayed clearly Turn off florescent lamps near ...

Page 8: ...ny Back of the TV For reception of cable channels 01 125 connect the cable supplied by your local cable company The antenna mode must be set to CABLE see page 14 Mode selection Certain cable systems offset some channels to reduce interference or view Premium scrambled channels A cable converter box is required for proper reception Check with your local cable company for its compatibility requireme...

Page 9: ... Back of the TV Connections AUDIO cable VIDEO cable Super VHS VCR CAMCORDER VIDEO GAME CONSOLE Rear Output Terminals Notes When connecting video cables priority is given to the S Video cable when both the S VIDEO input terminal and the VIDEO input terminal are connected Please make inquiries of video game manufacturers concerning component cables to connect with video game console Note To avoid no...

Page 10: ...en the TV is turned on Power cord AC120V 60Hz Power Indicator Note Select the menu language before operating the TV see pages 12 13 LANGUAGE Press to turn the TV s main power on off Power indicator Main power ON Green Main power OFF No light Remote control sensor Preparation Connect the plug to the wall outlet Connecting Headphones Earphones M3 plug Not supplied Connections Back of the TV C A T S ...

Page 11: ...le the menu is displayed press again to change the input mode The input mode changes each time this button is pressed Press this button to mute the sound press again to cancel the mute GUIDE RECALL MUTE TV VIDEO RETURN EXIT MENU CH CH VOL VOL O K SLEEP PROG 0 30 60 90 PROGdashbutton SLEEPTIMERbutton Program dash channel numbers for DTV and DBS Sleep timer MINUTES R TUNE button Switches to previous...

Page 12: ...BF 8EN D 97J I M 9 A OI ED J H CEJ 9EDJHEB 7H KI JE D7L 7J J C DK I EMD 3 AFGEH6G BA 5BK 4 4 4 7D J DFKJ CE S H II JE IFB7O J DFKJ I B 9J ED C DK S H II 9EHH IFED D DKC8 H A O ED J H CEJ 9EDJHEB JE I B 9J J DFKJ E OEKH 9 E 9 BG8 0 E DFKJ 97D 7BIE 8 I B 9J 8O FH II D J D J 8KJJEDI 7D FKI Q T A O 0 0 0 0 0 ...

Page 13: ...KHD JE J FH L EKI I9H D S E N J J I9H D I H JKHDI 0 JE DEHC7B L M D H II JE I B 9J J I9H D EH H II JE I B 9J J IK8 C DK 7JKH H II JE IFB7O J IK8 C DK I9H D F7 I F7 B 9J J C DK B7D K7 F7 F7 F7 F7 F7 2 0 R 4 4 4 Z 0 0 0 0 0 0 3 2 ...

Page 14: ...MENU ADJUST SET UP LANGUAGE PROGRAM CH LOCK CLOSED CAPTION INPUT LABEL OTHER ADJUST Press the MENU button to display the MENU screen and select SET UP Manual channel programming Add or delete a channel manually Channels will automatically advance until all channels have been scanned Channel numbers with video signal received will be stored in the Channel Memory PROGRAM CHANNELS MODE AUTO PROGRAM M...

Page 15: ...Press to select BLOCK PROGRAMS Press to select U S MOVIES U S TV PROGRAMS CANADIAN ENGLISH or CANADIAN FRENCH 4 Press to select CHANGE SETTING Press to enter the next menu 5 Note Use a code that is easy to remember and record it in a safe place 2 1 CH CH VOL VOL OK CH CH VOL VOL O K LOCK BLOCK PROGRAMS STATUS U S TV PROGRAMS CHANGE SETTING CHANGE CODE OFF ON LOCK BLOCK PROGRAMS STATUS U S TV PROGR...

Page 16: ...rating is locked all ratings below this rating are locked When a rating is unlocked all ratings above this rating are unlocked Press to select VIEW NR PROGRAMS Press to select NO or YES NO Cannot view programs with NR signals YES Can view programs with NR signals CH CH VOL VOL O K 6 8 Press to select SETTING Press to select BASIC or DETAILED BASIC You can select the ratings DETAILED You can select...

Page 17: ...levision programs based on the two rating systems used in Canada It also lets you block or unblock Canadian French programs according to various ratings categories CANADIAN ENGLISH CANADIAN FRENCH 6 Press to select VIEW E PROGRAMS Press to select NO or YES NO Cannot view programs with E signals YES Can view programs with E signals E means Exempt CANADIAN FRENCH VIEW E PROGRAMS NO YES G 8 ANS 13ANS...

Page 18: ... permitting viewing by pre teens and early teens 18 years old Programming restricted to adults Contains constant violence or scenes of extreme violence E G 8 ANS 13ANS 16ANS 18ANS Exempt Exempt programming General Programming intended for audience of all ages Contains no violence or the violence content is minimal or is depicted appropriately 8 General Not recommended for young children Programmin...

Page 19: ...ect SET UP OFF NO Recommended mode when Closed Caption is not being used C1 For video related information that can be displayed up to 4 lines of script strategically placed on the television screen so that it does not obstruct relevant parts of the picture C2 Another mode used for video related information You can change the video input labels displayed on the screen to match the connected device ...

Page 20: ...nput in COMPONENT input mode In any other case the indication of COLOR MATRIX becomes blue and changing between SD and HD is not possible POWER SAVE Reduces screen brightness to lower power consumption Eye friendly for viewing in a dark room BLACK LEVEL Select DARK or LIGHT depending on the picture conditions when selecting the video or component input The dark scene becomes easy to see Note Fixed...

Page 21: ... room Displays a clear image with high contrast in a bright room Automatically senses the ambient light conditions and adjusts the brightness and gradation accordingly to optimize contrast PIC MODE is stored for TV VIDEO1 VIDEO2 and COMPONENT individually CH CH VOL VOL O K PICTURE ADJUST Press the MENU button to display the MENU screen and select ADJUST Function Luminance of the back light is adju...

Page 22: ...IZE 15 RETURN ZOOM CH CH VOL VOL O K MENU ADJUST PICTURE AUDIO SET UP PICTURE ADJUST POSITION SIZE AUDIO ADJUST CH CH VOL VOL O K SIZE Press to shrink the picture vertically by 15 steps 15 original setting down to 1 Press OK to return to the factory default setting ZOOM POSITION SIZE During ZOOM mode finely adjust the vertical position and the size of the screen 1 2 Press the MENU button to displa...

Page 23: ...E ADJUST POSITION SIZE AUDIO ADJUST NORMAL NORMALIZE Select NORMALIZE and press OK to return each MODE to the factory default setting Notes NORMAL means the MODE is at the factory default setting NORMAL changes to NORMALIZE when you change the setting of BASS TREBLE BALANCE AI SOUND SURROUND or AUDIO LEVELER You can normalize each MODE separately AUDIO ADJUST PAGE 2 2 NORMAL 0 AUDIO LEVELER AUDIO ...

Page 24: ...tion is only apparent at the left and right edges of the screen The size of the picture will depend on the original signal Mode Picture Explanation NORMAL ZOOM FULL JUST ASPECT Controls This feature allows you to enjoy viewing the picture at its maximum size including wide screen cinema format picture Notes This feature does not work for 1080i and 720p input signals The aspect setting is stored se...

Page 25: ... DVD DBS CBL T V Select the type of the component The selected button lights and all others go out Programming the remote control code You can operate other manufacturers components using this TV s remote control Preparations Connect the plug of the external component to the wall outlet Make sure the component is turned off Notes If the component does not operate with the remote control repeat the...

Page 26: ...6 338 340 347 348 Sears 300 305 306 307 308 Sharp 335 336 Shintom 317 Signature 2000 335 Singer 317 Sony 328 329 330 Sylvania 323 324 331 Tashiro 306 Tatung 310 311 339 Teac 310 311 339 Technics 321 322 323 324 Teknika 324 Toshiba 301 346 Vector Research 311 Wards 306 309 335 336 344 Yamaha 305 310 311 339 Zenith 306 344 Brand Code Admiral 335 Aiwa 332 Akai 314 315 316 329 Audio Dynamic 311 339 Be...

Page 27: ...rgate 105 132 Tel eview 101 105 Texscan 144 Tocom 135 Toshiba 104 Unika 125 132 Universal 122 132 Videoway 106 Viewstar 129 130 Zenith 100 117 Zenith Drae 100 Satellite Brand Code Dish Network 105 115 116 Echo Star 105 Echostar Express VU 105 115 G E 106 G I 108 General Instrument Gradiente 114 Hitachi 103 111 112 HNS Hughes 103 Codes for DBS Brand Code Magnavox 101 102 Panasonic 104 Philips 101 1...

Page 28: ...ABLE VOL TV VOLUME MENU STB MENU DISPLAY EXIT STB EXIT STB GUIDE Select Channel Select Channel Select Channel Select Channel CABLE PREVIOUS STB PREVIOUS SLEEP VCR REW FF PLAY PLAY PAUSE PAUSE STOP STOP VCR RECORD ASPECT TV VCR SWITCH STB ASPECT OPEN CLOSE PAGE UP DOWN SLOW PREVIOUS CHAN OR VIDEO MODE CHANNEL UP DOWN TV CHANNEL UP DOWN STB NAVIGATION UP DOWN STB NAVIGATION RIGHT LEFT NEXT PREVIOUS ...

Page 29: ...s 2 No intente cargar cortocircuitar desarmar calentar o quemar las pilas usadas 3 El cambio de las pilas resulta necesario cuando el mando a distancia funciona esporádicamente o no puede controlar esta unidad 3 Vuelva a colocar la cubierta Se necesitan dos pilas AA 1 Abra la cubierta de las pilas 2 Instale las pilas Tenga en cuenta las polaridades y al instalar las pilas Dos pilas tamaño AA Ajust...

Page 30: ...te estos canales se necesita un sintonizador de conversión de televisión por cable Póngase en contacto con su compañía de televisión por cable para conocer los requerimientos de compatibilidad Ponga el canal del televisor en CH3 o CH4 utilice esta conexión Conexión del receptor de TV por cable Conexión de antena Para recibir correctamente los canales de VHF UHF se requiere una antena externa Para ...

Page 31: ...r la consola de videojuegos Cable de audio Reproductor de DVD Caja sobre el Equipo Cable de vídeo componente Cable de audio Cable de s vídeo Videograbadora Super VHS VIDEOCAMARA CONSOLA DE VIDEOJUEGOS COMPONENT VIDEO INPUT INPUT 2 1 S VIDEO VIDEO AUDIO OUT VIDEO Y PB PR AUDIO L R Audio IN R L El panel posterior del televisor Cable de audio Cable de vídeo Terminales de entrada traseros Terminales d...

Page 32: ...n esté introducido en la toma de corriente Interruptor POWER principal Indicador de la alimentación Cable de alimentación CA 120 V 60 Hz Púlselo para conectar desconectar la alimentación principal del televisor Indicador de la alimentación Conectada Verde Desconectada Apagado En el aparato principal En el mando a distancia Sensor de mando a distancia Preparación Conecte el enchufe al tomacorriente...

Page 33: ...elecciona el mismo canal que el canal actual DBS CBL VCR TV DVD R TUNE Satélite de emisión digital para el control remoto Selección del modo de televisión por cable para el control remoto Botón de la alimentación Púlselo para encender o apagar el televisor Nota El cable de la alimentación del televisor deberá enchufarse primero al tomacorriente y el televisor encenderse luego con el interruptor PO...

Page 34: ... EC7 0 0 H47EB 78 AFGEH66 BA8F 78 4LH74 8A C4AG4 4 K7D E I L IK7B P7 KD C Da D B J B L IEH 7F7H 9 KD 9K7 HE 7OK 7 D B7 F7DJ7BB7 IJ 9K7 HE 7OK 7 D 97 GK J 9B7I B C7D E 7 IJ7D9 7 I KJ B P7D F7H7 D7L 7H FEH B C Da CEIJH7 E 7C8 7 B CE E DJH7 7 S KBI F7H7 L IK7B P7H B C Da I B 99 D DJH7 7 S KBI B7 J 9B7 DaC HE 9EHH IFED DJ D B C7D E 7 IJ7D9 7 F7H7 I B 99 ED7H B7 DJH7 7 IK B 99 D BG4 7 DJH7 7 L E J 7 C ...

Page 35: ...B 99 ED7H B7 KD9 D C Da I 9KD 7H E aBI BE F7H7 L IK7B P7H B7 F7DJ7BB7 C Da I 9KD 7H E B 99 ED B EC7 B C Da E K8J JKBEI EC7 EC7 EHC7B C7 D KP JH7I 4 C7 D EHC7B E KIJ C7 D BEGK E HE H7C7I 9J L7 E E 97H 0 E B 9KB7I HE 7D7B I 0 0 0 EHC7B E H C 7 B P 7 H E I 9 E D JHE KIJ 3 BJHE E E 7JH P EBEH E ECFED DJ 0 E 0 E ECFED DJ 0 E 0 E ED 7 JKBEI Z C8E46 BA8F 6BA 8AWF E ...

Page 36: ...nlla MENU y seleccione Configu Programación automática de canales Añada o borre un canal manualmente Loscanalesavanzaránautomáticamentehastaquetodosellos hayan sido explorados Los números de los canales con señal de vídeo recibida se guardarán en la memoria de canales Pulse para seleccionar PROGRAMA MANUAL Pulse para visualizar la pantalla PROGRAMA MANUAL 4 Pulse para seleccionar canal También pue...

Page 37: ... Color Snowy Picture Normal Picture Poor or Distorted Picture Cannot operate with the remote control The battery ies is are exhausted The batteries polarity is wrong The remote control sensor is exposed to strong light from a fluorescent lamp etc The main unit is hot The main unit radiates heat and some of the parts may become hot This is not a problem for performance or quality Set up in a locati...

Page 38: ...ases Purchase Parts Accessories and Instruction Books on line for all Panasonic Products by visiting our Web Site at http www pasc panasonic com or send your request by E mail to npcparts us panasonic com You may also contact us directly at 1 800 332 5368 Phone 1 800 237 9080 Fax Only Monday Friday 9 am to 8 pm EST Panasonic Services Company 20421 84th Avenue South Kent WA 98032 We Accept Visa Mas...

Page 39: ...ION V Chip Temperature 41 F 95 F 5 C 35 C Humidity 5 90 RH non condensing VIDEO RCA PIN Type 1 2 1 0 Vp p 75 Ω S VIDEO MINI DIN 4pin 1 2 Y 1 0 Vp p 75 Ω C 0 286 Vp p 75 Ω AUDIO L R RCA PIN Type 2 2 0 5 Vrms Y 1 1 0 Vp p including synchronization PB PR 1 0 35 Vp p AUDIO L R RCA PIN Type 2 1 0 5 Vrms AUDIO L R RCA PIN Type 2 1 0 5 Vrms 20 2 18 1 10 2 24 1 19 9 10 2 514 mm 459 mm 259 mm 612 mm 505 mm...

Page 40: ...nada Inc 5770 Ambler Drive Mississauga Ontario L4W 2T3 Customer s Record The model number and serial number of this product can be found on its rear panel You should note this serial number in the space provided below and retain this book plus your purchase receipt as a permanent record of your purchase to aid in identification in the event of theft or loss and for Warranty Service purposes Model ...

Page 41: ......

Page 42: ......

Page 43: ......

Page 44: ......

Page 45: ......

Page 46: ......

Page 47: ......

Page 48: ......

Page 49: ......

Reviews: