


12
English
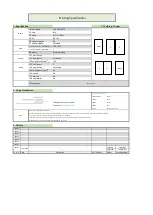
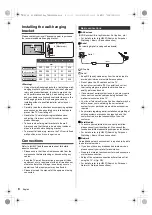
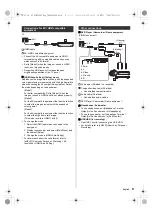
Controlling with your voice
1
Press the voice control button
2
Speak into the voice control microphone
≥
Functions of voice control and voice services are
subject to change without notice.
≥
When pressing 4, 5, 6 buttons, the control panel guide
appears on the right side of the screen for 3 seconds
to highlight which button has been pressed.
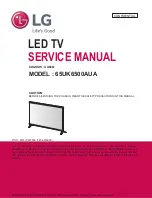
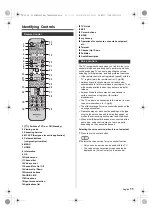
1 Remote control signal receiver (for infrared
communication)
≥
Do not place any objects between the TV remote
control signal receiver and remote control.
2 Ambient sensor
≥
Senses ambient lighting conditions to adjust the
picture when [Auto Brightness] and [Auto White
Balance] (Picture > Ambient Sensor Settings) are
set to [On].
3 Power LED
≥
The LED blinks when an infrared signal is received
from the remote control.
4 Input mode selection
≥
Press repeatedly until you reach the desired mode.
Menu
≥
Press and hold for about 3 seconds to display the
menu bar.
OK
(when in the menu system)
5 Channel Up / Down
≥
Cursor Up / Down (when in the menu system)
6 Volume Up / Down
≥
Cursor Left / Right (when in the menu system)
7 Power On / Off switch
≥
Switches TV On or Off (Standby)
≥
To turn Off the apparatus completely, you must pull
the mains plug out of the mains socket.
≥
[
]: Standby / On
8 Model name plate
Be sure to turn the TV off with the remote control or
Power On / Off switch to perform the panel maintenance.
The panel maintenance automatically starts, and it takes
approx. 10 minutes. During the panel maintenance, LED
turns to orange. The maintenance works as necessary.
≥
During panel maintenance, avoid touching and
exerting any pressure on the screen. (e.g. wiping the
screen, etc.)
First time Auto Tuning
When the TV is turned on for the first time, it will
automatically search for available TV channels and give
options to set up the TV.
≥
These steps are not necessary if the setup has been
completed by your local dealer.
≥
Please complete connections (p. 8 - 9) and settings (if
necessary) of the connected equipment before
starting Auto Tuning. For information about the
settings for the connected equipment, read the
manual of the equipment.
1
Plug the TV into a live mains socket and
turn the power on
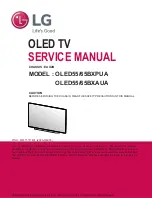
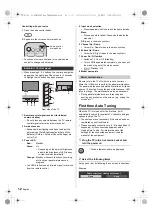
2
Select the following items
Set up each item by following the on-screen instructions.
Example:
Indicator / Control panel
Red:
Standby
Green:
On
• Depending on the ambient brightness,
adjusts the brightness of LED to easy-
to-view levels automatically.
Orange:
Standby with some functions (recording,
etc.) active or panel maintenance in
progress
Voice control
microphone
1
2 3
8
5
6
7
4
Rear side of the TV
Panel maintenance
≥
Takes a few seconds to be displayed.
Please select your viewing environment.
Shop
Home
TH-42_48_55_65MZ980Z_Eng_TQB4GA0288.book 12 ページ 2023年2月10日 金曜日 午後1時26分