

9
English
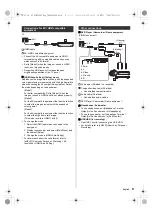
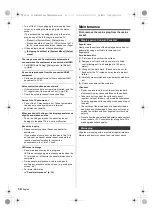
TV
HDMI cable
4K / HDR compatible equipment
≥
Connect the 4K compatible equipment to HDMI
terminal using a 4K compatible cable and you can
watch content in 4K format.
≥
Set to [Mode1] when the image or sound in HDMI
input is not played properly.
≥
Supporting HDR does not increase the peak
brightness capabilities of the TV panel.
∫
[HDMI Auto Setting] ([Setup] menu)
Reproduces the image more precisely with the expanded
colour gamut and more smoothly with the high frame rate
when connecting the 4K compatible equipment. Select
the mode depending on the equipment.
[Mode1]:
For better compatibility. Set to [Mode1] when the
image or sound in HDMI input is not played properly.
[Mode2]:
For the 4K compatible equipment that has the function
to output the image precisely with the expanded
colour gamut.
[Mode3]:
For the 4K compatible equipment that has the function
to output the high frame rate image.
(This mode is valid in HDMI 1 and 2)
≥
To change the mode
1. Select the HDMI input mode connected to the
equipment.
2. Display the menu bar and select [Main Menu], and
then select [Setup].
3. Change the mode in [HDMI Auto Setting].
≥
For information about the valid format, refer to
[eHELP] (Search by Purpose > Watching > 4K
resolution > HDMI Auto Setting).
∫
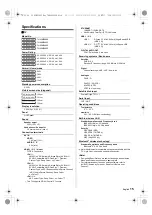
DVD Player / Camcorder / Game equipment
(VIDEO equipment)
AV adaptor (Shielded / not supplied)
Composite video cable (Shielded)
≥
Use shielded composite cable.
Audio cable (Shielded)
≥
Use shielded audio cables.
DVD Player / Camcorder / Game equipment
∫
Headphones / Subwoofer
≥
To use headphones, set [Headphone Terminal
Output] in the Sound menu to [Headphone].
≥
To use the subwoofer, set [Headphone Terminal
Output] in the Sound menu to [Sub Woofer].
∫
USB HDD (for recording)
≥
Use USB 1 port for connecting the USB HDD.
≥
For details, refer to [eHELP] (Search by Purpose >
Recording).
Connections for 4K / HDR compatible
equipment
HDMI
Other connections
a b c d
AV IN
(Viewing)
(Listening)
a: L
b: Video
c: Ground
d: R
3.5 mm
TV
TH-42_48_55_65MZ980Z_Eng_TQB4GA0288.book 9 ページ 2023年2月10日 金曜日 午後1時26分